Salta al contenuto principale

HP 15-r137wm TouchSmart Cooling Fan Replacement

Cosa ti serve

  1. HP 15-r137wm TouchSmart Cooling Fan Replacement, Front Panel Assembly: passo 1, immagine 1 di 3 HP 15-r137wm TouchSmart Cooling Fan Replacement, Front Panel Assembly: passo 1, immagine 2 di 3 HP 15-r137wm TouchSmart Cooling Fan Replacement, Front Panel Assembly: passo 1, immagine 3 di 3
    • Make sure that the device is powered off and unplugged before removing components.

    • Remove all ten (10) 5.5 mm Phillips #0 screws.

    • Remove the two (2) plastic tabs located at the rear of the panel. Locate the two (2) 7.5mm Phillips #0 screws underneath the pads and remove.

  2. HP 15-r137wm TouchSmart Cooling Fan Replacement: passo 2, immagine 1 di 1
    Attrezzo utilizzato in questo passaggio:
    Anti-Static Wrist Strap
    $7.95
    Compra
    • Use a wide plastic opening tool to pry off the top casing.

    • Be cautious not to crack the casing near the keyboard as it is quite fragile.

    • Lift the cover off carefully as there are wires still attached to internal components.

    • After panel is removed, use an anti-static wrist strap to ensure the motherboard does not get any external shocks from static discharge.

  3. HP 15-r137wm TouchSmart Cooling Fan Replacement: passo 3, immagine 1 di 1
    • The connection for the track pad is still connected.

    • Move the keyboard slightly out of the way to locate the connection.

    • Disconnect the small wire protruding from the motherboard underneath the metal plate.

  4. HP 15-r137wm TouchSmart Cooling Fan Replacement: passo 4, immagine 1 di 2 HP 15-r137wm TouchSmart Cooling Fan Replacement: passo 4, immagine 2 di 2
    • Locate the connection between the power button and the connecting cable.

    • Do not lift the front panel off to far as the cable is still attached.

    • Remove the cable from the motherboard carefully.

  5. HP 15-r137wm TouchSmart Cooling Fan Replacement, Keyboard: passo 5, immagine 1 di 2 HP 15-r137wm TouchSmart Cooling Fan Replacement, Keyboard: passo 5, immagine 2 di 2
    • Disconnect the connection between the keyboard the the motherboard.

  6. HP 15-r137wm TouchSmart Cooling Fan Replacement: passo 6, immagine 1 di 2 HP 15-r137wm TouchSmart Cooling Fan Replacement: passo 6, immagine 2 di 2
    • Remove the four (4) 2.5mm by 3.5mm Phillips #0 screws from the metal retaining plate.

    • Lift the metal retaining plate off and away from the device.

  7. HP 15-r137wm TouchSmart Cooling Fan Replacement, Cooling Fan: passo 7, immagine 1 di 2 HP 15-r137wm TouchSmart Cooling Fan Replacement, Cooling Fan: passo 7, immagine 2 di 2
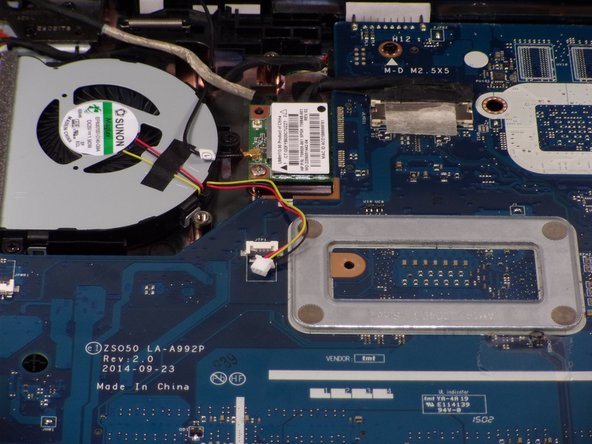
    • Locate the small connection on the motherboard and disconnect it by slowly pulling it away from the motherboard.

    • Slowly disconnect the cable as the wires are very small and fragile

  8. HP 15-r137wm TouchSmart Cooling Fan Replacement: passo 8, immagine 1 di 2 HP 15-r137wm TouchSmart Cooling Fan Replacement: passo 8, immagine 2 di 2
    • Remove the three (3) 2.5mm by 3.5mm Phillips #0 screws from the fan.

  9. HP 15-r137wm TouchSmart Cooling Fan Replacement: passo 9, immagine 1 di 1
    • Remove the cooling fan from the housing carefully.

    • The fan may be connected to the small foam screen. Pull gently to release it.

Conclusione

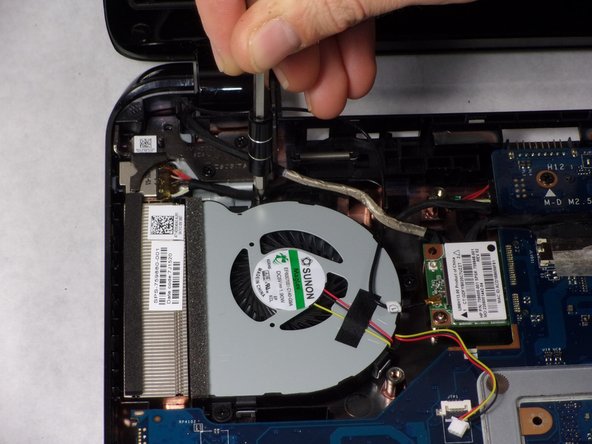
To reassemble your device, follow these instructions in reverse order.

Team

0 Commenti

Aggiungi Commento

Visualizza Statistiche:

Ultime 24 Ore: 0

Ultimi 7 Giorni: 2

Ultimi 30 Giorni: 6

Tutti i Tempi: 380