Salta al contenuto principale

HP 15-AF131DX Wireless Network Card Replacement

Cosa ti serve

  1. HP 15-AF131DX Wireless Network Card Replacement, Battery: passo 1, immagine 1 di 2 HP 15-AF131DX Wireless Network Card Replacement, Battery: passo 1, immagine 2 di 2
    • Turn the computer upside down on a level surface.

    • Slide the battery lock to unlock the battery.

    • Slide the battery release latch. The latch will click when the battery is released.

    • Lift the battery from the middle to remove it from the computer.

    • The latch will click again when a battery is reinstalled. Switch the battery lock back to locked after reinstalling a battery to keep it secure.

  2. HP 15-AF131DX Wireless Network Card Replacement, Optical Drive: passo 2, immagine 1 di 2 HP 15-AF131DX Wireless Network Card Replacement, Optical Drive: passo 2, immagine 2 di 2
    • Using a small Phillips screwdriver, remove the Phillips screw in the middle of the bottom of the computer.

    • Pull the CD/DVD drive outward to slide it away from the computer.

  3. HP 15-AF131DX Wireless Network Card Replacement: passo 3, immagine 1 di 1
    • To open the drive use an unbent paperclip and press it into the small hole until the disc tray releases.

    • Pull the disc tray out from the front until it is as far as it will go out of the optical drive.

  4. HP 15-AF131DX Wireless Network Card Replacement: passo 4, immagine 1 di 3 HP 15-AF131DX Wireless Network Card Replacement: passo 4, immagine 2 di 3 HP 15-AF131DX Wireless Network Card Replacement: passo 4, immagine 3 di 3
    • To remove excess parts from the optical drive press down on the plastic tab behind the tray's bezel.

    • Gently pry the bezel from the face of the optical drive.

    • With a smaller phillips head screwdriver, remove the screws on the back of the drive, then remove the small metal bracket.

  5. HP 15-AF131DX Wireless Network Card Replacement, Wireless Network Card: passo 5, immagine 1 di 2 HP 15-AF131DX Wireless Network Card Replacement, Wireless Network Card: passo 5, immagine 2 di 2
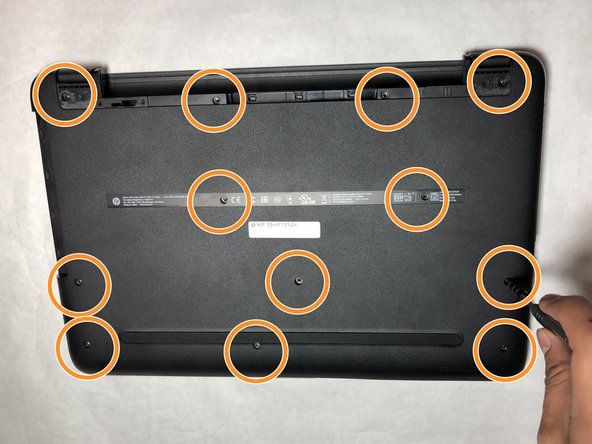
    • The first step of this process is to peel off two rubber feet from the bottom of the laptop.

    • Then remove twelve 8.8 mm screws using the Phillips #0 Screwdriver.

  6. HP 15-AF131DX Wireless Network Card Replacement: passo 6, immagine 1 di 3 HP 15-AF131DX Wireless Network Card Replacement: passo 6, immagine 2 di 3 HP 15-AF131DX Wireless Network Card Replacement: passo 6, immagine 3 di 3
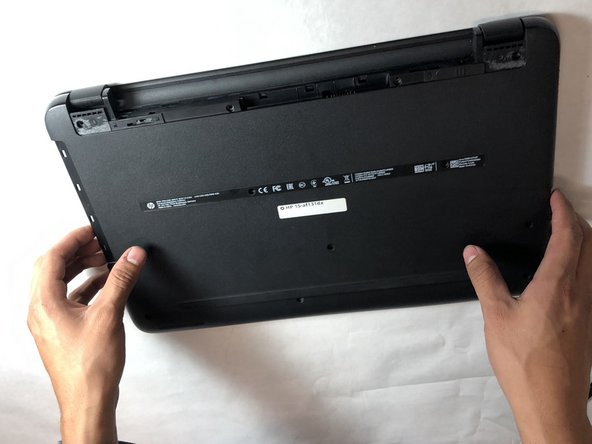
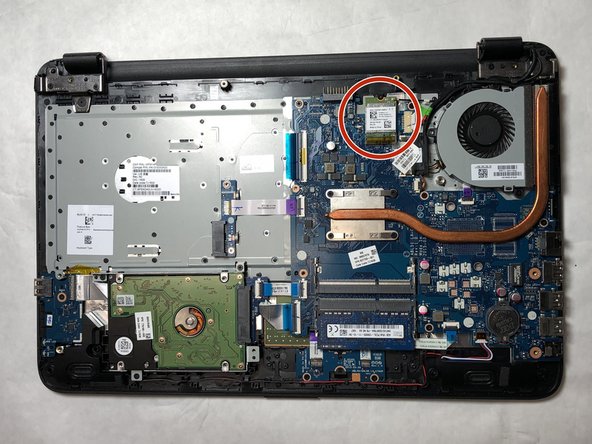
    • Remove the bottom of the plastic case using a blue plastic opening tool.

    • The HP Wireless Network Card is found in Picture 3, circled in red.

  7. HP 15-AF131DX Wireless Network Card Replacement: passo 7, immagine 1 di 3 HP 15-AF131DX Wireless Network Card Replacement: passo 7, immagine 2 di 3 HP 15-AF131DX Wireless Network Card Replacement: passo 7, immagine 3 di 3
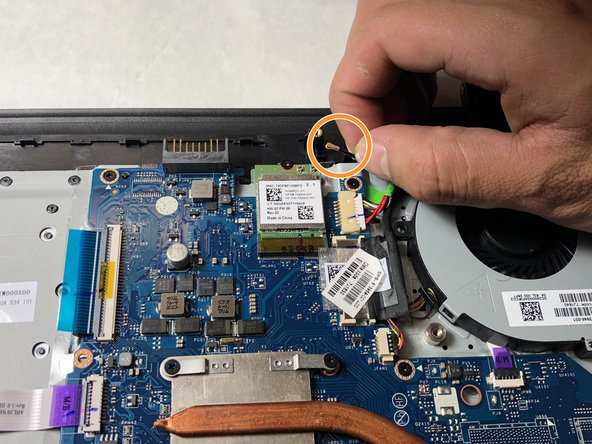
    • Remove one 3.3 mm screw using Phillips #0 screwdriver.

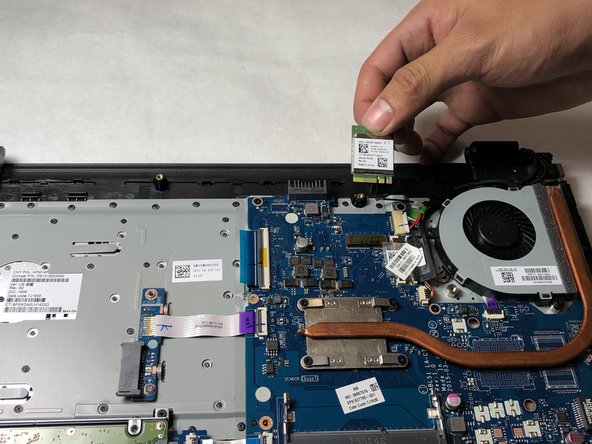
    • Pop off the connection wire by pulling the wire upwards off the stud on the HP Wireless Network Card.

    • Pull out the HP Wireless Network Card.

Conclusione

To reassemble your device, follow these instructions in reverse order.

Un'altra persona ha completato questa guida.

Team

IUPUI, Team S2-G2, Harley Fall 2018 Membro di IUPUI, Team S2-G2, Harley Fall 2018

IUPUI-HARLEY-F18S2G2

3 Membri

2 Guide realizzate

0 Commenti

Aggiungi Commento

Visualizza Statistiche:

Ultime 24 Ore: 0

Ultimi 7 Giorni: 5

Ultimi 30 Giorni: 14

Tutti i Tempi: 613