Salta al contenuto principale

Questa guida ha delle modifiche più recenti. Passa all'ultima versione non verificata.

HP 14-dq0052dx Motherboard Replacement

Cosa ti serve

  1. HP 14-dq0052dx Motherboard Replacement, Back Panel: passo 1, immagine 1 di 1
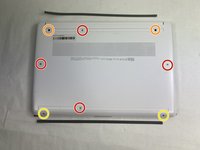
    • Orient your laptop so that the vents are facing upwards.

  2. HP 14-dq0052dx Motherboard Replacement: passo 2, immagine 1 di 1
    • Remove the rubber feet.

  3. HP 14-dq0052dx Motherboard Replacement: passo 3, immagine 1 di 2 HP 14-dq0052dx Motherboard Replacement: passo 3, immagine 2 di 2
    • Remove the four M2.0 x 6 mm screws using a JIS #1 screwdriver.

    • Remove the two M2.5 x 6 mm screws using a JIS #1 screwdriver.

    • Remove the two M2.0 x 4 mm screws using a JIS #1 screwdriver.

    • Use an iFixit opening tool to pry the back cover away from the laptop.

  4. HP 14-dq0052dx Motherboard Replacement, Battery: passo 4, immagine 1 di 1
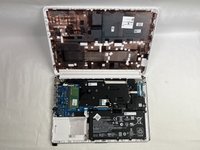
    • Unplug the battery from the motherboard.

    • Carefully pull back and raise the battery out of its slot.

    • Replace the battery.

  5. HP 14-dq0052dx Motherboard Replacement, Motherboard: passo 5, immagine 1 di 1
    • Remove the five 4 mm screws from the heatsink.

  6. HP 14-dq0052dx Motherboard Replacement: passo 6, immagine 1 di 1
    • Remove the heatsink from the laptop.

  7. HP 14-dq0052dx Motherboard Replacement: passo 7, immagine 1 di 1
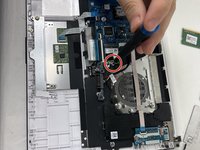
    • Remove the 4 mm screw from the bracket holding down the motherboard.

  8. HP 14-dq0052dx Motherboard Replacement: passo 8, immagine 1 di 2 HP 14-dq0052dx Motherboard Replacement: passo 8, immagine 2 di 2
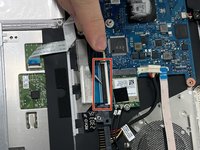
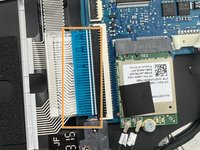
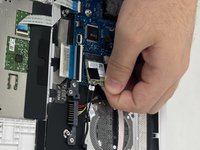
    • Lift up the retaining clip to access the ribbon cable attached to the motherboard.

    • Be careful when removing the ribbon cable as it is prone to ripping which will damage it.

    • Remove the ribbon cable from the motherboard

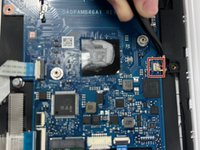
  9. HP 14-dq0052dx Motherboard Replacement: passo 9, immagine 1 di 1
    • Lift up this tab and remove the ribbon cable from the motherboard.

    • Be gentle with the ribbon cable as it can easily tear.

  10. HP 14-dq0052dx Motherboard Replacement: passo 10, immagine 1 di 2 HP 14-dq0052dx Motherboard Replacement: passo 10, immagine 2 di 2
    • Remove the 4 mm screw from the Wi-Fi card.

    • Remove the Wi-Fi card from the motherboard.

  11. HP 14-dq0052dx Motherboard Replacement: passo 11, immagine 1 di 2 HP 14-dq0052dx Motherboard Replacement: passo 11, immagine 2 di 2
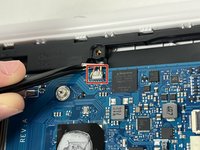
    • Disconnect the small wires from the top of the motherboard.

    • Be extremely careful with these wires as bending them can cause the fragile inner wire to break.

  12. HP 14-dq0052dx Motherboard Replacement: passo 12, immagine 1 di 1
    • Carefully remove the motherboard.

Conclusione

To reassemble your device, follow these instructions in reverse order.

DamianR

Membro da: 10/18/24

279 Reputazione

2 Guide realizzate

Team

UMass Dartmouth, Team 2-5, Konn Fall 2024 Membro di UMass Dartmouth, Team 2-5, Konn Fall 2024

UMASSD-KONN-F24S2G5

4 Membri

5 Guide realizzate

0 Commenti

Aggiungi Commento

Visualizza Statistiche:

Ultime 24 Ore: 0

Ultimi 7 Giorni: 5

Ultimi 30 Giorni: 21

Tutti i Tempi: 97