Questa traduzione potrebbe non riflettere gli aggiornamenti più recenti dalla guida originale. Aiuta ad aggiornare la traduzione o visualizza la guida d'origine.
Introduzione
Segui questa guida per aprire il Pixel XL e rimuovere e sostituire la sua batteria. Se la tua batteria è gonfia, prendi le precauzioni appropriate.
Prima di smontare il tuo telefono, scarica la batteria al di sotto del 25%. La batteria può prendere fuoco e/o esplodere se forata accidentalmente, ma le probabilità che succeda sono fortemente ridotte se è scarica.
Il pannello dello schermo non rinforzato del Pixel XL è delicato ed è incollato alla cornice con del forte adesivo, rendendo le riparazioni difficili. C'è una buona probabilità di rompere lo schermo, specialmente se ci sono già delle micro fratture. Assicurati di scaldarlo per bene e di essere estremamente attento durante la procedura.
La batteria è tenuta ferma da dell'adesivo molto resistente. Potresti dover usare dell'alcool isopropilico ad alta concentrazione (>90%) per ammorbidirlo.
Cosa ti serve
-
-
Scalda un iOpener ed appoggialo al bordo superiore dello schermo per due minuti.
-
Prendi nota delle seguenti aree prima di iniziare a fare leva:
-
Adesivo sottile allineato contro il pannello dello schermo
-
Adesivo spesso
-
Il pannello OLED dello schermo, che è molto delicato
-
Il cavo dello schermo, che può essere danneggiato mentre fai leva
-
-
-
Quando il bordo è caldo al tatto, fai aderire una ventosa vicino al bordo stesso.
-
Tira verso l'alto la ventosa ed infila un plettro nella fessura.
-
Se hai problemi nel creare una fessura, riscalda il bordo e riprova.
From my experience, I had to use a thin blade (such as the ones included with the deluxe iFixit repair kit) to slide into the small gap, and cut away at the foam adhesive. Once enough of a gap is created, the picks can then be used to push the adhesive aside - but the adhesive is so thick, especially -as Brewmaster396 observed in the comments below - at the top right corner behind the screen, that the knife is required to cut it. I failed here - cracking the back layer of my screen - because I didn’t take time to cut all the adhesive away from that thick part, and kept trying to pull the screen off. It doesn’t take a lot of pressure to crack - so maybe it’s more a thing of cutting and floating the screen up, not pulling and prying.
Mark the picks with lines that show how deep you can go in that part of the screen. This will help keep you from accidentally hitting the fragile screen
Matthew Goodwin - Excellent suggestion.
Jon T made a great suggestion about creating a mark on the picks (see above).
Matthew Goodwin responds with an “Excellent suggestion.”
Here we are 8 months later and no lines on the picks in my new pro-tech tool kit, not sure why this hasn’t been implemented at this point in time.
Bob H.
-
-
-
Scalda l'iOpener ed appoggialo al bordo destro del telefono per due minuti.
-
Infila un plettro vicino al bordo superiore del telefono, dove hai già tagliato l'adesivo.
-
Fai scorrere lentamente il plettro attorno all'angolo destro.
-
Fai scorrere attentamente il plettro sotto il bordo destro del telefono per tagliare l'adesivo.
-
Ripeti i passaggi precedenti per il bordo sinistro dello schermo.
-
-
-
Dopo aver tagliato lungo tutto il perimetro del telefono, solleva leggermente il gruppo dello schermo con attenzione dagli angoli a destra.
-
Usa un plettro per tagliare tutto l'adesivo rimasto.
As long as you’ve disengaged the adhesive relatively evenly around all sides, I found mounting the suction cup in the middle (biased a little to the left or right side), helps a lot on this step.
-
-
-
Usa la punta di uno spudger per sollevare e scollegare il cavo dello schermo dal suo connettore.
i have to agree with the comment here about the connector. If you press it in the middle, it will bend. Resulting in either bent pins on the motherboard or the display. In my case it was both !
Be careful prying up the connector and apply force only from the side as shown in the picture cause in the longest side there are capacitors that can be broke doing the lever ( happened to me Repair missing capacitor near display connection port )
-
-
-
-
Rimuovi il gruppo dello schermo.
The Parts List does not state you need a replacement display. Is this portion of the Repair Guide copied and pasted from another guide (perhaps the screen replacement guide) or will I need to procure a replacement screen before I attempt to replace the battery?
It is possible to replace the battery without replacing the display, but there is a significant chance you may break the display during removal. It depends on if your display already has micro-fractures, and how stubborn the screen adhesives are. I would personally buy a screen just in case, and return the part if I didn’t need it.
Hello, I recently bought a refurb screen off of eBay to fit. The phone was 100% working before and just needed a new display/battery.
The battery came before the display. I wanted to test the display before doing too much reassembly, so I plugged in the battery, connected the mother/daughter boards with the interconnect cable, and then plugged in the LCD.
When I press the power button there is the usual single buzz from booting, but the display is completely blank.
Is the replacement screen DOA, or are there important traces/connections made by fully assembling the midframe and missing screws before testing the LCD?
If I already have all the ingredients for a fair test of the LCD, then it seems the LCD is bad?
Like I said the phone worked perfectly before… and if the new battery is dead, I would expect no buzz, or at least a battery graphic?
Hi John,
If the phone buzzed, that usually signifies that it has booted up—having no image at that point usually means some kind of display issue. I would suggest disconnecting the display connector, carefully checking for any debris in the socket, and carefully re-connecting it.
I’ve also seen a comment in another Pixel guide that suggests plugging in the display connector before the battery. If that works, please leave a comment!
battery connector is not accessible without removing the display first………. and reassembling, battery has to be connected first, then the plastic piece and then the display
-
-
-
Svita le seguenti viti che fissano il telaio intermedio al retro:
-
Sette viti T5 nere da 4 mm
-
Due viti T5 argento da 3 mm
-
-
-
Trova la rientranza nell'angolo in basso a sinistra della cornice ed infilaci un plettro.
-
Fai scorrere il plettro sotto il bordo inferiore del telefono verso l'angolo in basso a destra e lascialo infilato lì sotto.
This step was impossible on my phone as a gap could not be formed at the notch to pry the corner up using either pick or playing card . Flathead micro screwdriver was required causing insignificant cosmetic damage at that area.
This step takes a few tries, starting with the pick perpendicular to the phone. Eventually, after gentle prying, it will catch the corner so you can slip the pick underneath. Like everything in this repair, it requires you to be exceedingly delicate and patient.
Take the tip of the tweezers, insert it in the screw hole near where they show to insert the pick and gently pry up. You should be able to move the plate upwards enough to insert the pick
-
-
-
Infila un altro plettro sotto il bordo destro del telefono, vicino a quello inferiore.
-
Spingi lentamente il plettro verso l'alto lungo la fessura finché il primo gancio non viene rilasciato.
-
Dopo aver rilasciato il gancio, lascia il plettro infilato per evitare che il telaio intermedio si richiuda.
-
-
-
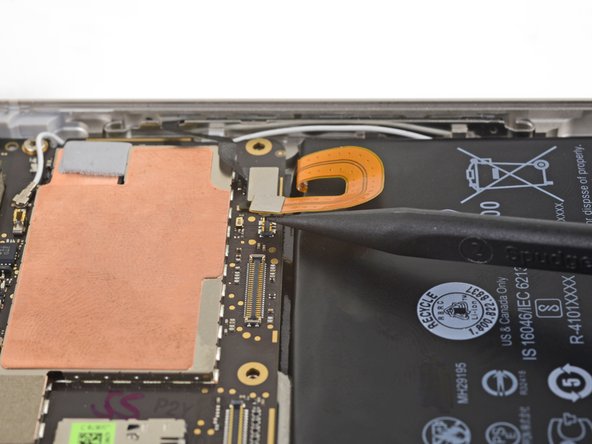
Usa la punta di uno spudger per sollevare e scollegare il connettore della batteria.
-
Piega leggermente il cavo a nastro della batteria in modo che non tocchi accidentalmente la scheda madre.
I found the black ribbon from the button power button board had broken off during phone disassembly, right where the cable bends 90°. That is the black ribbon connector adjacent to the battery flex cable pictured here (mine doesn’t have the brass looking rivet in it).
I bought a new one on iFixit to replace it and the phone works great now: Google Pixel Power Button Board
-
-
-
La batteria è tenuta ferma da due strisce di nastro biadesivo.
-
Scalda un iOpener ed appoggialo sul retro del bordo sinistro del telefono per due minuti. Potresti dover scaldare di nuovo e riappoggiare l'iOpener.
-
-
-
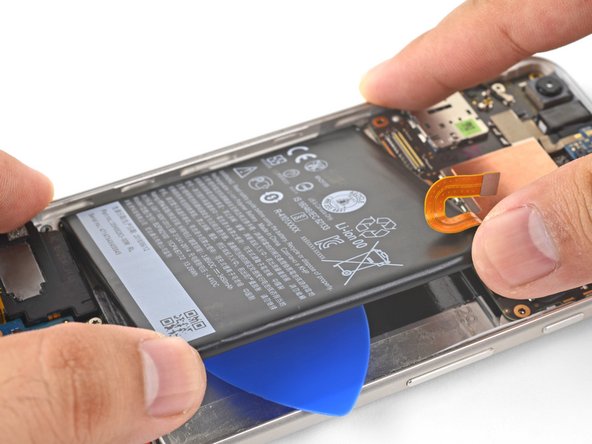
Gira il telefono.
-
Spingi un plettro lentamente ma con decisione sotto il bordo destro della batteria (che dovrebbe essere calda). Fallo scorrere leggermente avanti e indietro per tagliare l'adesivo.
-
Dopo aver liberato il bordo destro della batteria dalla copertura, lascia infilato il plettro per evitare che l'adesivo si reincolli.
Alcohol was the best bet for me - and I have a strip of class 2 HDPE plastic cut from a used chocolate milk bottle for the purpose of sliding underneath and “bridging” the alcohol underneath the battery and onto the adhesive. However, the actual adhesive tape bonding the battery to the case is far more resilient than the adhesive holding the plastic wrapping of the battery together - and, IMHO, only a little bit of it - less than a quarter of the original surface area - is required.
-
-
-
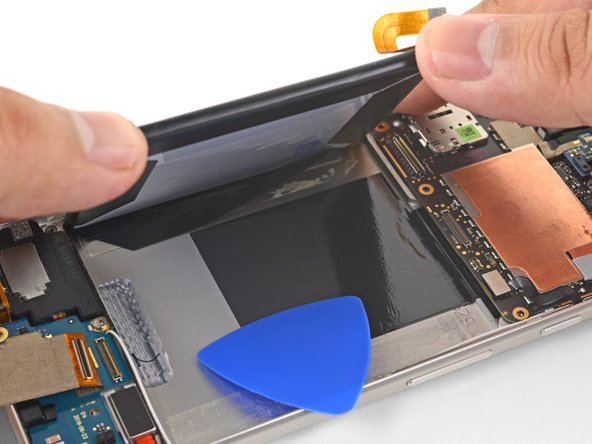
Scalda un iOpener ed appoggialo sul retro del bordo destro del telefono per due minuti. Potresti dover scaldare di nuovo e riappoggiare l'iOpener.
How is the battery connector positioned during this step? Is it fully folded over on itself?
The battery connector is not folded over itself. It makes a U-shape.
-
-
-
Applica delle strisce adesive estensibili, del nastro biadesivo o delle strisce adesive pretagliate.
-
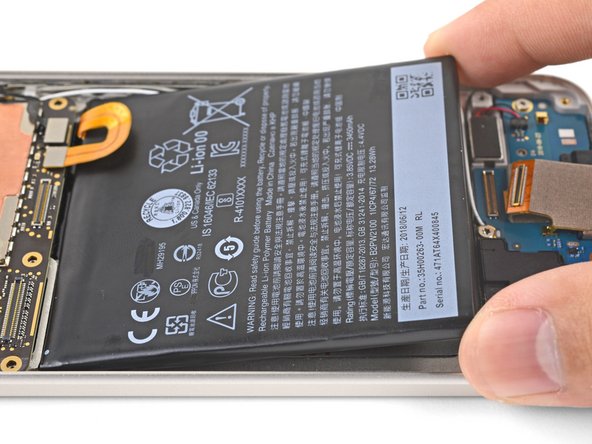
Appoggia la nuova batteria nel suo alloggio.
-
Usa la parte piatta di uno spudger o le dita per ricollegare momentaneamente il connettore della batteria alla scheda madre.
If you are ever planning to replace this battery again, it could be helpful to make a pull-tab with some tape so that it will be easier to remove next time.
-
-
-
Mentre la batteria è ancora collegata, solleva il bordo inferiore della batteria.
-
Usa delle pinzette per rimuovere le protezioni dell'adesivo.
-
Abbassa attentamente la batteria e premila contro i bordi per far fare presa all'adesivo.
-
Usa uno spudger per sollevare e scollegare il connettore della batteria dalla scheda madre e piegalo leggermente.
-
Continua a rimontare il telefono.
My Fixit failed here. Once you plug in the new battery DO NOT UNPLUG IT AGAIN! My phone power socket became damaged during the two unplugging directions here. I’ll propose an edit to the directions, but I am now waiting for a new phone as this step rendered my phone mulch.
Hi Gil,
I’m really sorry to hear of your news! Can you describe how the socket is damaged and how it happened, so that I can better update the guide steps to prevent it?
Also, power socket is on the daugtherboard, it’s not attached to the motherboard in any way on this step
First time I try to repair a phone myself. I was being very patient on the first step of removing the screen but I think at somepoint the blue triangle tool slipped in too much. The iOpener did not provide sufficient heat to loosen the adhesive even after I reheated and reapplyed it multiple times so I needed more force than necessary to remove the adhesive which lead to the slip up.
Need a link to the re-assembly process here please.
It was my first time doing a battery replacement and I seem to have somehow managed to put it together.
However, after I completed the reassembly I noticed that the phone was not charging. I had to re-open the phone and had to do some self troubleshooting and it turns out the bottom part of the interconnect cable was not fitted in.
Quick fix, but if you want to save yourself the trouble of potentially having to re-open up your phone, I would suggest that after you place your replacement battery into place - connect your display to the display connecter to see if the battery works and charges properly before closing up.
-


Se il tuo Pixel non si accende dopo aver sostituito lo schermo, c'è la possibilità che il telefono si sia acceso da solo quando hai ricollegato la batteria. Tieni premuto il tasto di accensione per qualche secondo finché il telefono non vibra per spegnersi. Dopodiché, ricollega lo schermo e riprova.
Per rimontare il tuo dispositivo, segui le istruzioni in ordine inverso.
Dopo aver completato la procedura, calibra la tua nuova batteria appena installata.
Porta i tuoi rifiuti elettronici a un riciclatore certificato R2 o e-Stewards.
La riparazione non è andata come previsto? Prova delle soluzioni di base ai problemi, oppure rivolgiti alla nostra comunità Risposte per trovare aiuto.
Annulla: non ho completato questa guida.
Altre 58 persone hanno completato questa guida.
Un ringraziamento speciale a questi traduttori:
85%

Questi traduttori ci stanno aiutando ad aggiustare il mondo! Vuoi partecipare?
Inizia a tradurre ›


47 Commenti
I applied the heat with the iOpener multiple times around the edges (reheating it as needed to where it could barely handle it), and they refused to lift up with the suction cup.
Eventually the screen cracked as I was attempting to pry up an edge out of desperation. First attempt at fixing my own phone = fail whale :(
Sorry to hear about the unsuccessful repair, John!
Our Support team is here to assist in the event you need to find additional parts to complete your repairs, or if you decide you wish to return the kit that you ordered. Feel free to reach out to us via help.ifixit.com and we’ll do our best to assist you.
Cheers,
Is there an ideal temperature to head the adhesive to without destroying the screen?
@martinsing For most adhesives, 80-85° C is about right. You might have to maintain that temperature for a few minutes before it softens up.
How much deeper do I need to cut with the picks/etc top and bottom. The ~1.5mm of my picks isn’t deep enough to cut all the glue on the bottom (haven’t tried on the top yet); my sides were ‘easy’ to free in that my bad battery already lifed them free leaving the screen secured only top and bottom. I can probe deeper with a card or spudger, but how much farther should I be going.
Hi Dan,
The 1.5 mm is mainly for the sides. You can push the pick into the top and bottom to the extent that you are cutting under the bezel and not reaching the fragile display panel. I’ve updated the step to include the clarification.
Broke the screen in the first 5 minutes. The corner is what got me and it appears it is less than 1.5mm from the edge of the device. For all the Americans on here that are unfamiliar with the metric system…1.5mm is slightly larger than the tip of a sharpened pencil. You might be wise to measure it on your triangle pick and put a peice of tape on it so you don’t go too deep. I thought it was much more than that hence me breaking the screen. Also…what you are trying to avoid is literally a paper thin piece of glass. If you even touch it with your triangle pick its over. Maybe a playing card is the better solution because it gives a little? Not sure. Definitely not worth the risk for a 10 dollar battery.
Edit: Also! If you need help visually how deep you can go with your triangle pick, look at your new replacement adhesive for the screen. The tiny tiny line of adhesive on the edge is 1.5mm for a frame of reference.
Do not try if this is your first time. Broke the screen when trying to remove the screen.
I ended up looking up a video on youtube which resulted in me not following the instructions correctly for Step 8. (The video used the flat portion of the spudger) and ended up destroying part of the motherboard (Those tiny parts are ultra-fragile), the screen doesn’t work at all now and i can’t figure out the action sequence to enable TalkBack (Text to Speech). Be extra careful about those tiny parts!
Also I couldn’t figure out how to use the adhesive that was provided in the kit, it seems to be inverted. . .
Hi John,
I’m really sorry to hear that. Did you break the connector on the motherboard, or did you knock off some tiny components near it?
There is a guide for the adhesive! You can find it in step 9, or you can find it right here.
1 hour stuck in step 2 as the adhesive will not even give a tiny bit…so gave up, I guess I’ll continue to use my dying battery until I can hopefully get a new phone.
Great guide! A few comments:
As others mentioned, I had to apply a lot of heat to get the adhesive to release. I probabaly reheated 2x and heated for 10 minutes before I could get the first suction lift.
The time in this guide is waaay too short. Took me about 6 hours.
Be careful not to crush the antenna cable when replacing the inner chassis.
Be careful around the top right corner where the antenna is, but this is really not all that bad as long as you keep heating it repeatedly and working the white area of the screen with the playing cards. Keep working around the edges and your patience will pay off.
A small part of the Pixel XL screen started to lift off my phone. The screen would not press back in, appeared to be pressure lifting it off in the center of the phone. I decided to replace the battery since I could not get anymore than a few hours out of a full charge (phone ~1.6 years old). I used a blow drier to heat up the phone and the playing card. The screen is extremely delicate so I took my time working it off. I found the original battery appeared to have expanded. The screen partially lifting off probably helped. I recommend to use adhesive strips for putting the phone back together. I replaced the battery and I’m getting a few days now out of a full charge.
Everything seemed done right, but at the end, the screen didn’t really turned on.
Just a little part of the screen at the top is flashing and not working like supposed to be…
what went wrong?
A note on this repair. I think it needs to be emphasized that the display screen is extremely delicate and one must be super careful when removing it! I did this repair and damaged the display. Thankfully there are used/refurbished ones available for around $60. I still fixed my own phone cheaper than having someone else do it and I have a new display! :-)
Completed repair, when attempting to power the phone on it just vibrates once, nothing ever comes up on the display so I’m assuming I killed it with the picks. I had to get in pretty deep to get all the glue. Just wondering if anyone had the same symptoms when powering on and if it was a bad display. I dont want to sink more money into replacing the display if its a lost cause. Thanks
The exact same thing happened to me :( Seemed to go fine but the screen no longer turns on and it just vibrates once.
Well written guide. Followed it and successfully replaced the battery on my Pixel XL. Be patient when removing the screen and just take your time. Also it helps to mark the picks with lines to show how deep you can go with the picks to cut through the glue. That will help keep you from accidentally damaging the screen.
What kind of tape is used on top of the interconnect cable? The grey one.
I did this repair, screen came off ok, etc. When I got everything put back together though the screen wont turn on. The phone will turn on and answer a call etc, but the screen is black. Checked to make sure it wasn’t just the backlight but no luck. It also will not connect to my computer when I plug it with a USB cord. Rendered the device useless. Any tips on how to fix this issue would be greatly appreciated!
Sorry to hear that! If you have the Pixel still open, can you test this:
1. Disassemble the Pixel to the point where you can disconnect the battery.
2. With the battery disconnected, connect the display cable to the motherboard. You do not need to re-attach the midframe at this point.
3. Re-connect the battery, and try to power up the phone.
Be sure to only use plastic tools while prying. Using metal tools may bridge some contacts and short delicate circuitry.
Well that was a waste of money, the iOpener does not get hot enough. I spent over an hour heating and apply the iOpener to the top to complete step 2 and it would not move, not even slightly. Eventually I decided to try heat it up a little more than 30 seconds and the iOpener burst.
Update: I had much more success with a hair dryer. Everything seemed to go fine but after all the step were complete my phone wouldn’t switch on. Just a single vibrate and nothing. Dead.
Hey Steve,
It may be that the phone is powering up fine, but the display is not. If you still have the phone open, try disconnecting the battery, connecting the display, and then re-connecting the battery. You can do this with the phone open, and you don’t have to install the plastic midframe to test this.
Not the best of the best, but I have taken a part 10 or so phones. Never broke one until this one. This job deserves it Difficulty rating. Order a screen with your battery instead of being stuck buying a new phone suddenly like I now am since the battery took over 2 weeks to get to me.
A heat pad is better than iopener in my opinon.
Continue with the reassembly process.
But where? There is no link?
Hi Clive,
To reassemble, follow the directions in reverse order, taking note of any reassembly bullet notes.
Successfully replaced battery and screen. Phone works like new except the new battery lasts only 7 hours. Yes, I followed the instructions for draining and charging the new battery. Seems that the “replacement” battery is no where near the quality of the original.
Ryan, did you ever find a solution to making your replacement battery last longer? I have the same issue.
Dberk -
I biffed the screen of the first Pixel XL I had to do this on. I didn’t want to cut too deep and chance hitting the display since the adhesive is so close to the screen, but given the phone is 3 years old, it didn’t want to come off that easy.
What I did was cut all around as close as I was comfortable, then applied heat back to the top of the phone, and was gently lifting the screen while slicing through the remaining adhesive. Then once I got the top of the screen to lift with light pressure, I started working on remaining adhesive on the sides. My mistake was I should have stopped, and started trying to gently lift the bottom of the screen and slice that remaining adhesive, then that would likely get the screen up without fracturing it. Instead, as I got the top and sides of the screen free and started to go around the bottom, some adhesive on the bottom came off easier than I thought which resulted in the screen popping up and cracking.
Also, my iOpener needed 35 seconds to be effective, Weak microwave
In addition, I had to use the Jimmy to get the subframe to break on that corner. A pick wasn’t cutting it. I tried for about 20 minutes and ended up needing to go with a tool that wouldn’t give so easy.
The good new is, I put the phone back together (minus the screen adhesive) and booted the phone, and aside from the cracked display randomly flashing on, everything appeared to work, and I was even getting feedback on the digitizer and was able to shut the phone off (knew where the off button was from using the phone so long), so it seems like I just need to replace the screen and it should be good.
Here’s to hoping the second Pixel XL I fix tomorrow is complete with a surviving screen. I won’t feel terrible if I’m 50% on my first go with changing a battery on a phone like this and only have to pay for one screen and not two…
Also, the speaker grill was causing my suction cup to not seal good enough to really lift the top of the screen, and placing the suction cup was too far from the edge to lift it with the pressure I was comfortable applying on that potato chip screen.
So what I did was wiped my screen clean, and applied wide packing tape along the top edge of the screen, covering the speaker grill (and rolled the ends so that it wouldn’t try sticking to the frame or the table I was working on), and that did the trick.
Also, if your phone is old, be prepared to spend about an hour just removing the old adhesive so you get a fresh surface for the new adhesive to grab on to. I used a paper towel with 99% iso and cleaned it. Watch for the cushions on the mid frame. The alcohol will attack it, so pay attention to where you wipe off especially on the sides.
That was a bust… 0/2. Hope the battery on the Pixel 4a can be done with just a battery and not other parts…
Needed a replacement battery since one of the new ones only had 50% the capacity of the other new one. Was able to get the new screen off without breaking it (granted the new screen was only on the chassis for barely two weeks). This time, the second I got a gap on the top of the screen, I pretty much used a dispenser bottle filled with 99.9% Isopropyl Alcohol and applied it very, very liberally into the gap of the screen. I held the phone upright and applied it through the entire width of the top of the screen with the hopes it would run down and attack as much adhesive as possible. Then I let it soak while heating up the left side of the phone, cut the adhesive on the side, and when the pick was in the bottom corner I applied more alcohol to the bottom part of the phone. Ended up being able to lift the screen off the chassis without even slicing the right side and bottom since pretty much the entire parameter was soaked in alcohol.
Definitely the way I’ll remove ANY screen on any phone from now on.
The guide worked well for me! Plan on taking at least 2hrs for repair if this is your first time repairing a phone. Also, probably at least 75% of your time will be removing the screen. If your screen already has a crack, then you might not be able to remove it intact. Really take your time on the screen, especially at the end when you are lifting up the last bit of screen, as this is like a lever putting a lot of pressure on the part of the screen still attached. I had good luck using the picks in a cutting motion, back and forth while slowly advancing into the case. Reheated each area so that it stayed warm while cutting the glue. Even spending 3hrs on the screen is faster than shipping a new one :) . Also, after everything is replaced and you are ready to glue the screen back on, read the guide for using the screen adhesive. Again, do everything in this guide very slowly and you should be fine. Thanks for the great guide!
i wouldnt bother with this, i have 2 phones here and man that glue is no joke. both screens crack. mind you im not a noobie niether, i run a shop and done hundreds if not thousands of repairs within the last 10 years or so…. dont do it!
I tried this and ended up cracking the screen, but it wasn’t the way I was expecting to. The external part of the screen, I guess it would be the digitizer screen, actually seems fairly sturdy, but the part I broke was an internal glass pane, which I think is actually part of the AMOLED screen. It’s the innermost hard surface of the screen, and it can be seen in the pictures of steps 8 and 9 and the third pictures of 7 and 10. There’s a black film on the back of it.
The part that broke for me was around the bottom corners, which the pictures of steps 8 and 9 are focused on. Basically, those corners were apparently still stuck down well when I brought the pick down along the side and rounded the corner to the bottom edge, and the pulling up of the outer screen caused the inner screen to break at the corner. I got the feeling that the adhesive holding the screen onto the frame had seeped down around the edge a little bit and was holding onto the more internal parts of the screen, not just edge of the digitizer.
My phone's battery is back to its original state now, this guide worked wonders! CAUTION: Be prepared to break your phone's screen while doing this - seriously, its a high likelihood you will. But the way I see it, a bit over $100 for a new screen and battery (screen was scratched up anyways) is certainly more cost effective than a new smartphone. Best of luck anyone who tries this!
If I destroy the display, can I just buy another one and repair that too?
Thank you for the really detailed guide, I followed this through and amazingly did not break the screen! Although it took an hour at least to remove!
All reassembled and appeared to work fine, but now the microphone does not work, making the phone worthless and unsellable realistically. As I’ve glued the screen back on already, is there anything worth attempting or is it time to give up?
I don’t mind trying to take it apart again but it would be pointless if I don’t know how to fix the microphone. A missed connection perhaps? Everything else works and it is not water damaged at all. Any advice appreciated, thank you!
You might be surprised about the resale value - people buy these mostly for free GPhoto uploads, not to actually use as a phone. You should be able to buy pixel 2 or 3 for what you make...
Thanks for the guide! My old battery expanded so much that it made opening the phone easier, once display is off, the repair is a breeze with the guide.
From my experince, it’s better to use a heat gun (if iFixit sold a good heat gun in volume, they should spruik that). Also, heat ALL sides at the same time BUT concentrate on the top part of the phone where the foam adhesive tape is thickest, second on the bottom where the foam is almost as thick. It also helps to use the 2nd & 3rd images in the series to visualise where the adhesive is.
Jon T. - Replica
Ty for the advice I prefer heat gun but my first pixel
Michael Koch -