Salta al contenuto principale
GoPro Hero3+ Silver Edition Image Sensor Replacement

GoPro Hero3+ Silver Edition Image Sensor Replacement

Patrick Cook

Patrick Cook e 7 altri collaboratori

Ultimo aggiornamento il May 31, 2021

3 - 8 minuti
Facile

Introduzione

Vai al passo 1

The image sensor is a vital part of your GoPro. However, don't fear if it has broken, this guide will bring your device back to life!

Cosa ti serve

Ricambi

Strumenti

Mostra di più…

  1. GoPro Hero3+ Silver Edition Image Sensor Replacement, Battery: passo 1, immagine 1 di 2 GoPro Hero3+ Silver Edition Image Sensor Replacement, Battery: passo 1, immagine 2 di 2
    • Push the tab on the back of the device left to remove the plate covering the battery.

  2. GoPro Hero3+ Silver Edition Image Sensor Replacement: passo 2, immagine 1 di 1
    • Use the strip of tape on the battery to remove the battery from the housing.

  3. GoPro Hero3+ Silver Edition Image Sensor Replacement, Front Panel: passo 3, immagine 1 di 1
    • Insert a plastic opening tool in between the front face plate and the black housing.

    • Make sure you insert the plastic opening tool next to the microSD card slot. There is a small gap that will help separate the face plate.

  4. GoPro Hero3+ Silver Edition Image Sensor Replacement: passo 4, immagine 1 di 1
    • Continue to use the plastic opening tool and separate the front face plate from the rest of the device.

    • There is adhesive that helps attach the front face plate. Some extra prying may be required to separate the face plate, but do not use excessive force.

  5. GoPro Hero3+ Silver Edition Image Sensor Replacement, Image Sensor: passo 5, immagine 1 di 3 GoPro Hero3+ Silver Edition Image Sensor Replacement, Image Sensor: passo 5, immagine 2 di 3 GoPro Hero3+ Silver Edition Image Sensor Replacement, Image Sensor: passo 5, immagine 3 di 3
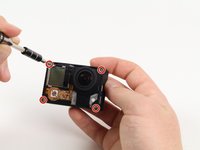
    • Locate the four 8.1mm PH00 screws on the corners of the GoPro and unscrew them using the phillips screwdriver.

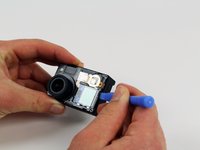
    • Gently remove the motherboard by using a plastic opening tool to pry it out of the housing.

    • Be careful not to damage the ribbon cable connected to the GoPro housing and motherboard.

  6. GoPro Hero3+ Silver Edition Image Sensor Replacement: passo 6, immagine 1 di 2 GoPro Hero3+ Silver Edition Image Sensor Replacement: passo 6, immagine 2 di 2
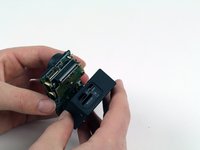
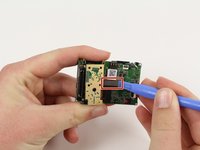
    • Remove the ribbon cable by carefully flipping the black clip up with the plastic opening tool and pulling the cable out.

  7. GoPro Hero3+ Silver Edition Image Sensor Replacement: passo 7, immagine 1 di 1
    • Remove the four 4mm PH00 screws attaching the image sensor to the motherboard with your screwdriver.

  8. GoPro Hero3+ Silver Edition Image Sensor Replacement: passo 8, immagine 1 di 2 GoPro Hero3+ Silver Edition Image Sensor Replacement: passo 8, immagine 2 di 2
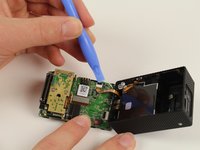
    • Pry off the last ribbon cable with a plastic opening tool.

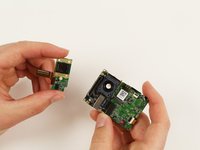
    • Remove the image sensor from the motherboard.

Conclusione

To reassemble your device, follow these instructions in reverse order.

Altre 4 persone hanno completato questa guida.

Team

Cal Poly, Team 5-8, Maness Fall 2015 Membro di Cal Poly, Team 5-8, Maness Fall 2015

CPSU-MANESS-F15S5G8

4 Membri

12 Guide realizzate

0Commenti sulla guida

Aggiungi Commento

Visualizza Statistiche:

Ultime 24 Ore: 0

Ultimi 7 Giorni: 1

Ultimi 30 Giorni: 22

Tutti i Tempi: 814