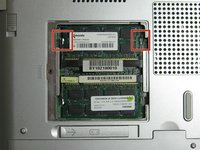
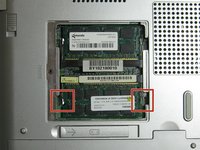
Salta al contenuto principale

Gateway 600YGR RAM Replacement

Cosa ti serve

  1. Gateway 600YGR RAM  Replacement, RAM: passo 1, immagine 1 di 2 Gateway 600YGR RAM  Replacement, RAM: passo 1, immagine 2 di 2
    • Flip the computer over so that the bottom of your device is face up.

  2. Gateway 600YGR RAM  Replacement: passo 2, immagine 1 di 3 Gateway 600YGR RAM  Replacement: passo 2, immagine 2 di 3 Gateway 600YGR RAM  Replacement: passo 2, immagine 3 di 3
    • Use a Philips head screwdriver and the PH1 bit to remove the indicated 5.35mm screw.

    • Remove the cover panel.

  3. Gateway 600YGR RAM  Replacement: passo 3, immagine 1 di 3 Gateway 600YGR RAM  Replacement: passo 3, immagine 2 di 3 Gateway 600YGR RAM  Replacement: passo 3, immagine 3 di 3
    • Locate the indicated tabs on the edges of the top RAM board.

    • Pull the tabs outward and the RAM board will release.

    • Remove the RAM board.

  4. Gateway 600YGR RAM  Replacement: passo 4, immagine 1 di 2 Gateway 600YGR RAM  Replacement: passo 4, immagine 2 di 2
    • Locate the indicated tabs on the edges of the bottom RAM board.

    • Pull the tabs outward.

    • Remove the RAM board.

  5. Gateway 600YGR RAM  Replacement: passo 5, immagine 1 di 2 Gateway 600YGR RAM  Replacement: passo 5, immagine 2 di 2
    • You have now successfully removed the RAM boards.

Conclusione

To reassemble your device, follow these instructions in reverse order.

0 Commenti

Aggiungi Commento

Visualizza Statistiche:

Ultime 24 Ore: 1

Ultimi 7 Giorni: 2

Ultimi 30 Giorni: 6

Tutti i Tempi: 161