Salta al contenuto principale

Garmin Nuvi 1490T Speaker Replacement

Cosa ti serve

  1. Garmin Nuvi 1490T Speaker Replacement, Front Frame Panel: passo 1, immagine 1 di 1
    • Power off your GPS before moving on.

    • Locate the crevice that separates the frame from the body.

  2. Garmin Nuvi 1490T Speaker Replacement: passo 2, immagine 1 di 1
    • Carefully insert the plastic prying tool into the crevice to separate the frame from the body.

    • Applying excessive force can lead to a damaged or scratched display screen.

  3. Garmin Nuvi 1490T Speaker Replacement: passo 3, immagine 1 di 2 Garmin Nuvi 1490T Speaker Replacement: passo 3, immagine 2 di 2
    • Slide the plastic prying tool around the perimeter to completely remove the frame.

  4. Garmin Nuvi 1490T Speaker Replacement, Second Frame Panel: passo 4, immagine 1 di 3 Garmin Nuvi 1490T Speaker Replacement, Second Frame Panel: passo 4, immagine 2 di 3 Garmin Nuvi 1490T Speaker Replacement, Second Frame Panel: passo 4, immagine 3 di 3
    • Remove the four 11.0 mm screws using the Torx T5 screwdriver.

  5. Garmin Nuvi 1490T Speaker Replacement: passo 5, immagine 1 di 3 Garmin Nuvi 1490T Speaker Replacement: passo 5, immagine 2 di 3 Garmin Nuvi 1490T Speaker Replacement: passo 5, immagine 3 di 3
    • Using the plastic prying tool, dislodge the frame from the body of the device.

    • Using your hands, completely disconnect the frame from the body.

    • Set the pieces of the frame aside.

  6. Garmin Nuvi 1490T Speaker Replacement, Speaker: passo 6, immagine 1 di 2 Garmin Nuvi 1490T Speaker Replacement, Speaker: passo 6, immagine 2 di 2
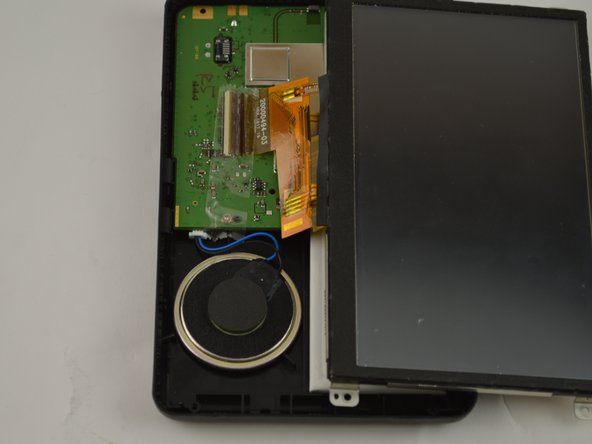
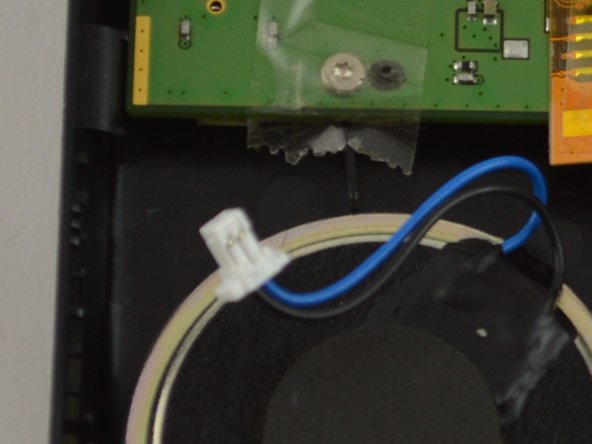
    • Carefully move the display out of the way of the speaker revealing the blue and black cord from the speaker.

  7. Garmin Nuvi 1490T Speaker Replacement: passo 7, immagine 1 di 2 Garmin Nuvi 1490T Speaker Replacement: passo 7, immagine 2 di 2
    • Using tweezers, gently clamp onto the white plastic end of the speaker connector.

    • Remove it by pulling slightly towards the speaker.

  8. Garmin Nuvi 1490T Speaker Replacement: passo 8, immagine 1 di 3 Garmin Nuvi 1490T Speaker Replacement: passo 8, immagine 2 di 3 Garmin Nuvi 1490T Speaker Replacement: passo 8, immagine 3 di 3
    • Wedge a nylon spudger into the crevice to begin to dislodge it from the body.

    • When working with electronics, it's important to choose a tool that's ESD-safe to avoid accidental damage to the device. The metal spudger is great when you need serious prying power, but the regular black nylon spudger or a plastic opening tool should be used whenever possible.

    • Slide the tool around the perimeter to fully dislodge the speaker.

Conclusione

To reassemble your device, follow these instructions in reverse order.

Ricardo Solis

Membro da: 01/20/16

1.037 Reputazione

6 Guide realizzate

Team

USF Tampa, Team 15-2, Remmell Spring 2016 Membro di USF Tampa, Team 15-2, Remmell Spring 2016

USFT-REMMELL-S16S15G2

4 Membri

6 Guide realizzate

0 Commenti

Aggiungi Commento

Visualizza Statistiche:

Ultime 24 Ore: 3

Ultimi 7 Giorni: 4

Ultimi 30 Giorni: 5

Tutti i Tempi: 250