Introduzione
If the battery is not holding a charge as long as it should, or is failing to charge at all, use this guide to replace the battery. You will need a T6 Torx screwdriver, a T5 Torx screwdriver, and a spudger.
Cosa ti serve
-
-
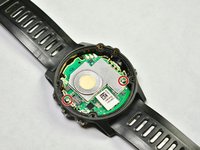
Use a T6 screwdriver to remove the five 1.7 mm screws from the watch face.
-
-
-
-
Set the watch face aside.
-
-
Attrezzo utilizzato in questo passaggio:Tweezers$4.99
-
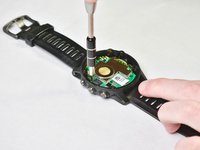
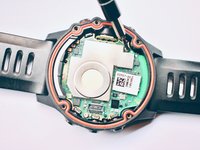
Use a T5 screwdriver to remove the two silver 1.4 mm screws from the motherboard.
-


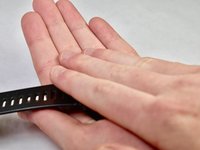
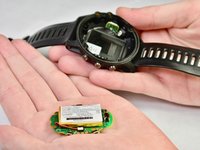

To reassemble your device, follow these instructions in reverse order.
To reassemble your device, follow these instructions in reverse order.
Annulla: non ho completato questa guida.
Altre 18 persone hanno completato questa guida.
Team

Appalachian State University, Team S1-G3, Menagarishvili Fall 2018 Membro di Appalachian State University, Team S1-G3, Menagarishvili Fall 2018
APSU-MENAGARISHVILI-F18S1G3
3 Membri
8 Guide realizzate
32Commenti sulla guida
Ruined my watch… The battery connection socket ripped off with the battery connector…
I have taken apart phones and laptops in the past without issue, so I am not inexperienced by any means. I was as careful as possible.
Sounds like it may have had a factory defect. I did the same fix and it worked fine, just like any other computer or phone.
Excellent guide - thanks! My Fenix3 wasn't charging any more so following your guide I replaced the ‘dead’ battery with a new one with ease. However, when reassembled, the new battery worked but would not charge. I took it apart again, and found slight corrosion or gunk on the motherboard terminals where they contact the inner side of the charging pins. After a good clean with meths and a cotton bud I popped the original battery back in, reassembled it, and hey presto! it started charging! Very happy!
I appreciate the guide as my Fenix 3 after 6 years of owning it could barely make it 24 hours without charging it.
The only thing I’d add to the guide is that you can reuse the adhesive from the existing battery as it’s only double-sided tape. Other than, it went flawless!
Thanks for this. Just did it successfully. A quick note, when you are separating the battery from the motherboard, it pulls up/perpendicular to the device and not parallel to it as I had initially thought. Luckily I did not break the battery connector to the motherboard. When I put it back in I needed to push it towards the motherboard to properly seat it. Look closely to make sure no part of the connector is sticking up, even a hair or it will not work.
Worked perfectly! Thanks a lot
Nice guide, thanks. However after battery replacement the watch dont switch on anymore. When it is connected to the charger appear on the screen battery 100% and time but, when I disconnect it stay off and dont react to the buttons commands. Anyone knows what could be happen? Thanks a lot
Mine does the exact same thing. It no longer turns on. It says battery 100% on charger but as soon as I remove it from charger it turns off again and won’t turn on.
I noticed some glitching happening after I changed my battery. In my case, loosening the T5 screws that hold the motherboard worked (I guess I had too tight). Good luck!
I have the same issue, did anyone find a solution to the not turning on and 100% on charger issue?
Mike P -
I found that my issue was not the battery at all. It was the speaker. I put some kapton tape over the connectors to isolate it and it was fine after. No speaker though.
The battery I received from iFixit doesn’t work. When I tried it, the watch does not turn on. When I put watch in the charger it comes on and says "Battery 100%” but as soon is it’s unplugged from the charger it turns off again and is unresponsive. I put the old garmin battery back in and it works again. Will be returning replacement battery to ifixit.
Aloha! Not difficult at all. Thanks for the great instructions and pictures. I’d add one note: when putting the T5 screws back on the motherboard make sure they are not too tight! My watch started glitching and showing the logo randomly. I reopen the watch and loosen it a quarter turn and it is working fine now. Also, I did not pull the screen ribbon but was careful and it worked fine.
I had a very similar issue but I think it was because the speaker was faulty. I isolated the contacts with kapton tape and it works 100% now. You mileage may vary. I think that was the initial issue all along.
Garbage, now watch doesn't work at all. Build computers for fun/hobby, whomever classified this as an easy repair is full of it. Both removing the battery and trying to reattach the ribbon cable are extremely difficult. Now that I am done, nothing, no screen, doesn't work period. Thanks for taking my money, wasting my time and lying about the ease of use of your product.
I had a similar issue but I think it was the speaker all along that had a fault. I isolated it from the motherboard with some kapton tape and it works now, just no speaker.
Top job. reiterating the above comments of Michael Reid re battery plug removal/replacement and suggesting the guide would be flawless by adding the above comments at the appropriate picture. I experienced the "100% charging issue and failure to turn on" following my first reassembly but on reopening it is was clear i had left the battery connector plug not quite seated.Thanks very much.
Easy to follow. Fixed my watch.
Thanks a lot. I opend my Fenix 3 HR and cleaned the start button with contact spray and wd40, and the clock works.
I do not think WD- 40 is good for this purpose. I think it is rather corrosive?
The critical part where you are supposed to disconnect the display from the press fit connector is described very poorly. I ripped off even the underlying connector which was attached to the motherboard so now I need to get even new motherboard...
Is there a requirement for a new seal for waterproofing when reassembling.. I only bought this for th ebattery life and the 100m water resistance.
Also is there a higher capacity battery avaialble? Should you use a genuine battery from Garmin, sa Im sick of cheapo copied batteries being useless.
It is just a crushed O ring. As long as the surfaces are clean and clear of debris and there is no break in the O ring it should be fine. I put a little bit of Vaseline on my O ring, just rubbed some on my fingers and then very lightly went over the O ring. It may degrade the O ring over time but I think it should help to seal for now.
What is secret to reattaching the Face Ribbon to mother board ?
Being very careful? You may have damaged it if it is not reconnecting.
I wonder: is it still fully water-resistant after replacing the battery??
Should be if you made sure all the sealing surfaces were very clean and smooth. It would also not be too bad of an idea to put some kind of lubricant on the O ring. I used Vaseline but it may eat away the O ring after some time. I just lightly put some on my fingers and then lightly put it on the O ring. I also took apart the buttons and cleaned and lubed those O rings too.
Bloody excellent. Thank you so much. The advice about the 100% and poor battery connection was crucial.
I've dropped the watch too many times and this was happening. I probably didn't need the new battery and was just a bad connection
No harm though having a new battery. Thank you.
Before I started watch wasn't coming on at all. After following the steps and replacing the battery, the watch now comes on when on charger but only shows word "Garmin" for a few seconds, then goes off, and comes back again with "Garmin" like a constant on / off reboot.
There was no doublesided for the battery, so I just sat that inside the case. Could that be the issue?
Any tips?
A good guide for those needing to know what's inside. I was glad for the explanation of removing the battery connector. I've worked on a lot of small electronics and it's the first time I've seen that lifting type connector. Otherwise, this repair is straightforward if you take your time. That's especially true for the gasket. Ensure it's in the groove and make sure there's no dirt where the gasket will touch.
Seating the display connector is difficult for people that aren't familiar with that type of connection. Just roughly align it then with a fingertip, slide it around until you feel it fall in. Then push gently until you feel the connection being made. Afterwards take a plastic spudger and gently press down to fully seat the connector.
The battery I ordered was slightly thicker than the original but on my Fenix 3, there was enough room to fit it in.
My Fenix 3 has lasted 10 years and is still a great watch. So thanks for this because there's no need to replace it just because the battery was only lasting a few days at a time. I ordered a replacement battery and completed the task in about 1/2 hour of careful work. The hardest part was disconnecting the battery. Mine didn't come out easily but I got it to it pop out by pulling straight up with tweezers while I held the battery connector socket down with my fingernail. I was leery because the first commenter had his break off.