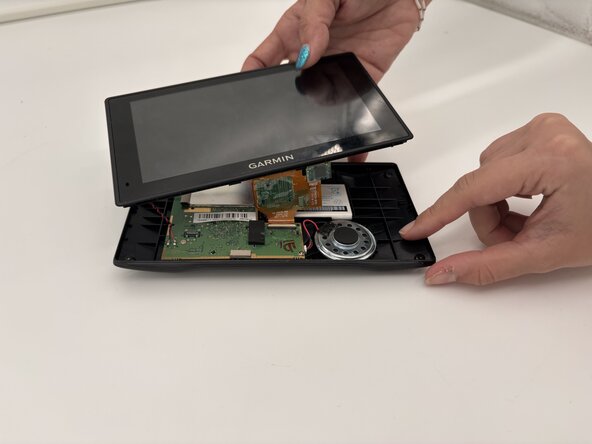
Salta al contenuto principale

Garmin DriveSmart 60 LMT Power Button Replacement

Cosa ti serve

  1. Garmin DriveSmart 60 LMT Power Button Replacement, Rear Case: passo 1, immagine 1 di 2 Garmin DriveSmart 60 LMT Power Button Replacement, Rear Case: passo 1, immagine 2 di 2
    • Use a T4 Torx screwdriver to remove the four 6.3 mm-long screws that secure the rear case.

  2. Garmin DriveSmart 60 LMT Power Button Replacement: passo 2, immagine 1 di 2 Garmin DriveSmart 60 LMT Power Button Replacement: passo 2, immagine 2 di 2
    • Insert a plastic opening tool into the seam between the rear case and chassis.

    • Pry around the perimeter until the rear case fully releases.

    • Take your time and work slowly to avoid damaging the clips or the casing.

    • Remove the rear case.

  3. Garmin DriveSmart 60 LMT Power Button Replacement: passo 3, immagine 1 di 2 Garmin DriveSmart 60 LMT Power Button Replacement: passo 3, immagine 2 di 2
    • Use a spudger to gently disconnect the black and red wires (ZIF connector) from the socket on the screen assembly. Take care not to pull on the wires or damage the connector.

  4. Garmin DriveSmart 60 LMT Power Button Replacement: passo 4, immagine 1 di 2 Garmin DriveSmart 60 LMT Power Button Replacement: passo 4, immagine 2 di 2
    • Gently lift the white clamp to release the ZIF Connector, which is the orange ribbon cable, and carefully unsnap it from the connector.

    • Avoid using too much force to prevent damage to the ribbon or the clamp.

  5. Garmin DriveSmart 60 LMT Power Button Replacement, Power Button: passo 5, immagine 1 di 2 Garmin DriveSmart 60 LMT Power Button Replacement, Power Button: passo 5, immagine 2 di 2
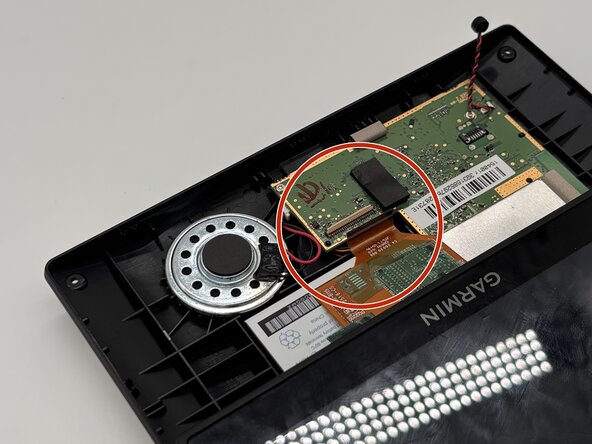
    • Using a plastic spudger, gently disconnect the black and red wires (ZIF connector) from the socket on the screen assembly. Take care not to pull on the wires or damage the connector.

  6. Garmin DriveSmart 60 LMT Power Button Replacement: passo 6, immagine 1 di 2 Garmin DriveSmart 60 LMT Power Button Replacement: passo 6, immagine 2 di 2
    • Gently lift the white clamp to release the ZIF Connector, which is the orange ribbon cable, and carefully unsnap it from the connector.

    • Avoid using too much force to prevent damage to the ribbon or the clamp.

  7. Garmin DriveSmart 60 LMT Power Button Replacement: passo 7, immagine 1 di 2 Garmin DriveSmart 60 LMT Power Button Replacement: passo 7, immagine 2 di 2
    • Unscrew the four 5 mm Phillips screws and gently lift the motherboard up.

    • Be careful when unscrewing and removing the motherboard to avoid damaging the device.

  8. Garmin DriveSmart 60 LMT Power Button Replacement: passo 8, immagine 1 di 2 Garmin DriveSmart 60 LMT Power Button Replacement: passo 8, immagine 2 di 2
    • Remove the power button.

Conclusione

To reassemble your device, follow these instructions in reverse order.

Un'altra persona ha completato questa guida.

0Commenti sulla guida

Aggiungi Commento

Visualizza Statistiche:

Ultime 24 Ore: 0

Ultimi 7 Giorni: 6

Ultimi 30 Giorni: 17

Tutti i Tempi: 60