Salta al contenuto principale

GameSir T4 Pro Directional Pad Replacement

Cosa ti serve

  1. GameSir T4 Pro Directional Pad Replacement, Battery: passo 1, immagine 1 di 1
    • Using the Phillips 1 screwdriver, gently turn the screw to the left (repeat this step until all four screws are taken out).

  2. GameSir T4 Pro Directional Pad Replacement: passo 2, immagine 1 di 1
    • Use your iFixit opening tool to break the seam of the back of your controller.

    • Be careful when pulling apart, as the charging port wires are connected to both sides of the controller.

  3. GameSir T4 Pro Directional Pad Replacement: passo 3, immagine 1 di 1
    • Using the plastic spudger, wiggle the connection out of place.

  4. GameSir T4 Pro Directional Pad Replacement: passo 4, immagine 1 di 1
    • Apply a slow, but consistent pull to the old 600 maH battery.

    • Attach new battery onto the pad.

  5. GameSir T4 Pro Directional Pad Replacement, Directional Pad: passo 5, immagine 1 di 2 GameSir T4 Pro Directional Pad Replacement, Directional Pad: passo 5, immagine 2 di 2
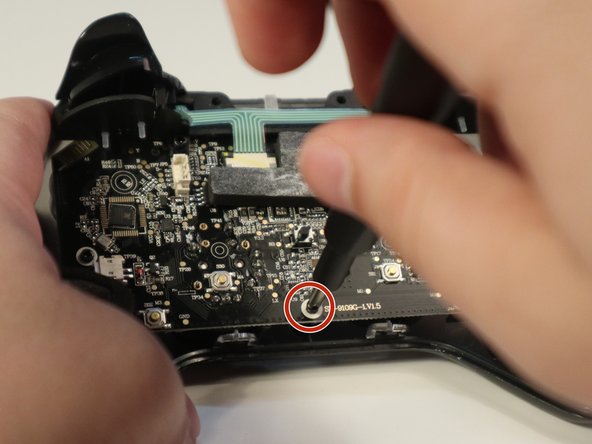
    • To get to the directional pad (d-pad), remove the three 5mm screws on the motherboard.

  6. GameSir T4 Pro Directional Pad Replacement: passo 6, immagine 1 di 1
    • Disconnect all white connectors from the motherboard.

  7. GameSir T4 Pro Directional Pad Replacement: passo 7, immagine 1 di 1
    • Carefully pull the motherboard away to reveal the front panel.

  8. GameSir T4 Pro Directional Pad Replacement: passo 8, immagine 1 di 1
    • Remove the d-pad from the front panel.

  9. GameSir T4 Pro Directional Pad Replacement: passo 9, immagine 1 di 1
    • Place your new d-pad in place.

Conclusione

To reassemble your device, follow these instructions in reverse order.

Altre 2 persone hanno completato questa guida.

0 Commenti

Aggiungi Commento

Visualizza Statistiche:

Ultime 24 Ore: 0

Ultimi 7 Giorni: 7

Ultimi 30 Giorni: 33

Tutti i Tempi: 699