Salta al contenuto principale

Game Boy Pocket Power Button Replacement

Cosa ti serve

  1. Game Boy Pocket Power Button Replacement, Remove the external screws: passo 1, immagine 1 di 3 Game Boy Pocket Power Button Replacement, Remove the external screws: passo 1, immagine 2 di 3 Game Boy Pocket Power Button Replacement, Remove the external screws: passo 1, immagine 3 di 3
    • Place the Game Boy Pocket face-down on a clean, flat surface.

    • Use a Y1 tri-wing screwdriver and turn counterclockwise to remove the four external screws.

    • Use a Y1 tri-wing screwdriver and turn counterclockwise to remove the two screws inside the battery compartment.

  2. Game Boy Pocket Power Button Replacement, Open the device: passo 2, immagine 1 di 3 Game Boy Pocket Power Button Replacement, Open the device: passo 2, immagine 2 di 3 Game Boy Pocket Power Button Replacement, Open the device: passo 2, immagine 3 di 3
    • Place your hands on the front and back covers of the Game Boy Pocket, and carefully separate the device.

    • Set the back cover aside. You will need it to reassemble the device.

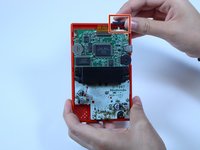
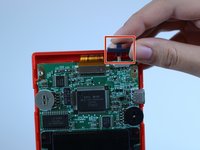
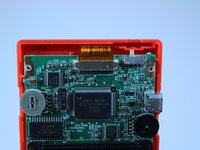
  3. Game Boy Pocket Power Button Replacement, Remove the power button: passo 3, immagine 1 di 3 Game Boy Pocket Power Button Replacement, Remove the power button: passo 3, immagine 2 di 3 Game Boy Pocket Power Button Replacement, Remove the power button: passo 3, immagine 3 di 3
    • Use your fingers to remove the grey power button to the right of the ribbon cable.

Conclusione

To reassemble your device, follow these instructions in reverse order.

Un'altra persona ha completato questa guida.

Adriana Rahrig

Membro da: 10/07/14

1.523 Reputazione

5 Guide realizzate

Team

USF Tampa, Team 1-1, Leahy Fall 2014 Membro di USF Tampa, Team 1-1, Leahy Fall 2014

USFT-LEAHY-F14S1G1

4 Membri

13 Guide realizzate

0 Commenti

Aggiungi Commento

Visualizza Statistiche:

Ultime 24 Ore: 1

Ultimi 7 Giorni: 9

Ultimi 30 Giorni: 35

Tutti i Tempi: 3,678