Introduzione
Questa guida fornisce le istruzioni passo passo per rimuovere e sostituire la batteria del Galaxy Tab S 10.5.
Cosa ti serve
-
-
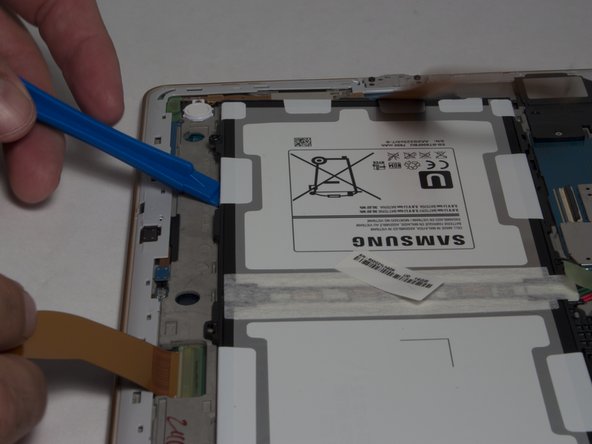
Infila lo strumento di apertura in plastica nel lettore delle schede SD o nella porta di carica.
-
Fai leva verso l'alto finché non vedi una fessura tra il tablet e la copertura posteriore.
-
-
-
Fai scorrere lo strumento di apertura in plastica sotto tutti i bordi del dispositivo.
Both plastic tools broke within the first two minutes of use. Had to resort to a narrow conventional flat screwdriver.
-
-
-
Rimuovi la copertura posteriore dopo aver rilasciato tutti i ganci.
I’ve taken the back cover off my Samsung tablet, and in the process I have torn one of the little orange plastic connectors that are attached to the back cover. The connector I’ve damaged is the second one in on top left in the picture above. Can you please tell me if I need to replace this before I can get the tablet to work?
Thanks.
If you remove just the back cover - which to the uninitiated does look less scary than trying to get between the bezel and the display - you will destroy the tiny plastic rivets that lock the cover onto the bezel. More importantly, you will then find that getting to the parts you need to replace is rendered impossible because they will be hidden under the bezel, which of course will still be in place. So the correct way to take this tablet apart is the more challenging way i.e. separate the front display from the bezel and rear. But with care and the right tools this is still not too difficult. And if you are in any doubt about this, it is worth pointing out that in all of the photos below from Step 4 onwards, the work shown is taking place with the bezel removed. There is nothing written in this guide to indicate that this had to be done.
Have just gone through this process, successfully having read this and other guides and I totally agree with PhilipHN that the most reliable is the slightly scarier approach of removing the front display from the bezel and rear. It is easier overall, you just have to attack it confidently (but gently!).
-
-
-
-
Usando delle pinzette, separa il nastro adesivo verde dai connettori ZIF dei due cavi a nastro neri.
-
Usa uno strumento di apertura in plastica per sollevare i ganci in plastica sui connettori ZIF.
The ZIF connector on the angled ribbon literally fell apart when the tape was gently removed. Im wondering if that was my “battery" poem in the first place. Can that ZIF connector be replaced? If so, where do I order it? No problem with the other connector or replacing the battery, but it won't work with this broken connector,
-


Per rimontare il tuo dispositivo, segui le istruzioni in ordine inverso.
Per rimontare il tuo dispositivo, segui le istruzioni in ordine inverso.
Annulla: non ho completato questa guida.
Altre 82 persone hanno completato questa guida.
Un ringraziamento speciale a questi traduttori:
100%
Daniele Carminati ci sta aiutando ad aggiustare il mondo! Vuoi partecipare?
Inizia a tradurre ›
Team

USF Tampa, Team 3-2, Eyestone Fall 2015 Membro di USF Tampa, Team 3-2, Eyestone Fall 2015
USFT-EYESTONE-F15S3G2
3 Membri
20 Guide realizzate
19 Commenti
where is a good place to buy a replacement battery?
Artículo muy positivo: pasos muy bien detallados. Me ha resultado fácil la el cambio de batería. Gracias por tu colaboración.
Bought mine off of ebay
Good guide, my tablet only had 4 screws. Battery connector plug has to be lifted from the board vertically.
As replacement battery had similar manufactures date will have to see if it lasts longer. purchased my replacement from https://www.amazon.co.uk/gp/product/B00U...
Update, suggested battery has lasted a week in standby so strongly recommend at £15 paid
My battery only had 4 screws also. Should show a bit more on disconnecting the final cable, I could see some people yanking too hard.
Another side note concerning the final battery cable connection, I could see some people yanking too hard by figuring they had to pull it out of it’s socket. Don’t do that. Just lift the cable straight up at a 90 degree angle (gently), and it will disengage from the socket. I thought it was pushed in, wrong, it connects at an angle, then snaps down into place.
Hi, switched out battery and charging port. Put everything back together. After the new battery charged, everything is working except the ‘back' and ‘multiwindow’ icons on either side of the button that changes s c reen, takes you back to your home page. What do you think happened, what do I need to look for to fix this when I take my Tab S apart?
Thanks
Battery Giant sells, installs and provides excellent service.
I highly recommend them.
Hi, my Tab S 10.5 got dicharged, and turned off as it should when any device gets discharged. Next day I recharge my tab, any now the screen is no more responding. The home, Recent App and Back bottons are working, but the touch screen is no more responding, so I can not even slide on the screen to unlock the Tab.
PS: my tab did not even feld down. Have been very carefull from when I got it.
Any idea what it can be?? Can it be related to the MotherBoard or the screen itself?? Its
Excellent and easy to follow. I have an old Galaxy Tab S10 (bought it about four years ago) the device was so drained the battery refused to charge. I saw on a technical site that the problem can be solved by disconnecting the battery, waiting 30 seconds and reassembling. I followed your detailed instructions successfully disassembled and reassembled the device. And it now charges!
Thanks to your Fixit walk-through I was able to easily and quickly repair my Galaxy Tab S10
Très bon tuto facile à suivre. Attention en déconnectant la batterie à bien la soulever pour sortir le connecteur, cela aurait mérité une explication.
OK
explications et photos parfaiites.changement de batterie réalisée en 20’ et réussie;
Merci
Jean
Hat prima geklappt, tolle Anleitung. Vielen Dank.
Dose the battery connection come off battery or off tablet hard board, please help ernie
Mit entsprechendem Werkzeug und manuellem Geschick kein Problem