Salta al contenuto principale

Cosa ti serve

Questo smontaggio non è una guida di riparazione. Per riparare il tuo GG TR16 R4, usa il nostro manuale di assistenza.

  1. G&G TR16 R4 Airsoft Disassembly, G&G TR16 R4 Airsoft Disassembly: passo 1, immagine 1 di 3 G&G TR16 R4 Airsoft Disassembly, G&G TR16 R4 Airsoft Disassembly: passo 1, immagine 2 di 3 G&G TR16 R4 Airsoft Disassembly, G&G TR16 R4 Airsoft Disassembly: passo 1, immagine 3 di 3
    • Before disassembling your AEG (Automatic Electric Gun), it is strongly advised to release spring tension to disassemble the gearbox easier.

    • Normally, this would be done by shooting the gun twice on semi-auto, but TopTech AEG's have a spring release in the form of a forward assist. That is more effective.

    • Press down on the forward assist button as shown

  2. G&G TR16 R4 Airsoft Disassembly: passo 2, immagine 1 di 3 G&G TR16 R4 Airsoft Disassembly: passo 2, immagine 2 di 3 G&G TR16 R4 Airsoft Disassembly: passo 2, immagine 3 di 3
    • This step is for those who wish to remove the front rail system, which is unnecessary for the following steps, but still good to know.

    • To remove the front rail system, first remove the 3mm hex screw on the top of the rail.

    • Next, pull back on the Delta-Ring as shown in the third picture. Remove the lower section of the rail first and then the upper section of the rail.

  3. G&G TR16 R4 Airsoft Disassembly: passo 3, immagine 1 di 3 G&G TR16 R4 Airsoft Disassembly: passo 3, immagine 2 di 3 G&G TR16 R4 Airsoft Disassembly: passo 3, immagine 3 di 3
    • First remove stock rubber pad by pinching the tabs on either side of the stock.

    • Remove the battery mount and the end cap of the stock.

    • Press down on stock adjustment lever and pull the stock off the buffer tube.

  4. G&G TR16 R4 Airsoft Disassembly: passo 4, immagine 1 di 2 G&G TR16 R4 Airsoft Disassembly: passo 4, immagine 2 di 2
    • In order to remove upper receiver, you must first push out the body pins. (The body pins do not come all the way out.)

    • It is recommended to use a punch that is slightly smaller than the body pin. Once the body pin is sticking out half way you should be able to pull it the rest of way by hand.

    • Do not remove the pin completely. The pins are meant to stay attached to the body body so they wont get lost or fall out on their own.

  5. G&G TR16 R4 Airsoft Disassembly: passo 5, immagine 1 di 2 G&G TR16 R4 Airsoft Disassembly: passo 5, immagine 2 di 2
    • You can now slide the upper receiver forward. It may take some pulling to get it to move.

    • Attention: Although it is easier to pull the receiver off with the dust cover in the open position, avoid the dust cover colliding with the extended body pin as shown by the square marker. The open dust cover will prevent you from moving the receiver forward and could potentially bend the body pins with excessive force.

    • After this step, the spring and charging handle might fall off, which is okay.

  6. G&G TR16 R4 Airsoft Disassembly: passo 6, immagine 1 di 2 G&G TR16 R4 Airsoft Disassembly: passo 6, immagine 2 di 2
    • Now that the upper receiver is off you can now take off the charging handle and spring if they haven't come off already.

    • You can also remove the Hop-up unit and barrel from the upper receiver. For hop-up break down you can go to step 10 of G&G CM16 Carbine Airsoft Disassembly

  7. G&G TR16 R4 Airsoft Disassembly: passo 7, immagine 1 di 3 G&G TR16 R4 Airsoft Disassembly: passo 7, immagine 2 di 3 G&G TR16 R4 Airsoft Disassembly: passo 7, immagine 3 di 3
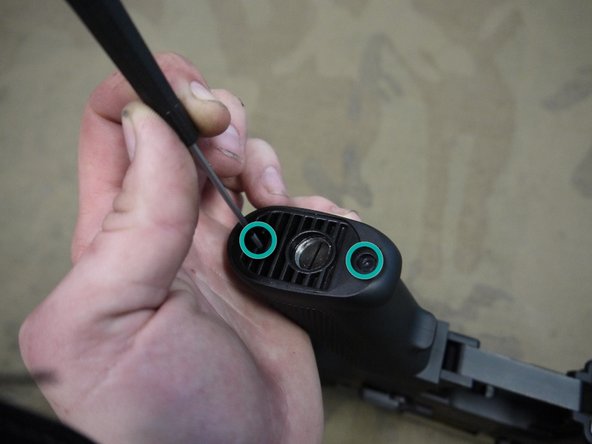
    • With the stock off, look down the Buffer-tube. You will see a large Philips screw which needs to be removed with a long screw driver.

    • With the screw removed, slide the buffer-tube far enough to expose the wire connectors in between the tube and body of the gun.

    • Grab the wires on either side of the connectors and pull the connectors apart.

  8. G&G TR16 R4 Airsoft Disassembly: passo 8, immagine 1 di 3 G&G TR16 R4 Airsoft Disassembly: passo 8, immagine 2 di 3 G&G TR16 R4 Airsoft Disassembly: passo 8, immagine 3 di 3
    • With the wiring connectors separated and the buffer-tube removed, the sling adapter should slide right off.

    • You can now take off the bolt catch release by taking a thin punch and pushing the pin completely out as shown. The release should come right out after the pin is removed.

    • Doing so will make it far easier to remove the magazine release.

  9. G&G TR16 R4 Airsoft Disassembly: passo 9, immagine 1 di 3 G&G TR16 R4 Airsoft Disassembly: passo 9, immagine 2 di 3 G&G TR16 R4 Airsoft Disassembly: passo 9, immagine 3 di 3
    • The Magazine release of TopTech m4's come out just like a real M4 firearm.

    • Start by pushing the magazine release button into the receiver, so that the catch section on the other side of the gun is protruding as far outward as possible.

    • Then turn the Magazine catch (the long part sticking out) counter-clockwise wile keeping the button stationary, which will unscrew the button from the catch.

    • Warning: sometimes the button piece can fly off once unscrewed. Slowly ease off the pressure to prevent losing the button or the spring.

  10. G&G TR16 R4 Airsoft Disassembly: passo 10, immagine 1 di 2 G&G TR16 R4 Airsoft Disassembly: passo 10, immagine 2 di 2
    • With magazine catch/release out, you can start by removing the bottom plate on the grip.

    • Grab a 2mm Hex driver and begin removing the 2 small screws.

    • With the Hex screws remove the bottom plate with a set of needle-nose pliers

  11. G&G TR16 R4 Airsoft Disassembly: passo 11, immagine 1 di 3 G&G TR16 R4 Airsoft Disassembly: passo 11, immagine 2 di 3 G&G TR16 R4 Airsoft Disassembly: passo 11, immagine 3 di 3
    • With the bottom plate removed you will see the back of the motor. Unlike other AEG's there is NO small disk to worry about.

    • Grab the the motor connectors with the pliers by their base(where the wire and connector meets) and pull the red and then the black connectors off the motor contacts.

    • Next, pull the motor out of the grip either with pliers or a long thin tool.

  12. G&G TR16 R4 Airsoft Disassembly: passo 12, immagine 1 di 2 G&G TR16 R4 Airsoft Disassembly: passo 12, immagine 2 di 2
    • Unscrew the 2 Philip screws at the bottom of the hand grip.

    • It is often easier for re-assemble if the screws are left in the grip especially when using non-magnetized tools

    • Now pull the grip off the wile making sure the connectors do not get stuck.

  13. G&G TR16 R4 Airsoft Disassembly: passo 13, immagine 1 di 2 G&G TR16 R4 Airsoft Disassembly: passo 13, immagine 2 di 2
    • With the grip off grab a thin punch push the small thin body pin out if see the textured end of the body pin coming out then you are doing it correctly.

    • The thin body pin needs to come completely out of the gun.

    • Next push the large rear body pin to the outward position. This pin is not as hard to push as it's forward counter part and can usually be done by hand. Do not try and push it out completely.

  14. G&G TR16 R4 Airsoft Disassembly: passo 14, immagine 1 di 1
    • Next switch the gun fire mode to safe if it is not already and begin to push the gearbox out of the receiver.

    • You may need to switch the selector back and forth between safe and semi auto to push out the gearbox. The gearbox should be able to be push slightly forward and then up out of the receiver.

    • You can grab the from the top and push the gearbox out from the bottom where the pistol grip was.

    • With the gearbox out the selector indicator on the right side of the gun should fall right out.

  15. G&G TR16 R4 Airsoft Disassembly: passo 15, immagine 1 di 2 G&G TR16 R4 Airsoft Disassembly: passo 15, immagine 2 di 2
    • Now remove the the selector link piece by putting a tool underneath long section shown and prying it upward.

  16. G&G TR16 R4 Airsoft Disassembly: passo 16, immagine 1 di 2 G&G TR16 R4 Airsoft Disassembly: passo 16, immagine 2 di 2
    • The next task is to remove the fake bolt.

    • Start by removing the C clip as shown. you may need to use a pick to pry it off.

    • After the clip is remove slide the fake bolt all the way back. With the bolt in the rear position press the fake bolt parts that still attached slightly up.

    • Use a pick to pry the bolt linking section out of the blow back cylinder on both sides.

    • Careful not too bend the fake bolt as it can harm its functionality.

    • Next remove the retaining strap by using a punch in the little notch shown in Yellow and punch off the retaining strap off the back of the gearbox.

  17. G&G TR16 R4 Airsoft Disassembly: passo 17, immagine 1 di 3 G&G TR16 R4 Airsoft Disassembly: passo 17, immagine 2 di 3 G&G TR16 R4 Airsoft Disassembly: passo 17, immagine 3 di 3
    • With the retaining strap off you can now use the same punch on the area shown to remove the blow-back housing.

    • Afterwords the cylinder piece shown in the second picture can be simple poled off.

    • Then pull off the hop up gasket (the green rubber piece) just so it wont get lost.

  18. G&G TR16 R4 Airsoft Disassembly: passo 18, immagine 1 di 1
    • Now comes the easy part. Remove the 5 shiny screws shown.

    • On the old TopTech AEG's these screws will be 2mm Hex and on the new line they will be standard Philips screws.

    • Start wit the screws that are at each end and work your way to the middle.

  19. G&G TR16 R4 Airsoft Disassembly: passo 19, immagine 1 di 3 G&G TR16 R4 Airsoft Disassembly: passo 19, immagine 2 di 3 G&G TR16 R4 Airsoft Disassembly: passo 19, immagine 3 di 3
    • With the screws removed take a long thin screw driver and insert it into the back hole of the gearbox. This will prevent parts from shooting out when removing the shell.

    • You can now us your finger nails and separate both sides of of the gearbox shell and pull the top half of the gearbox off.

    • Next remove the spring and spring guide by lift the spring guide up and out of the gearbox. Then take out the cylinder and connected parts to have access to the gears.

  20. G&G TR16 R4 Airsoft Disassembly: passo 20, immagine 1 di 2 G&G TR16 R4 Airsoft Disassembly: passo 20, immagine 2 di 2
    • first pictures shows all the terms for internals to help with future steps. Note Some parts will look a little different.

    • Now remove the gears without removing the little washers (or shims as there called in the airsoft industry). Check to see if there are shims left on the bearings and put them back on the gear it came off of.

    • Warning: Do no misplace the shims as they have very exact placement within the gearbox.

    • Shimming or the practice of placing shims on each gear can a complicated and tedious process recommend for those with previous airsoft technical experience. G&G AEG Shimming Guide Airsoft guide is avalable if would like to learn this process.

    • With the gears removed you can now remove the anti-reversal latch and spring. Careful not to loose the anti-reversal latch spring as its small size makes it easy to misplace.

  21. G&G TR16 R4 Airsoft Disassembly: passo 21, immagine 1 di 2 G&G TR16 R4 Airsoft Disassembly: passo 21, immagine 2 di 2
    • If you choose you can also remove the trigger and wiring.

    • The trigger can be poled right out and the switch/wiring harness can be removed by taking out the small screw just under the trigger.

    • Congratulations you have completed taking a TR16 R4 completely apart.

101 Tech USA

Membro da: 08/06/12

4.127 Reputazione

17 Guide realizzate

2 Commenti

Do you have any suggestions about any particular internal components that should be upgraded?

Juan Diaz Hernandez - Replica

so what dose the button do on my right hand side it is a gray button

Justin Teresi - Replica

Aggiungi Commento

Visualizza Statistiche:

Ultime 24 Ore: 0

Ultimi 7 Giorni: 7

Ultimi 30 Giorni: 21

Tutti i Tempi: 18,822