Salta al contenuto principale

Fujifilm X-M1 LCD Screen Replacement

Cosa ti serve

  1. Fujifilm X-M1 LCD Screen Replacement, Battery: passo 1, immagine 1 di 2 Fujifilm X-M1 LCD Screen Replacement, Battery: passo 1, immagine 2 di 2
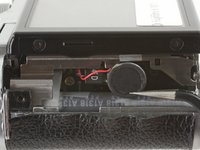
    • Turn the camera upside down to locate the battery compartment.

    • Slide the button up to open the compartment.

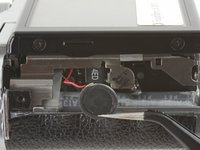
    • Slide the orange button up to release the battery.
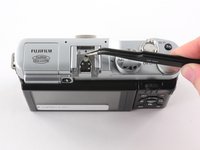
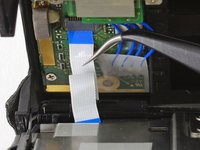
    • The battery is not shown in these photos.

  2. Fujifilm X-M1 LCD Screen Replacement, Lens Assembly: passo 2, immagine 1 di 3 Fujifilm X-M1 LCD Screen Replacement, Lens Assembly: passo 2, immagine 2 di 3 Fujifilm X-M1 LCD Screen Replacement, Lens Assembly: passo 2, immagine 3 di 3
    • Twist the lens cap to remove it from the camera.

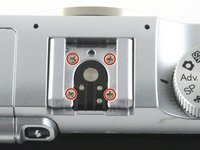
    • Remove the six 6.5 mm Phillips screws from the front of the lens assembly.

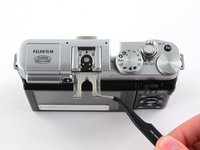
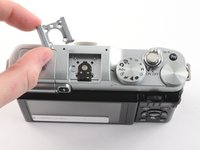
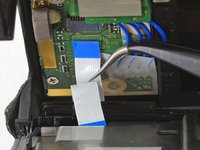
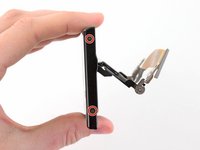
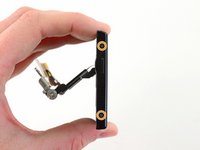
    • Use tweezers to remove the top metal ring and the thin metal ring below it .

  3. Fujifilm X-M1 LCD Screen Replacement: passo 3, immagine 1 di 1
    • Remove the four 4.3 mm Phillips screws inside the lens assembly.

  4. Fujifilm X-M1 LCD Screen Replacement, Back Case: passo 4, immagine 1 di 1
    • Remove the six 2.5 mm Phillips screws from the bottom of the camera.

  5. Fujifilm X-M1 LCD Screen Replacement: passo 5, immagine 1 di 1
    • Use tweezers or a finger nail to peel back the rubber cover on the left handgrip.

    • Remove the 3.4 mm Phillips screw.

    • Remove the 3.7 mm screw.

  6. Fujifilm X-M1 LCD Screen Replacement: passo 6, immagine 1 di 1
    • Use tweezers or a fingernail to peel back the rubber cover on the right handgrip.

    • Remove the 3.2 mm Phillips screw.

    • Remove the 3.8 mm Phillips screw.

    • Remove the 2.8 mm Phillips screw.

  7. Fujifilm X-M1 LCD Screen Replacement: passo 7, immagine 1 di 2 Fujifilm X-M1 LCD Screen Replacement: passo 7, immagine 2 di 2
    • Use tweezers to slide the metal shield straight out of the external flash mount.

  8. Fujifilm X-M1 LCD Screen Replacement: passo 8, immagine 1 di 3 Fujifilm X-M1 LCD Screen Replacement: passo 8, immagine 2 di 3 Fujifilm X-M1 LCD Screen Replacement: passo 8, immagine 3 di 3
    • Remove the four 4.6 mm Phillips screws from the external flash mount.

    • Use tweezers or two fingers to remove the mount clip.

  9. Fujifilm X-M1 LCD Screen Replacement: passo 9, immagine 1 di 1
    • Extend the LCD.

    • Remove the two black 4.3 mm Phillips screws from the back case.

  10. Fujifilm X-M1 LCD Screen Replacement: passo 10, immagine 1 di 2 Fujifilm X-M1 LCD Screen Replacement: passo 10, immagine 2 di 2
    • Use two fingers to peel back and remove the black plastic cover from behind the LCD.

  11. Fujifilm X-M1 LCD Screen Replacement: passo 11, immagine 1 di 3 Fujifilm X-M1 LCD Screen Replacement: passo 11, immagine 2 di 3 Fujifilm X-M1 LCD Screen Replacement: passo 11, immagine 3 di 3
    • Slowly pull the back frame away from the camera.

    • Do not attempt to remove the frame, as it is attached to the camera by a ribbon cable.

    • Use tweezers to pull the white and blue ribbon cable out of the connector.

  12. Fujifilm X-M1 LCD Screen Replacement: passo 12, immagine 1 di 1
    • Slide the frame around the LCD to remove it from the camera.

  13. Fujifilm X-M1 LCD Screen Replacement: passo 13, immagine 1 di 1
    • Remove the two 2.6 mm Phillips screws from the right side of the metal frame.

  14. Fujifilm X-M1 LCD Screen Replacement: passo 14, immagine 1 di 2 Fujifilm X-M1 LCD Screen Replacement: passo 14, immagine 2 di 2
    • Use tweezers to unhook the speaker near the left handgrip.

  15. Fujifilm X-M1 LCD Screen Replacement: passo 15, immagine 1 di 2 Fujifilm X-M1 LCD Screen Replacement: passo 15, immagine 2 di 2
    • Slowly lift the metal frame away from the motherboard.

    • Do not attempt to remove the frame, as it is attached to the motherboard by a large ribbon cable.

    • Use tweezers to remove the plastic covering the motherboard.

  16. Fujifilm X-M1 LCD Screen Replacement: passo 16, immagine 1 di 3 Fujifilm X-M1 LCD Screen Replacement: passo 16, immagine 2 di 3 Fujifilm X-M1 LCD Screen Replacement: passo 16, immagine 3 di 3
    • To remove the ribbon cable, flip back the orange lock on the large ZIF connector with the flat end of a spudger.

    • If the ribbon cable does not pop out on its own, use tweezers to pull it out of the connector.

    • Remove the back case.

  17. Fujifilm X-M1 LCD Screen Replacement, LCD Screen: passo 17, immagine 1 di 2 Fujifilm X-M1 LCD Screen Replacement, LCD Screen: passo 17, immagine 2 di 2
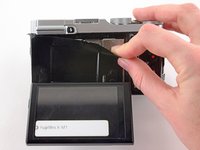
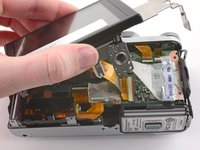
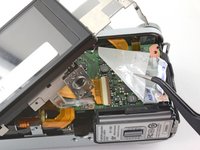
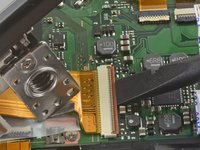
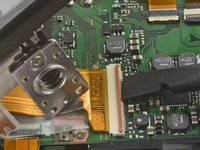
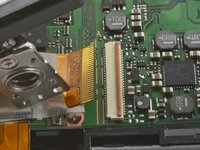
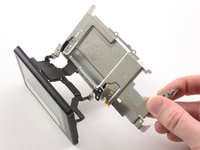
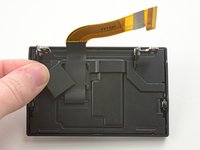
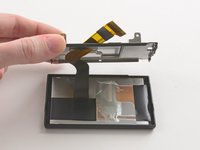
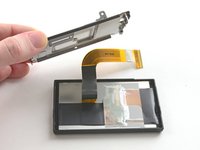
    • Remove the four 2.6 mm Phillips screws from the LCD hinges.

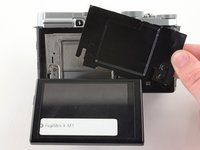
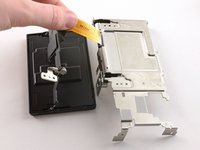
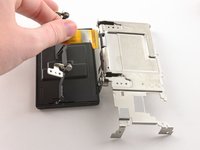
    • Tilt the LCD away from the metal frame.

    • Do not attempt to remove the LCD, as it is attached to the metal frame by a ribbon cable.

  18. Fujifilm X-M1 LCD Screen Replacement: passo 18, immagine 1 di 2 Fujifilm X-M1 LCD Screen Replacement: passo 18, immagine 2 di 2
    • Use two fingers to pull the ribbon through the hole in the metal frame.

    • Remove the LCD from the metal frame.

  19. Fujifilm X-M1 LCD Screen Replacement: passo 19, immagine 1 di 2 Fujifilm X-M1 LCD Screen Replacement: passo 19, immagine 2 di 2
    • Use the pointed end of a spudger to remove the ribbon cover on the back of the LCD.

  20. Fujifilm X-M1 LCD Screen Replacement: passo 20, immagine 1 di 2 Fujifilm X-M1 LCD Screen Replacement: passo 20, immagine 2 di 2
    • Remove the two 2.6 mm Phillips screws from the right hand side of the LCD screen.

    • Remove the two 2.6 mm Phillips screws from the left hand side of the LCD screen.

  21. Fujifilm X-M1 LCD Screen Replacement: passo 21, immagine 1 di 3 Fujifilm X-M1 LCD Screen Replacement: passo 21, immagine 2 di 3 Fujifilm X-M1 LCD Screen Replacement: passo 21, immagine 3 di 3
    • Use a plastic opening tool to pry the LCD case open.

    • Once the case is open, pull the ribbon through the hole on the back case.

  22. Fujifilm X-M1 LCD Screen Replacement: passo 22, immagine 1 di 1
    • Remove the LCD from the screen cover.

Conclusione

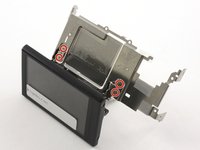
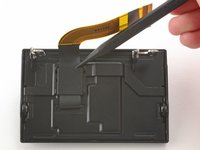
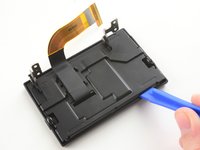
To reassemble your device, follow these instructions in reverse order.

Un'altra persona ha completato questa guida.

Kelsea Weber

Membro da: 11/12/15

19.857 Reputazione

32 Guide realizzate

Team

iFixit Membro di iFixit

Staff

135 Membri

16.718 Guide realizzate

0 Commenti

Aggiungi Commento

Visualizza Statistiche:

Ultime 24 Ore: 0

Ultimi 7 Giorni: 4

Ultimi 30 Giorni: 47

Tutti i Tempi: 4,674