Salta al contenuto principale

Fixed Gear Bike Chainring Replacement

Cosa ti serve

  1. Fixed Gear Bike Chainring Replacement, Chainring: passo 1, immagine 1 di 2 Fixed Gear Bike Chainring Replacement, Chainring: passo 1, immagine 2 di 2
    • Slightly loosen the two rear nuts with a 15 mm wrench to give the chain slack.

    • Remove the chain from the worn out chain ring.

  2. Fixed Gear Bike Chainring Replacement: passo 2, immagine 1 di 2 Fixed Gear Bike Chainring Replacement: passo 2, immagine 2 di 2
    • Undo all five bolts attached to the crank arm with a hex tool.

  3. Fixed Gear Bike Chainring Replacement: passo 3, immagine 1 di 2 Fixed Gear Bike Chainring Replacement: passo 3, immagine 2 di 2
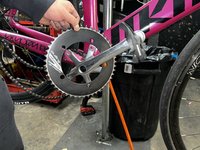
    • Take the chain ring off through the crank arm of the pedal and swap the chainring of your choice.

    • Keep all five bolts in the same area to prevent losing them.

    • When bolts appear to be rusty, I recommend replacing them with a new set of bolts for the longevity of the drivetrain.

  4. Fixed Gear Bike Chainring Replacement: passo 4, immagine 1 di 1
    • Line up the chainring’s hole to the crankset and tighten all five bolts to hold the chainring in place.

  5. Fixed Gear Bike Chainring Replacement: passo 5, immagine 1 di 1
    • Lastly, attach the chain back to the new chainring.

    • Before tightening the two rear nuts back together, ensure the wheel is centered and not touching the rear bike frame.

Linea Traguardo

aljndro__

Membro da: 08/22/23

121 Reputazione

1 Guida realizzata

Team

0 Commenti

Aggiungi Commento

Visualizza Statistiche:

Ultime 24 Ore: 0

Ultimi 7 Giorni: 8

Ultimi 30 Giorni: 21

Tutti i Tempi: 93