Introduzione
I could not get the vacuum to power on. The guide will explain how I disassembled the vacuum and repaired the power switch. I do not recommend repairing the power switch unless you are trained and qualified to repair 120VAC electrical appliances.
Cosa ti serve
-
-
Flip the black release handle and remove the dust canister from the vacuum.
-
-
-
Rotate the grey slotted filter cover and pull the cover off.
-
Remove the filter.
-
Remove the black filter housing trim by unscrewing the two hex (H3.0) screws and carefully lifting the trim out. Note the power cord entry into the vacuum is partially covered by this trim.
-
-
-
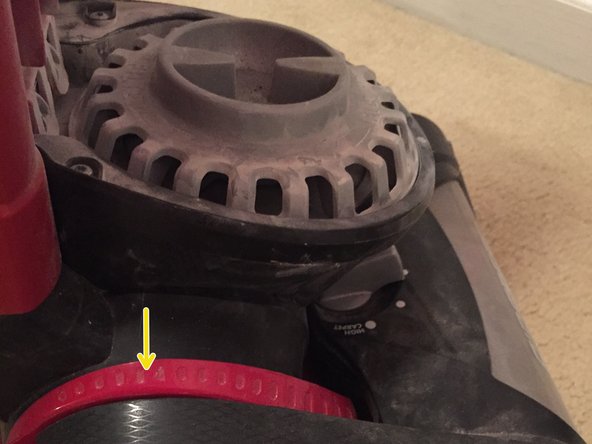
Using screwdriver remove two screws from each side of the vacuum brush and belt cover (four total screws). Note, there is a small flat tab toward the back of the each side of the cover which helps to lift the cover (orange arrow)
-
Remove the cover from the vacuum.
-
-
-
Unscrew the single screw from the belt cover over the brush and remove the belt cover.
-
Remove the brush by lifting straight up on both sides and the belt can be removed at the same time.
-
Remove the belt from the motor shaft by sliding the belt off of the shaft and slipping it between the end of the shaft and the adjacent plastic post.
-
The cavity under the belt can apparently collect hair, dirt and debris so while we are in here, we can remove the nasty stuff and clean things up. I also remove hair from the brush as this is a common cause of brush problems.
-
-
-
-
Near the carpet height selector switch you'll notice the end of a spring.
-
You'll be able to view this spring along its length by looking up from the bottom of the vacuum. I disconnected it from the bottom by using needle nose pliers.
-
-
-
At this point I did not find any more fasteners to remove and sort of jockeyed the black brush and belt housing around by pulling it outward from one side.
-
I noticed that there was a "keyed" fit between the housing and the frame. By rotating the housing and holding the frame steady I was able to carefully but firmly free one side of the housing and pull it away from the frame. Once one side was removed, the other side could be easily taken out and the whole housing removed.
-
Unfortunately, I don't have a good photo of this process.
-
-
-
After the brush and belt housing is removed, the red wheel frame can be removed in a similar fashion.
-
The first photo is from the bottom just to show how the wheel frame is wrapped around the black motor housing.
-
Carefully but firmly pull outwards on one of the wheel frame ends to free it from the motor housing and then remove the whole red wheel frame.
-
-
-
Remove the five hex (H3.0) screws from the black motor housing - three on one side and two on the opposing side.
-
With the screws removed, the motor housing can be opened up.
-
-
-
With the motor housing pulled apart and using a flashlight, locate the two black wires that go into the power switch cavity.
-
One black (hot) wire originates from the power cable (containing a black and white wire) and the other black wire goes to the motor via what appears to be a thermal overload or other overload device.
-
Disconnect the black wire lugs from the spade connectors on the bottom of the power switch.
-
-
-
Remove the red plastic cover piece from the power switch cavity.
-
From the motor housing side, push up on the power switch - I used my pliers to pop up the two spade connectors through the slots. The switch is held in place only by a friction fit and will come up and out through the top easily.
-
-
-
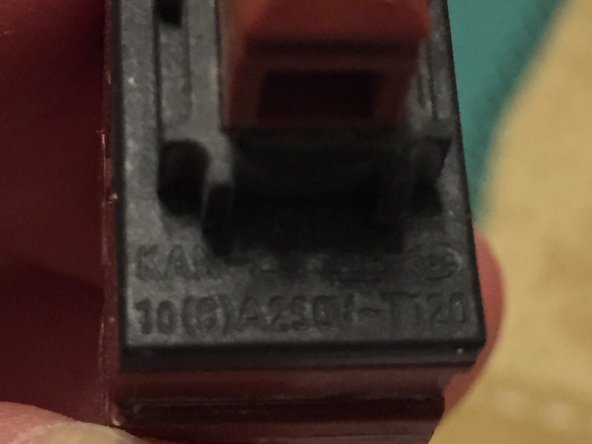
With the switch removed, the make and model are identified. The switch is a NOVA KAN-L5 SPST pushbutton switch. This appears to be an imported component from China. I could not find much documentation on the internal details.
-
Further research indicates the Eureka / Electrolux OEM part is #81142-1. Repair Clinic, an online retailer, shows that their replacement switch is a "Defond CPU-1113"
-
At my house, every cleaning appliance (vacuum, clothes washer, clothes dryer, etc.) is critical and must be in working order 24 x 7 or my spouse will go out and quickly purchase a new working replacement...therefore I was under pressure to perform a repair or get out the wallet.
-
It's not often that I've noticed 120VAC switches with removable components so I was intrigued to see the plastic tabs on each side of this switch.
-
-
-
Using my iFixit tweezers I carefully lifted the black tabs of the switch and the top half of the switch could be lifted off.
-
The switch contained two springs and a small copper pole. Upon inspection, when the switch was pressed, the main spring compressed and held the switch pole down, but the pole was not making contact with the "throw" (one of the spade connectors).
-
It appeared that the pole might have been bent slightly from its original orientation. My fix was to slightly bend the pole to ensure that it would make contact with the spade connector as designed.
-


To reassemble the vacuum, follow these instructions in reverse order.
To reassemble the vacuum, follow these instructions in reverse order.
Annulla: non ho completato questa guida.
Altre 5 persone hanno completato questa guida.
Team

5 Commenti
anyone know if the power cord uses the two or three wire cord plug??
Awesome post with great instructions and illustrative photos. Thank you. I had disassembled this unit to the point of the wheel housing and like you could not find any more fasteners. Following your lead I was able to finagle the motor housing rotation position and the wheel housing to get the tabs aligned with the slots and spread the wheel housing to clear the motor housing. For my unit, the switch was not making contact and I found a fair amount of oxides on the switch contacts. Cleaning the oxides off restored continuity to the switch. I did not need to bend the armature of the switch (see-saw if you will). Even though it is working fine now, I will order a replacement switch to make sure this one will never fail again. ;-)