Introduzione
This guide is for the disassembly and subsequent battery replacement of the Eufy HomeVac H11
Warnings/disclamers:
- The manufacturer states that the battery isn't replaceable.
- The manufacturer states that "There are no user-serviceable parts inside." (see user manual).
- This guide applies to the HomeVac H11 only (NOT for H11 Pure).
- Following this guide is at your own risk and will most definitely void the warranty.
- Following this guide involves exposing the vacuum's air pump blades, which can inflict serious damage to fingers.
- Depending on the tools used, following this guide may damage the device's exterior.
- This guide involves working with unprotected Li-ion batteries, which are dangerous when shorted.
- Depending on the new battery capacity and chemistry, the charge indicator may not show the correct remaining charge during use. In practice, that means that while the indicator shows one solid light (i.e. "Low battery level", according to the manual), in fact the vacuum still has a lot of run time left.
- The photos in this guide are from after I've replaced the batteries. So the batteries you can see there are not the original ones. Also the exterior damage is much worse than can be. I did the disassembly with zero knowledge of how to do it correctly and not with the best tools initially.
Cosa ti serve
-
-
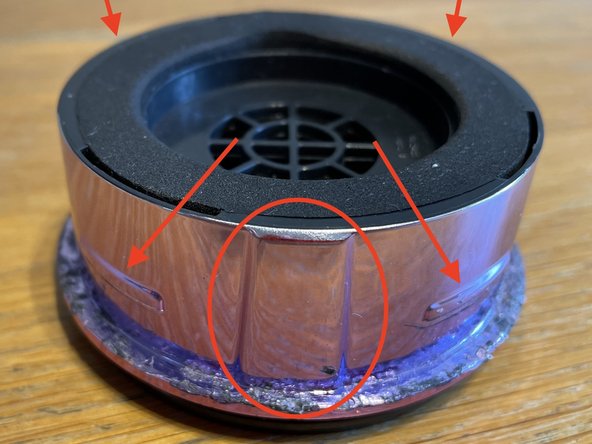
The cover is kept in place with four teeth that are placed around the circumference, with the eufy logo sitting right between two of them (see arrows in 2nd picture)
-
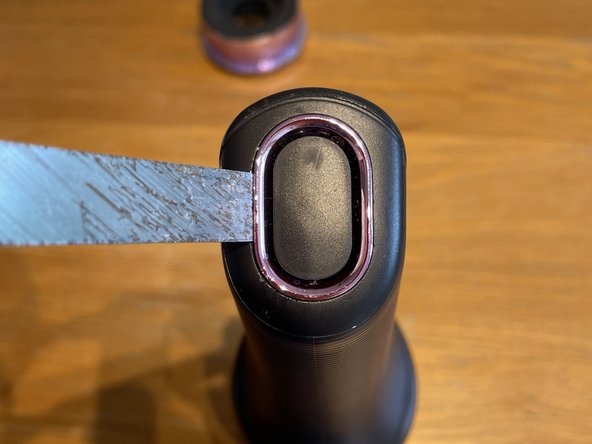
Use the widest and sharpest tool you have for prying open. In the 1st photo a wood chisel is shown
-
For maximum leverage and minimum damage to the device body, place two prying tools, to each side of where the tooth is
-
The force needed to pry it open is quite high, but eventually it will pop
-
Once one tooth has come loose, work around the circumference to the next tooth, keeping the secondary prying tool (e.g. flat-head screwdriver) near the previous tooth to prevent it snapping back closed
-
The indentation damage on the body in the photos is much worse than can be achieved with the right tools. When I opened the vacuum the first time, I was using small screwdrivers and did not know what to expect.
-
-
-
Once you've gone all around the body and popped open all four teeth, it should be trivial to pull out the cover
-
Notice in the 1st and 2nd photos the location of the teeth, you'll need to match them with their corresponding grooves when assembling
-
Notice in the 1st photo, in the red square at the centre, the engine's blades are exposed. Do not insert your fingers or any other items in there.
-
Also notice in the 2nd photo circled is the guiding indentation. This indentation needs to match with its corresponding groove at the front of the device, right behind the Eufy logo, when assembling
-
-
-
The end of the handle contains a vent, which I think is there so that part of the air flow goes around the batteries, cooling them (more on that later)
-
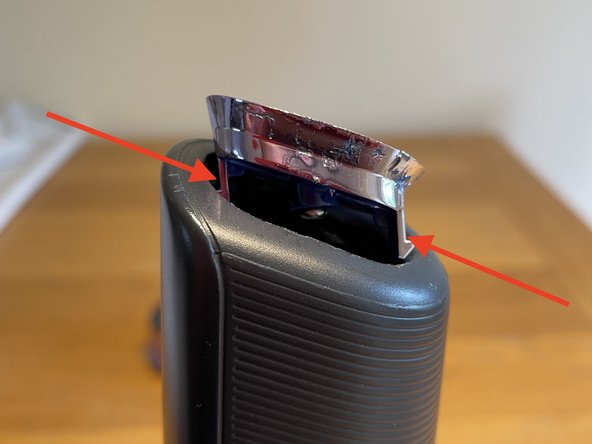
The vent cover is held in place by two teeth, shown in the photos by the arrows
-
Though the teeth are at the narrow/rounded edges of the vent cover, I recommend prying it open by working the straight edges because then you can use the pry tool with maximum advantage and avoid damaging the rounded edge
-
In contrast to the main cover, the vent cover doesn't require much force to open
-
-
-
-
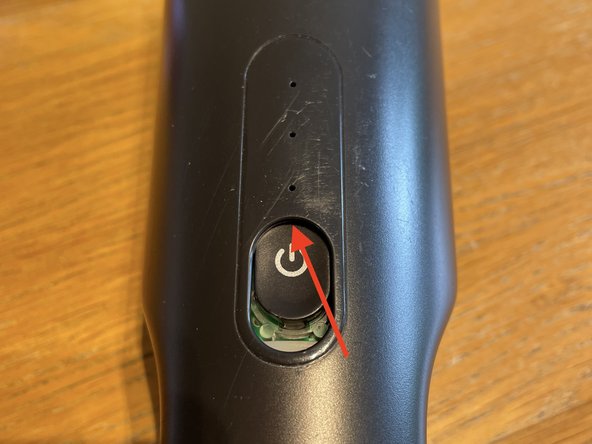
Once the vent cover has been removed, it is possible to push out the vacuum contents by pressing here, shown by the arrow in the 1st photo
-
The on/off button will prevent the contents from sliding out, so it needs to be pushed in. Do that by pressing it's front edge (shown by the arrow on 2nd photo), while also continuing to push the internals through the handle
-
-
-
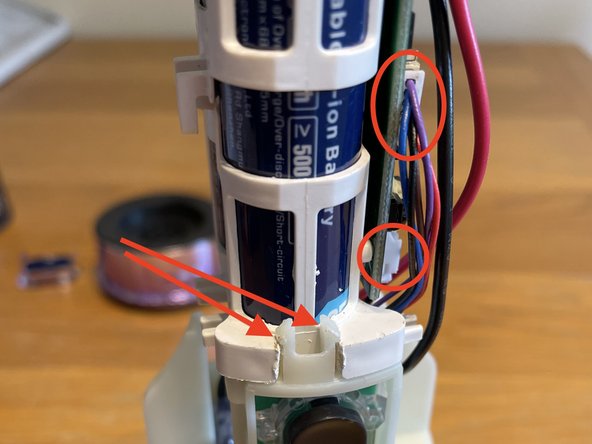
The batteries housing is held together by the two teeth on the assembly front; the one tooth at the back, that keeps the two halves together; the one screw that holds the main circuit board to the top half of the batteries housing; two pin connectors; and, sadly, the nickel strips that are welded to the battery terminals;
-
In this step:
-
unscrew the circuit board screw (arrow in the 1st photo)
-
bend the two teeth at the front of the assembly (indicated by arrows in the 2nd photo)
-
unplug the pin connectors 1 and two (circled in the 1st and 2nd photos)
-
undo the two halves of the battery assembly on the side opposite the circuit board
-
and, as carefully as possible, break off the strips welded to the battery terminals. NB: do not short the battery + and - terminals with your tool while working on it
-
for access to the top terminals, unscrew the translucent plastic cap that covers it.
-
-
-
You'll see a red wire glued to the batteries. This is (presumably) the overheating sensor. You'll need it later, so be careful not to damage it. Carefully scrape the glue/cement from the battery.
-
When the battery housing is disassembled and the batteries are free of the welding, they can be removed and recycled.
-
-
-
If you have found new, unprotected 18650 batteries - congratulations! skip to the next step
-
WARNING: the protection circuitry is there for a reason. Shorting an unprotected battery will result in sparks and overheating.
-
Why do we need unprotected batteries:
-
the protection circuitry, among other things, disconnects the battery if it's being shorted (i.e. the discharge current is over a certain threshold).
-
as a result, when the vacuum tries to pull the current necessary to run the quite powerful motor, the battery protection circuitry shuts down preventing normal operation
-
To compensate for the missing battery protection, the vacuum has airflow cooling for the batteries, as well as a thermal sensor (which is what I think the red wire glued between the batteries is, see photo) which should shut it down in case of overheating.
-
Also, the protection circuitry adds an extra 2mm to the battery tallness, which means that protected batteries don't fit in the battery assembly housing
-
Follow any tutorial on Youtube about "how to remove 18650 protection". For example this one
-
-
-
Depending on your materials and tools, solder or weld the new batteries to the battery terminals
-
Depending on how badly damaged have the old metal strips become when ripping off the welding from the batteries, you might be able to reuse them and just solder/weld them to the new batteries. However, in most cases you'll have to first unsolder the old strips from the circuit board.
-
Soldering to battery terminals is perhaps the most difficult part of this entire procedure. Here's a pretty good Youtube video that shows how to do it.
-
When connecting the batteries, remember that the wiring needs to be passed through the two halves of the battery assembly. Once the batteries are soldered to the circuit board, you won't be able to re-assemble the battery housing around it any more.
-
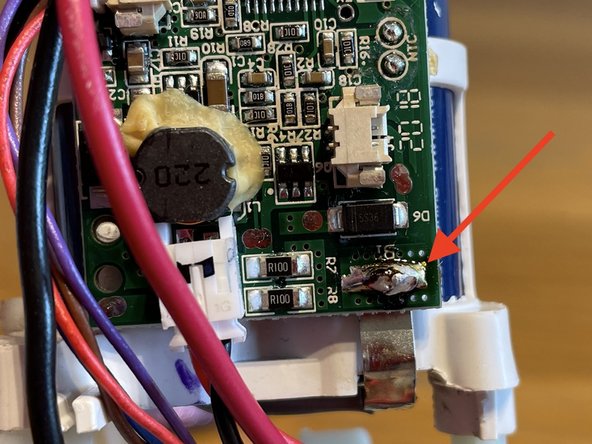
In the photos are shown the three circuit board locations where the batteries need to be connected to
-
B+ and B-
-
The batteries need to be connected between themselves, making a series of 2 batteries
-
The mid-point between the batteries needs to be connected to the terminal at the bottom end of the circuit board (2nd photo). NB: it is necessary to connect this point too, otherwise the vacuum will refuse to charge the batteries
-
-
-
NB: don't forget to stick red wire (thermal sensor?) to the batteries. Ideally to BOTH the batteries, just like it used to be. This is necessary for the safe operation of your device.
-
Reconnect the pin connectors on the circuit board
-
Click the battery assembly to the motor housing
-
At this point you may test whether the electricals are connected correctly (WARNING: make sure nothing is anywhere near the engine blades)
-
pressing the on/off button initially after the battery replacement shouldn't start the engine, instead the lights will seemingly show the batteries are empty
-
So, plug a micro-USB charger to your device briefly. This should trick the circuitry into accepting the batteries.
-
Now, after making sure your fingers are far from the engine blades, when you press the on/off button the engine should come alive.
-
Don't run the device in this disassembled state for more than ~10 seconds. Remember that running the vacuum without its housing is DANGEROUS
-
-
-
Place the internals on top of the main cover, as shown in the photo.
-
You will need to push these items into the vacuum body, so having the main cover between your fingers and the engine blades is a good idea
-
Pop the handle vent cap back on and gently place the vacuum body over the internals
-
Make sure you line up the groove at the front (where the eufy logo is, see step 3) with the corresponding protrusion of the main cover
-
Make sure you also line up the internals correctly: the button should be right behind the button hole in the body. The battery housing though is slightly off-center, that is ok
-
Press the vacuum body over internals. If everything is lined up correctly, it should eventually click.
-
IMPORTANT: because a lot of force is required to click the main cover with the body, it is really important everything is lined up correctly so that you don't damage the device.
-
The on/off button will end up being pressed during the procedure. When that happens, I advise to ignore it and simply continue pushing the two halves together until the click as quickly as possible so that you can turn the vacuum off. Alternatively, turn the engine on before putting the body on it, this way it shuts down during assembly.
-
-
-
Plug the device to a charger. The lights should come on as expected, and, depending on the battery chemistry and capacity, should show the charge process as expected.
-
When the charge shows as complete, unplug, attach the dust collector, and start the engine.
-
Start a timer and let the vacuum run for a while to make sure it doesn't turn off, overheat, or catch fire (unlikely).
-
The user manual states a run time of 14 minutes on a full charge. It is recommended to supervise the running of the vacuum for at least this amount of time.
-
Ideally, let it run until fully discharged. When empty - stop the timer.
-
Hopefully the new run time is much longer than the old batteries. In my case, it was 24 minutes vs ~5 minutes on the old and used batteries.
-
It is normal for the body of the vacuum, the handle specifically, to become warm to the touch during operation. However, even when run for 24 minutes, it should not become hot, nor should there be any melted plastic smells
-