Salta al contenuto principale

Epson Powerlite 410W Motherboard Replacement

Cosa ti serve

  1. Epson Powerlite 410W Motherboard Replacement, Top Cover: passo 1, immagine 1 di 1
    • Press the power button located on top of the projector.

    • Remember to let the projector cool off completely after turning off the power before beginning the repair.

  2. Epson Powerlite 410W Motherboard Replacement: passo 2, immagine 1 di 1
    • Remove eight screws from the bottom of the device using a Phillips #00 screwdriver.

  3. Epson Powerlite 410W Motherboard Replacement: passo 3, immagine 1 di 3 Epson Powerlite 410W Motherboard Replacement: passo 3, immagine 2 di 3 Epson Powerlite 410W Motherboard Replacement: passo 3, immagine 3 di 3
    • Turn the projector so the power button is on top.

    • Gently pull up the cover until it pops off.

    • Do not pull too far; a ribbon cable still connects the top cover to the motherboard.

    • Disconnect the ribbon cable that attaches the cover to the motherboard.

    • Remove the cover and place to the side.

  4. Epson Powerlite 410W Motherboard Replacement, Motherboard: passo 4, immagine 1 di 2 Epson Powerlite 410W Motherboard Replacement, Motherboard: passo 4, immagine 2 di 2
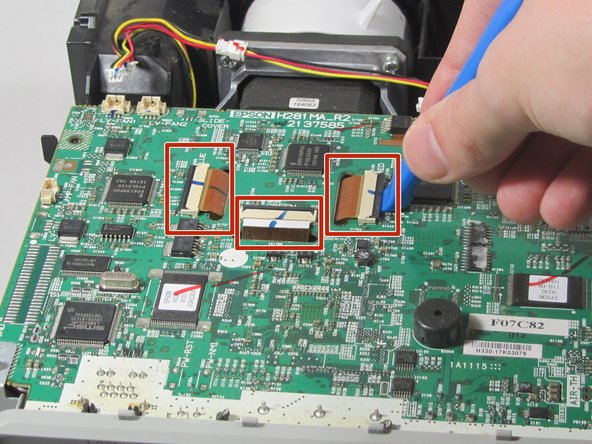
    • Remove the two screws holding down the motherboard using a Phillips #00 screwdriver.

    • Remove the four screws holding down the I/O board using a Phillips #00 screwdriver.

  5. Epson Powerlite 410W Motherboard Replacement: passo 5, immagine 1 di 1
    • Remove the seven cables that are running to the motherboard by pulling them out of their sockets.

  6. Epson Powerlite 410W Motherboard Replacement: passo 6, immagine 1 di 3 Epson Powerlite 410W Motherboard Replacement: passo 6, immagine 2 di 3 Epson Powerlite 410W Motherboard Replacement: passo 6, immagine 3 di 3
    Attrezzo utilizzato in questo passaggio:
    Tweezers
    $4.99
    Compra
    • Using a plastic opening tool, gently pry up the black tabs holding in the ribbon cables on the motherboard.

    • Using tweezers, gently pull the ribbon cables out of the sockets.

  7. Epson Powerlite 410W Motherboard Replacement: passo 7, immagine 1 di 1
    • Gently pull the motherboard up and tilt it back, revealing the last cable attached to the motherboard. Disconnect this cable.

    • Remove the motherboard from the projector.

Conclusione

To reassemble your device, follow these instructions in reverse order.

0 Commenti

Aggiungi Commento

Visualizza Statistiche:

Ultime 24 Ore: 0

Ultimi 7 Giorni: 0

Ultimi 30 Giorni: 7

Tutti i Tempi: 99