Salta al contenuto principale

Echo Chain Saw CS4910 2020 Clutch Assembly Replacement

Cosa ti serve

  1. Echo Chain Saw CS4910 2020 Clutch Assembly Replacement, Turn off the chainsaw: passo 1, immagine 1 di 2 Echo Chain Saw CS4910 2020 Clutch Assembly Replacement, Turn off the chainsaw: passo 1, immagine 2 di 2
    • Make sure you have the ignition switch turned off before starting your repair.

    • The chainsaw should be cool to the touch before continuing.

  2. Echo Chain Saw CS4910 2020 Clutch Assembly Replacement, Loosen the air filter cover: passo 2, immagine 1 di 2 Echo Chain Saw CS4910 2020 Clutch Assembly Replacement, Loosen the air filter cover: passo 2, immagine 2 di 2
    • Use your fingers to loosen the air filter cover knob.

  3. Echo Chain Saw CS4910 2020 Clutch Assembly Replacement, Remove the air filter cover: passo 3, immagine 1 di 3 Echo Chain Saw CS4910 2020 Clutch Assembly Replacement, Remove the air filter cover: passo 3, immagine 2 di 3 Echo Chain Saw CS4910 2020 Clutch Assembly Replacement, Remove the air filter cover: passo 3, immagine 3 di 3
    • Remove the air filter cover.

  4. Echo Chain Saw CS4910 2020 Clutch Assembly Replacement, Remove the air filter: passo 4, immagine 1 di 3 Echo Chain Saw CS4910 2020 Clutch Assembly Replacement, Remove the air filter: passo 4, immagine 2 di 3 Echo Chain Saw CS4910 2020 Clutch Assembly Replacement, Remove the air filter: passo 4, immagine 3 di 3
    • Remove the air filter

    • During reassembly, clean the air filter with compressed air or with light brushing before reinstalling it.

  5. Echo Chain Saw CS4910 2020 Clutch Assembly Replacement, Disconnect the spark plug: passo 5, immagine 1 di 3 Echo Chain Saw CS4910 2020 Clutch Assembly Replacement, Disconnect the spark plug: passo 5, immagine 2 di 3 Echo Chain Saw CS4910 2020 Clutch Assembly Replacement, Disconnect the spark plug: passo 5, immagine 3 di 3
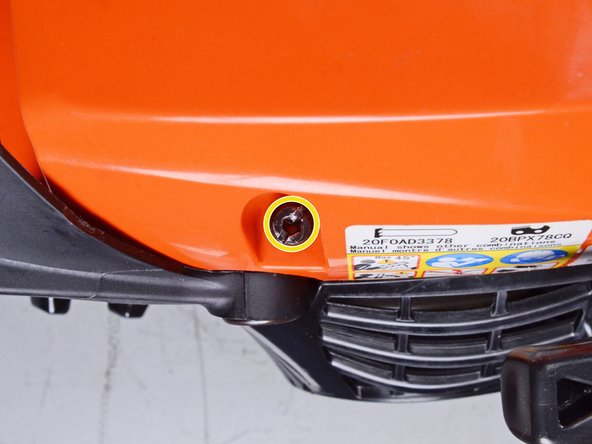
    • Use your fingers to pull up and disconnect the spark plug boot.

  6. Echo Chain Saw CS4910 2020 Clutch Assembly Replacement, Loosen the sprocket guard: passo 6, immagine 1 di 2 Echo Chain Saw CS4910 2020 Clutch Assembly Replacement, Loosen the sprocket guard: passo 6, immagine 2 di 2
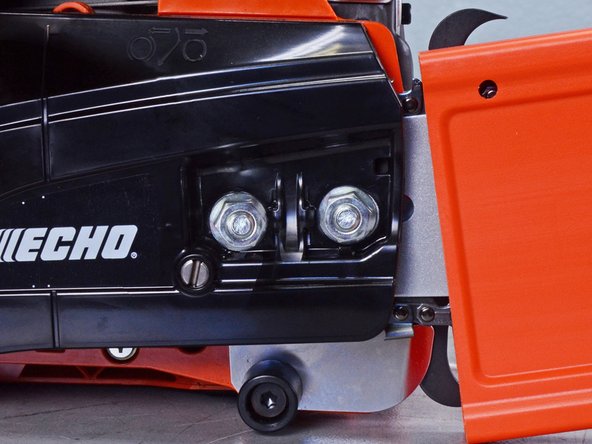
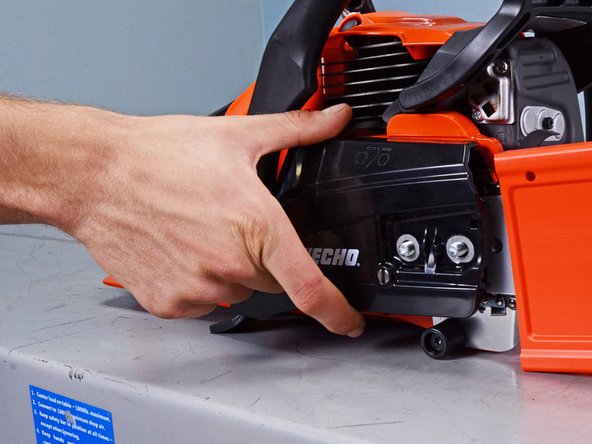
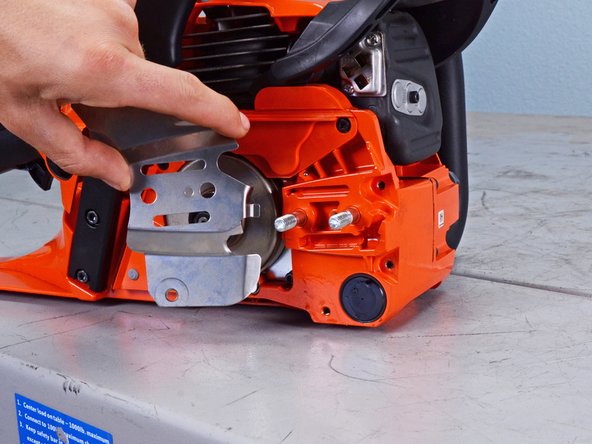
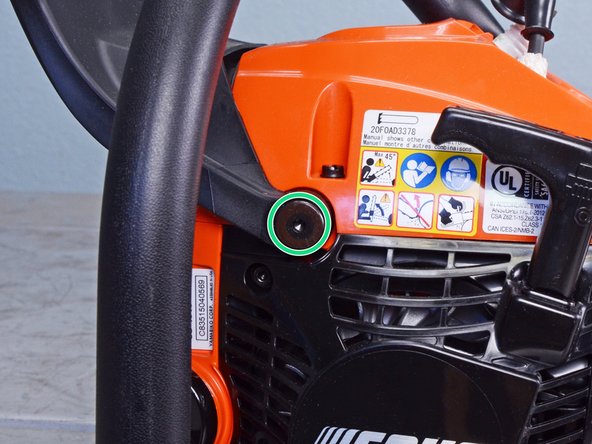
    • Use a 13 mm wrench to loosen and remove the two nuts securing the sprocket guard.

  7. Echo Chain Saw CS4910 2020 Clutch Assembly Replacement, Remove the sprocket guard: passo 7, immagine 1 di 3 Echo Chain Saw CS4910 2020 Clutch Assembly Replacement, Remove the sprocket guard: passo 7, immagine 2 di 3 Echo Chain Saw CS4910 2020 Clutch Assembly Replacement, Remove the sprocket guard: passo 7, immagine 3 di 3
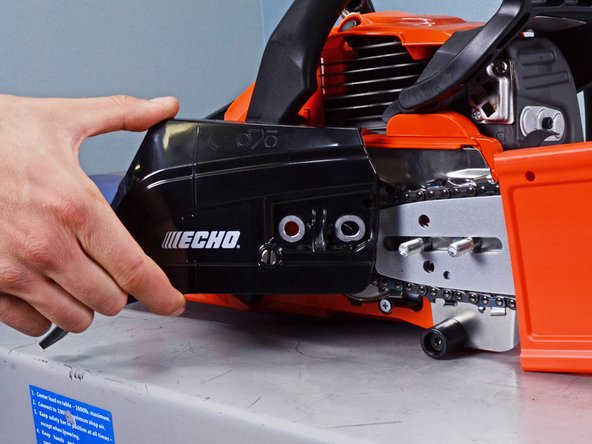
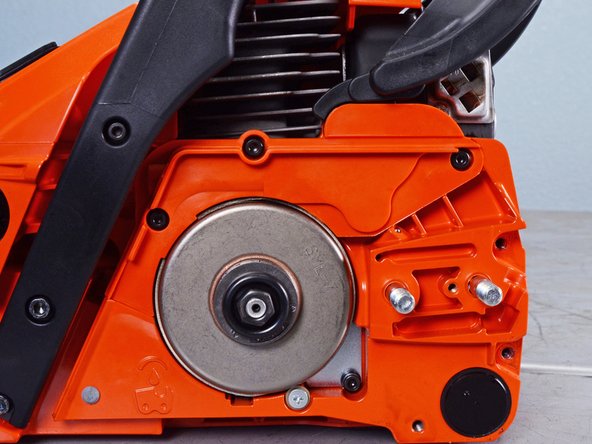
    • Pull the sprocket guard straight off its two pegs and remove it.

  8. Echo Chain Saw CS4910 2020 Clutch Assembly Replacement, Unclip the saw chain: passo 8, immagine 1 di 2 Echo Chain Saw CS4910 2020 Clutch Assembly Replacement, Unclip the saw chain: passo 8, immagine 2 di 2
    • Put on gloves before performing the next two steps.

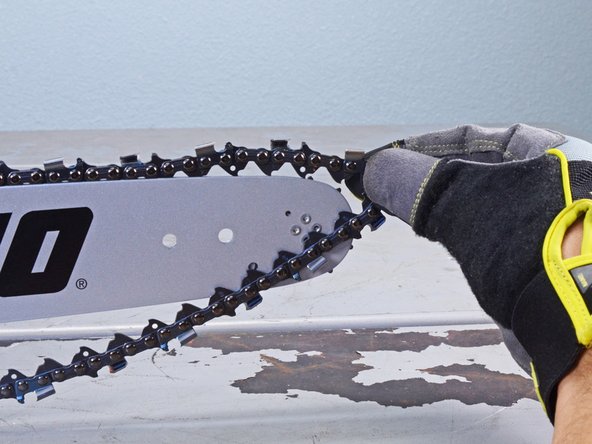
    • Pull the saw chain away from the tip of the guide bar to unclip it.

  9. Echo Chain Saw CS4910 2020 Clutch Assembly Replacement, Remove the guide bar: passo 9, immagine 1 di 3 Echo Chain Saw CS4910 2020 Clutch Assembly Replacement, Remove the guide bar: passo 9, immagine 2 di 3 Echo Chain Saw CS4910 2020 Clutch Assembly Replacement, Remove the guide bar: passo 9, immagine 3 di 3
    • Push the guide bar towards the back of the device to unclip the rest of the saw chain.

    • Pull the guide bar away from the device to separate the saw chain from the clutch drum.

    • Remove the guide bar and the saw chain.

  10. Echo Chain Saw CS4910 2020 Clutch Assembly Replacement, Unfasten the bumper spike: passo 10, immagine 1 di 2 Echo Chain Saw CS4910 2020 Clutch Assembly Replacement, Unfasten the bumper spike: passo 10, immagine 2 di 2
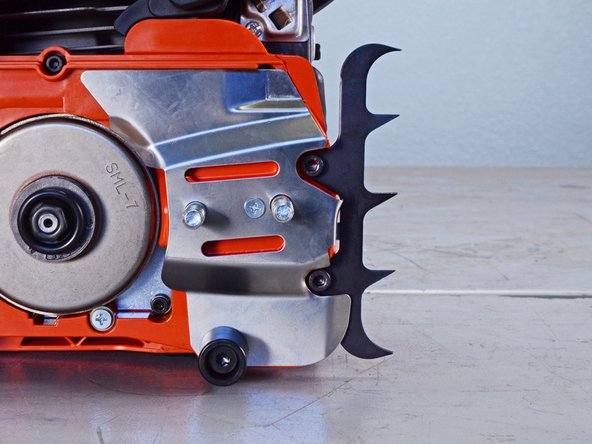
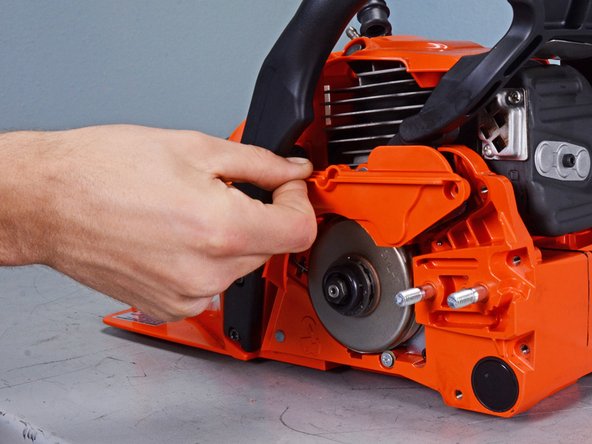
    • Use a T25 Torx driver to remove the two 17 mm-long screws securing the bumper spike.

  11. Echo Chain Saw CS4910 2020 Clutch Assembly Replacement, Remove the bumper spike: passo 11, immagine 1 di 2 Echo Chain Saw CS4910 2020 Clutch Assembly Replacement, Remove the bumper spike: passo 11, immagine 2 di 2
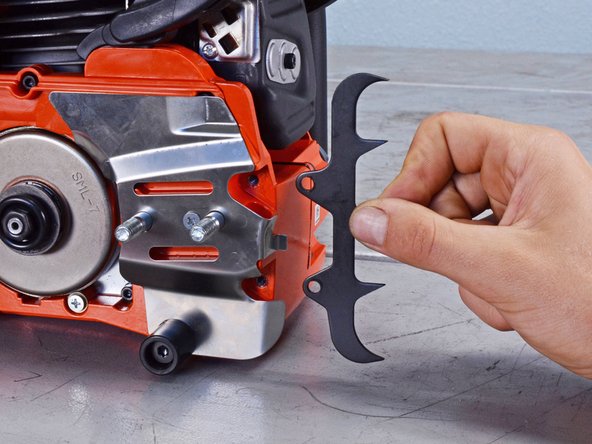
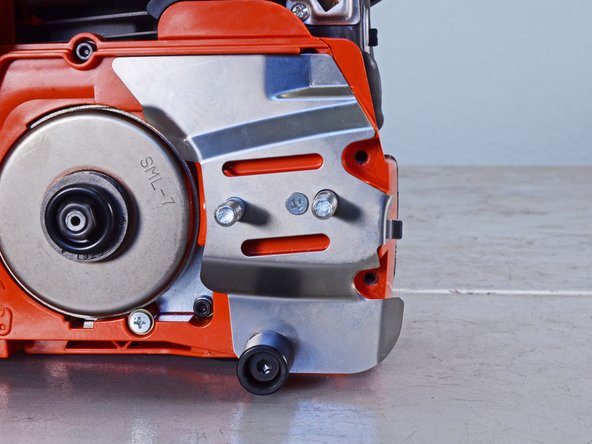
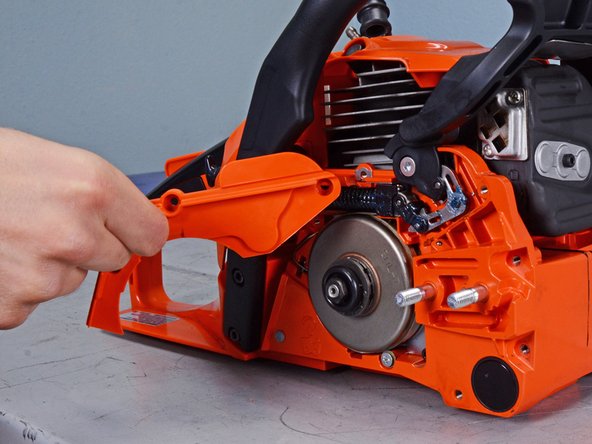
    • Pull the bumper spike away from the chassis and remove it.

  12. Echo Chain Saw CS4910 2020 Clutch Assembly Replacement, Unfasten the inner guide plate: passo 12, immagine 1 di 2 Echo Chain Saw CS4910 2020 Clutch Assembly Replacement, Unfasten the inner guide plate: passo 12, immagine 2 di 2
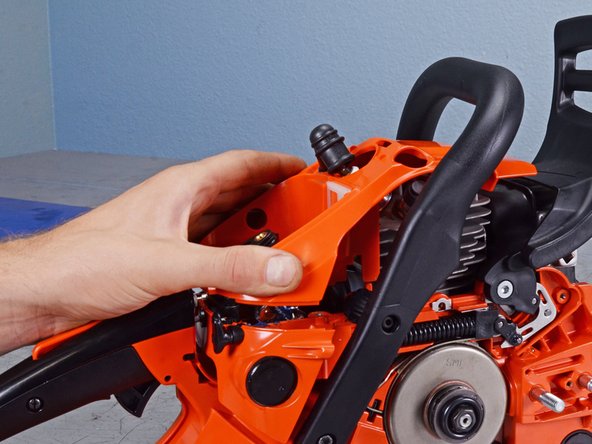
    • Remove the two screws securing the inner guide plate:

    • Use a Phillips driver to remove the 8 mm-long screw.

    • Use a T25 Torx driver to remove the 33 mm-long screw.

  13. Echo Chain Saw CS4910 2020 Clutch Assembly Replacement, Remove the inner guide plate: passo 13, immagine 1 di 3 Echo Chain Saw CS4910 2020 Clutch Assembly Replacement, Remove the inner guide plate: passo 13, immagine 2 di 3 Echo Chain Saw CS4910 2020 Clutch Assembly Replacement, Remove the inner guide plate: passo 13, immagine 3 di 3
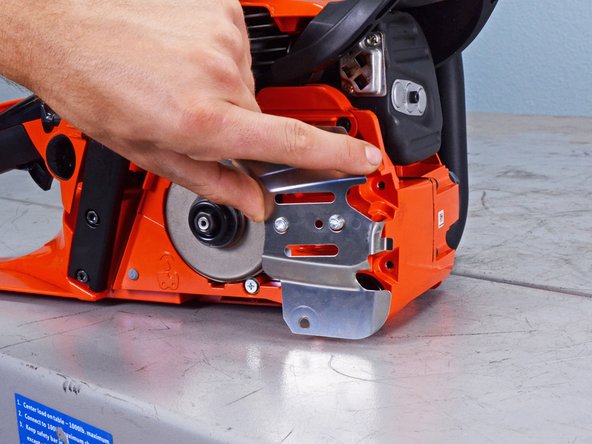
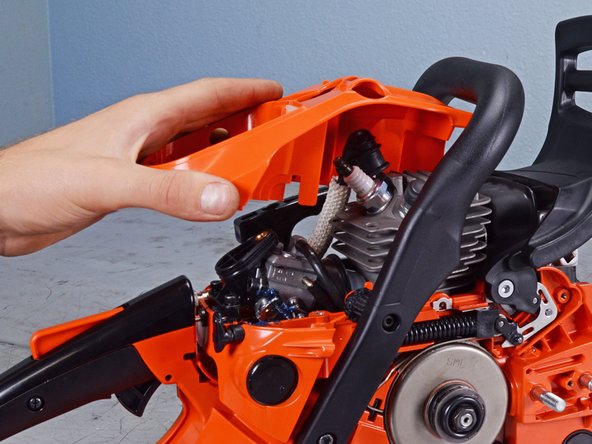
    • Pull the inner guide plate straight off its two pegs and remove it.

  14. Echo Chain Saw CS4910 2020 Clutch Assembly Replacement, Unfasten the brake cover: passo 14, immagine 1 di 2 Echo Chain Saw CS4910 2020 Clutch Assembly Replacement, Unfasten the brake cover: passo 14, immagine 2 di 2
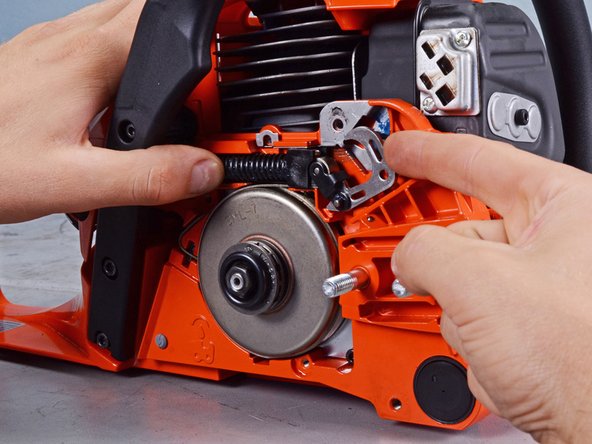
    • Use a 2.5 mm hex key to remove the three 14 mm-long screws securing the brake cover.

  15. Echo Chain Saw CS4910 2020 Clutch Assembly Replacement, Remove the brake cover: passo 15, immagine 1 di 3 Echo Chain Saw CS4910 2020 Clutch Assembly Replacement, Remove the brake cover: passo 15, immagine 2 di 3 Echo Chain Saw CS4910 2020 Clutch Assembly Replacement, Remove the brake cover: passo 15, immagine 3 di 3
    • Pull the brake cover straight off the chassis and remove it.

    • Make sure the chain brake is in the disengaged position before continuing.

  16. Echo Chain Saw CS4910 2020 Clutch Assembly Replacement, Unfasten the chain brake handle: passo 16, immagine 1 di 2 Echo Chain Saw CS4910 2020 Clutch Assembly Replacement, Unfasten the chain brake handle: passo 16, immagine 2 di 2
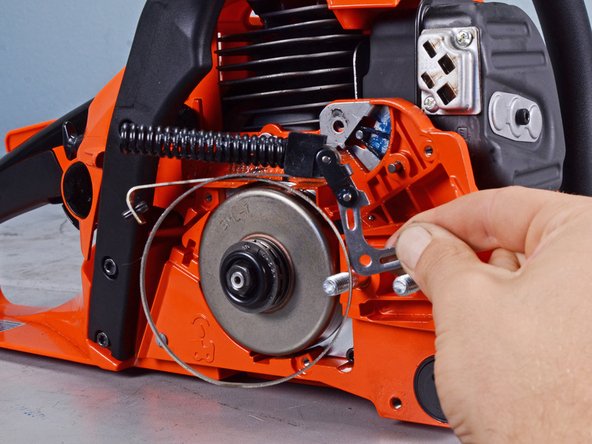
    • Use a 4 mm hex key to remove the two screws securing the chain brake handle:

    • One 19 mm-long screw

    • One 23 mm-long screw

  17. Echo Chain Saw CS4910 2020 Clutch Assembly Replacement: passo 17, immagine 1 di 3 Echo Chain Saw CS4910 2020 Clutch Assembly Replacement: passo 17, immagine 2 di 3 Echo Chain Saw CS4910 2020 Clutch Assembly Replacement: passo 17, immagine 3 di 3
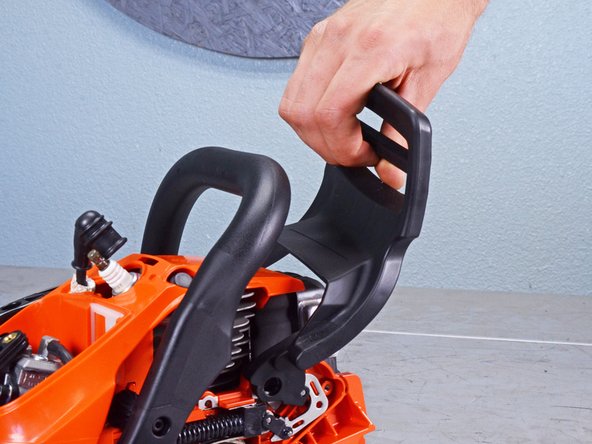
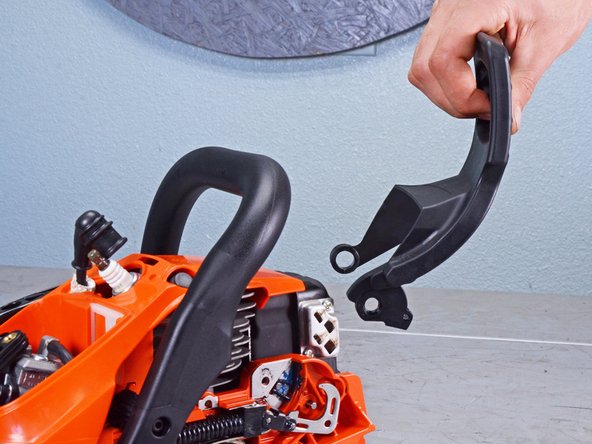
    • Rotate the chain brake handle towards the guide bar recess to unhook the brake lever.

    • Pull the handle away from the chassis to completely remove it.

  18. Echo Chain Saw CS4910 2020 Clutch Assembly Replacement, Unfasten the chain brake assembly: passo 18, immagine 1 di 2 Echo Chain Saw CS4910 2020 Clutch Assembly Replacement, Unfasten the chain brake assembly: passo 18, immagine 2 di 2
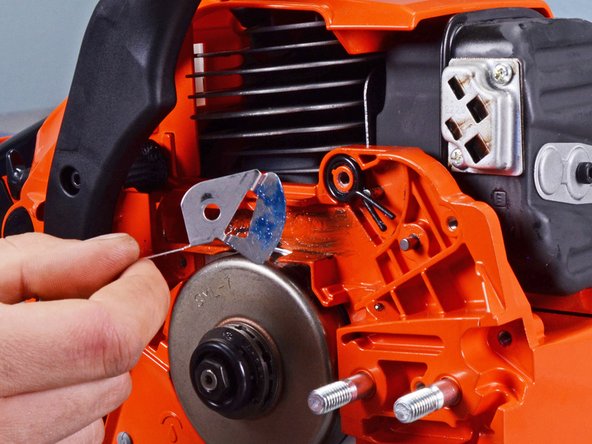
    • Use a Phillips driver to remove the 8 mm-long screw securing the chain brake assembly.

  19. Echo Chain Saw CS4910 2020 Clutch Assembly Replacement, Remove the chain brake assembly: passo 19, immagine 1 di 3 Echo Chain Saw CS4910 2020 Clutch Assembly Replacement, Remove the chain brake assembly: passo 19, immagine 2 di 3 Echo Chain Saw CS4910 2020 Clutch Assembly Replacement, Remove the chain brake assembly: passo 19, immagine 3 di 3
    • Be careful with this step, as there's tension within the spring. Work slowly to avoid the spring from ejecting.

    • While holding the spring with one hand, slowly push the brake lever out of its recess until the spring is fully extended.

    • Remove the chain brake assembly.

    • During reassembly, insert the spring into its recess first and compress it enough to reinsert the brake lever.

  20. Echo Chain Saw CS4910 2020 Clutch Assembly Replacement, Remove the retaining plate: passo 20, immagine 1 di 3 Echo Chain Saw CS4910 2020 Clutch Assembly Replacement, Remove the retaining plate: passo 20, immagine 2 di 3 Echo Chain Saw CS4910 2020 Clutch Assembly Replacement, Remove the retaining plate: passo 20, immagine 3 di 3
    • Pull the retaining off the chassis and remove it.

  21. Echo Chain Saw CS4910 2020 Clutch Assembly Replacement, Remove the torsion spring: passo 21, immagine 1 di 3 Echo Chain Saw CS4910 2020 Clutch Assembly Replacement, Remove the torsion spring: passo 21, immagine 2 di 3 Echo Chain Saw CS4910 2020 Clutch Assembly Replacement, Remove the torsion spring: passo 21, immagine 3 di 3
    • Pull the torsion spring off the chassis and remove it.

  22. Echo Chain Saw CS4910 2020 Clutch Assembly Replacement, Remove the collar: passo 22, immagine 1 di 3 Echo Chain Saw CS4910 2020 Clutch Assembly Replacement, Remove the collar: passo 22, immagine 2 di 3 Echo Chain Saw CS4910 2020 Clutch Assembly Replacement, Remove the collar: passo 22, immagine 3 di 3
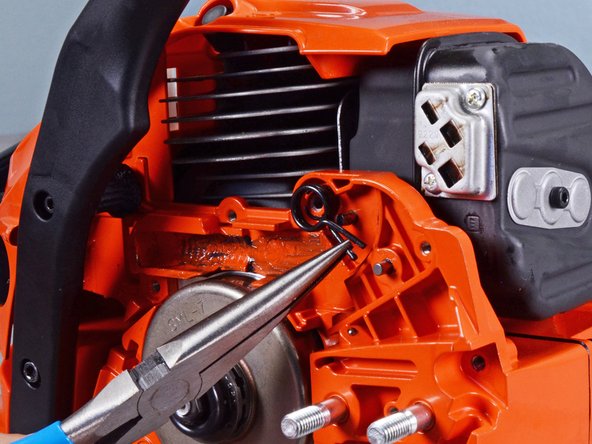
    • Use a flathead screwdriver to pry the collar out of its recess.

    • Remove the collar.

  23. Echo Chain Saw CS4910 2020 Clutch Assembly Replacement, Unfasten the engine cover: passo 23, immagine 1 di 2 Echo Chain Saw CS4910 2020 Clutch Assembly Replacement, Unfasten the engine cover: passo 23, immagine 2 di 2
    • Use a flathead screwdriver, or a 3 mm hex key, to remove the three 18 mm screws securing the engine cover.

  24. Echo Chain Saw CS4910 2020 Clutch Assembly Replacement, Remove the engine cover: passo 24, immagine 1 di 3 Echo Chain Saw CS4910 2020 Clutch Assembly Replacement, Remove the engine cover: passo 24, immagine 2 di 3 Echo Chain Saw CS4910 2020 Clutch Assembly Replacement, Remove the engine cover: passo 24, immagine 3 di 3
    • Pull the engine cover straight up off the engine.

    • Remove the engine cover.

  25. Echo Chain Saw CS4910 2020 Clutch Assembly Replacement, Loosen the spark plug: passo 25, immagine 1 di 2 Echo Chain Saw CS4910 2020 Clutch Assembly Replacement, Loosen the spark plug: passo 25, immagine 2 di 2
    • Use a spark plug socket to loosen the spark plug.

  26. Echo Chain Saw CS4910 2020 Clutch Assembly Replacement, Remove the spark plug: passo 26, immagine 1 di 1
    • Remove the spark plug.

  27. Echo Chain Saw CS4910 2020 Clutch Assembly Replacement, Insert a rope: passo 27, immagine 1 di 3 Echo Chain Saw CS4910 2020 Clutch Assembly Replacement, Insert a rope: passo 27, immagine 2 di 3 Echo Chain Saw CS4910 2020 Clutch Assembly Replacement, Insert a rope: passo 27, immagine 3 di 3
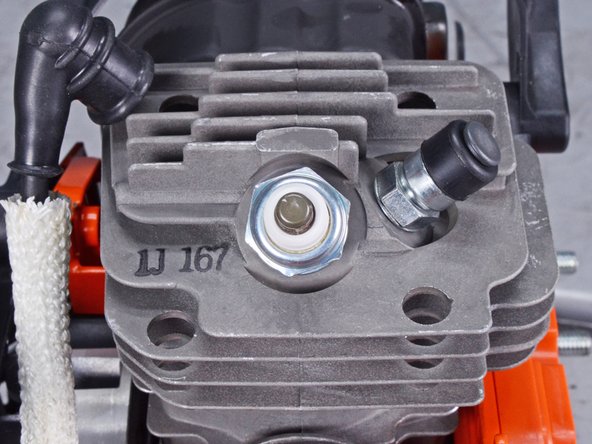
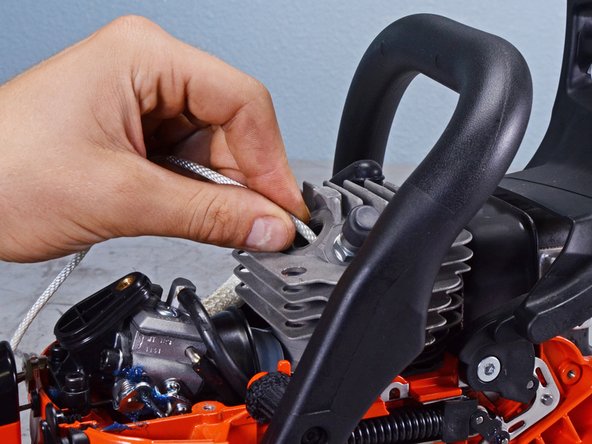
    • Insert a piston stopping cord or rope through the cylinder head into the combustion chamber until the crankshaft can no longer turn over.

    • Do not insert the entire cord into the combustion chamber.

  28. Echo Chain Saw CS4910 2020 Clutch Assembly Replacement, Remove the clutch drum nut: passo 28, immagine 1 di 2 Echo Chain Saw CS4910 2020 Clutch Assembly Replacement, Remove the clutch drum nut: passo 28, immagine 2 di 2
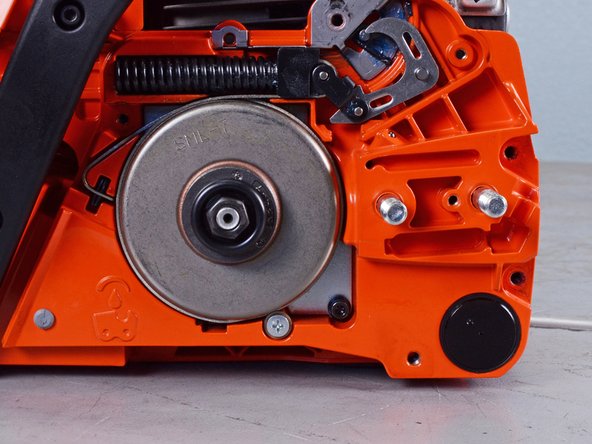
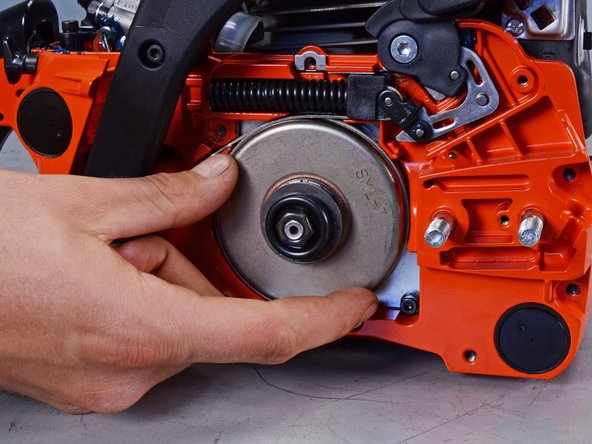
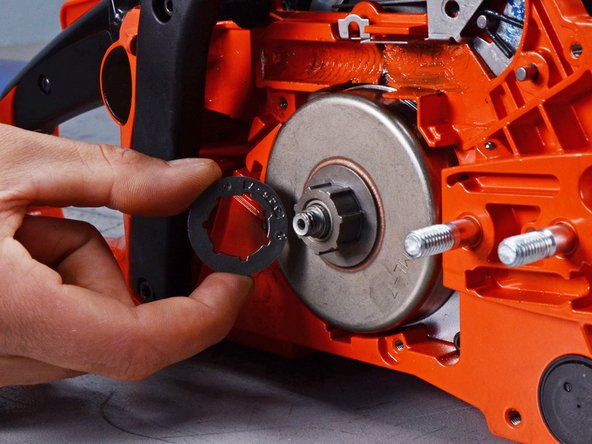
    • Use a 13 mm wrench to loosen and remove the clutch drum nut.

  29. Echo Chain Saw CS4910 2020 Clutch Assembly Replacement, Free the clutch drum: passo 29, immagine 1 di 3 Echo Chain Saw CS4910 2020 Clutch Assembly Replacement, Free the clutch drum: passo 29, immagine 2 di 3 Echo Chain Saw CS4910 2020 Clutch Assembly Replacement, Free the clutch drum: passo 29, immagine 3 di 3
    • Remove the washer.

    • Remove the rim sprocket.

  30. Echo Chain Saw CS4910 2020 Clutch Assembly Replacement, Remove the clutch drum: passo 30, immagine 1 di 2 Echo Chain Saw CS4910 2020 Clutch Assembly Replacement, Remove the clutch drum: passo 30, immagine 2 di 2
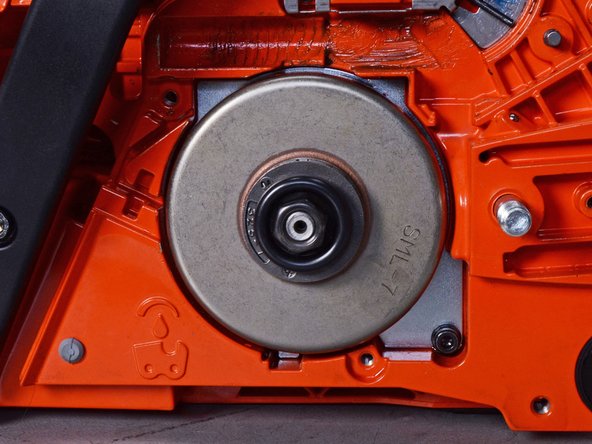
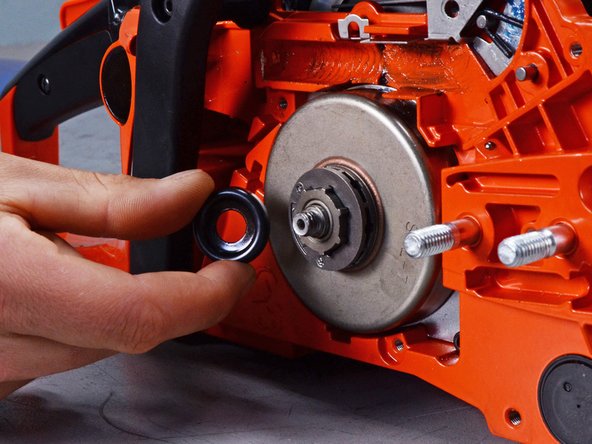
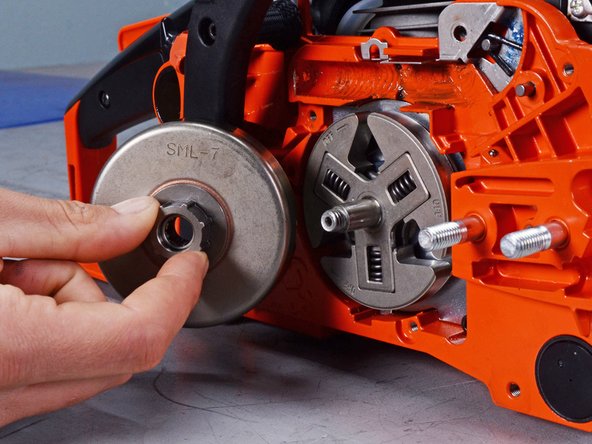
    • Pull the clutch drum straight off the clutch assembly to remove it.

  31. Echo Chain Saw CS4910 2020 Clutch Assembly Replacement, Remove the clutch assembly: passo 31, immagine 1 di 2 Echo Chain Saw CS4910 2020 Clutch Assembly Replacement, Remove the clutch assembly: passo 31, immagine 2 di 2
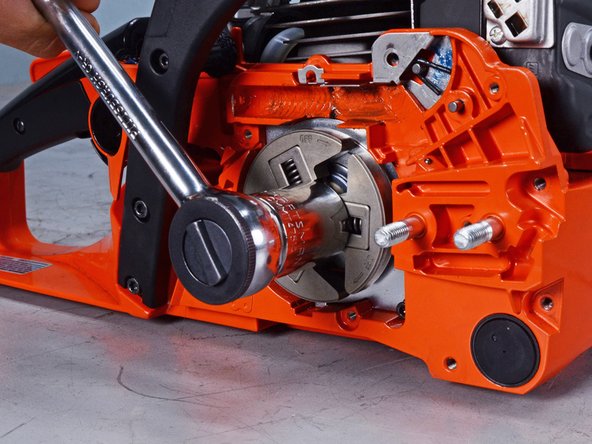
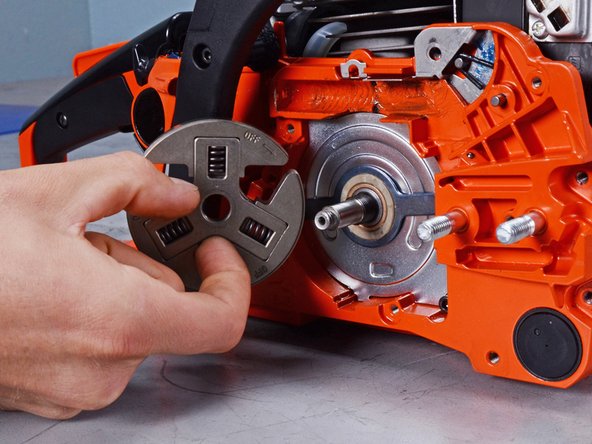
    • Use a clutch removal tool to loosen the clutch assembly.

    • Rotate the wrench clockwise instead of counter-clockwise.

  32. Echo Chain Saw CS4910 2020 Clutch Assembly Replacement, Remove the clutch assembly: passo 32, immagine 1 di 2 Echo Chain Saw CS4910 2020 Clutch Assembly Replacement, Remove the clutch assembly: passo 32, immagine 2 di 2
    • Remove the clutch assembly.

Conclusione

To reassemble your device, follow these instructions in reverse order.

Altre 4 persone hanno completato questa guida.

Alex Diaz-Kokaisl

Membro da: 01/16/22

125.786 Reputazione

592 Guide realizzate

Team

iFixit Membro di iFixit

Staff

137 Membri

17.524 Guide realizzate

3 Commenti

In step 28 where you are removing the nut that holds the clutch drum on which direction is the nut turned to remove it?

Woodrow Williams - Replica

Hi there!

It should be the normal counterclockwise movement to loosen that nut.

Alex Diaz-Kokaisl -

I have lossen the nut, it turns but does not come off. Do you know what it might be?

Svyatoslav Bogatyrev - Replica

Aggiungi Commento

Visualizza Statistiche:

Ultime 24 Ore: 1

Ultimi 7 Giorni: 15

Ultimi 30 Giorni: 98

Tutti i Tempi: 1,335