Introduzione
Questa guida è solo un prerequisito per disconnettere la batteria su un iPhone 7 Plus. Questi passi dovrebbero essere eseguiti ogni volta che si ripara un iPhone per evitare di attivare l'alimentazione durante l'operazione.
Cosa ti serve
-
-
Spegni il tuo iPhone prima di iniziare lo smontaggio.
-
Rimuovi le due viti pentalobe da 3,4 mm sul lato inferiore dell'iPhone.
-
-
-
Disponi l'iOpener al centro del tuo forno a microonde.
I didn't find this to be as hard as I had built it up in my mind to be; HOWEVER, saying that I need to say years ago I was the local Nokia service center in my town. But many years ago right after they got rid of analog times. Yeah. A classic installer/repairer mistake when starting something they haven't fixed or installed before is picking up the instructions, flipping through them; maybe even reading a section that is new-then tossing the instructions over the shoulder. "I got this." This usually comes right before something major gets broke. And I can tell you when you try to do it yourself and then mess it up horribly then take it to the repair shop. Well we called that "I can do it myself" syndrome and charged extra to put back together what they brought in in the box. Now knowing all this - I can't stress this enough because I am stupid, stupid, stupid. COVER YOUR SCREEN IN CLEAR BOXING TAPE AND READ ALL THE INSTRUCTION BELOW THROUGH TO THE END BEFORE EVEN ATTEMPTING THIS FIX. Take my advise.
I didn't have an iOpener, so I used a wheat type heat bag. If you do this though, make sure you put a layer of plastic between your Mac and the bag, or you'll get condensation in places you don't want it.
I started out using the iOpener but switched to my wife's hairdryer. A heat gun or hair dryer proved to be much more convenient and is a time saviour. You can heat more and the glue becomes more fluid make the next steps with the opening picks much easier
I know this is obvious, but backup your iPad with iTunes before you start. I'd also turn off your passcode if you have one.
Ther first time you heat up the iOpener for this repair when its room temperature I had to heat it up for more than 30 seconds. I remember I had to heat it up for around 45 seconds. However, after that when you need to reheat it again during the repair 30 seconds will be enough.
I used the wheat bag in a sensor microwave heating up to 65-70 deg C (155 def F).
Get yourself a cherry pit bean bag the size of your iPad. Heat it, put the iPad on it for 3 to 5 minutes or so, reheat the cherry pit bean bag, again put your iPad on it. Then heat the iOpener and start working. The cherry pit bean bag will have to be reheated several times, but it will soften the adhesive so you have less problems with the iOpener
The heating can be done very effectively (and quickly) with 3d printer heated bed. Make sure the bed is clean. Set the temperature to 60c, (130f ) and put the ipad face down for +/- 10 minutes. Repeat as needed throughout the “gentle prying” stages.
The iOpener did not work at all for me.
I had to use a heat gun and bring the edges of the case up to ~200 degrees (used an infrared thermometer to measure) before the glue would weaken. This obviously superheated the metal frame, so I also had to wear gloves to handle the phone while prying the back off with the included picks.
The iOpener, in my opinion, is of no help. Many warnings to say “don’t warm it too much”, but the glue doesn’t melt if not warm enough. As a result, a complete waste of time and energy. In addition, too much liquid in it, so it doesn’t lay on the device on a sufficient surface. I took a hairdryer and it worked much much better.
I used an immersion bath to heat this to 180F and applied it to the device until the outside temperature of the opener read 150F with an IR thermometer. Removing the screen took very little force with this method.
My experience. I was replacing the screen which had been cracked and a little shattered in some places. The iopener is pretty much useless, so was the suction cup. The suction cup would probably be more useful if I was doing something besides the screen. Also you probably want the clean the screen before using it so it can get good suction. I used a hair dryer on high for a couple of minutes at a time (someone on this tread suggested that). I used my exacto knife and a razor blade to get into the adhesive. First the exacto to get the initial cut, then the razor blade to go a little deeper. Could have probably just used the razor blade, but the exacto has a little more finesse. I got the razor blade in and a little under the glass then I used the picks to wedge in. I didn’t want to risk anything using the razor blade too much. Used tape to keep the shattered glass together.
My experience pt2
Fortunately the shattering was mostly on the edges and most of it had adhesive on the back so it stuck together. Just take your time and work your way around following the guide to get the screen off. Have some goof off or goo be gone to clean the frame when putting the new glass on or putting the existing one back. (someone suggested that also, very good idea). Be careful of the LCD (you should know that). The cable on my LCD was pretty tight, so I propped it up while taking the cable cover off and when I put it back on I did the same thing. I just put a bottle on the battery and leaned the back of the LCD on that while attaching the cables and putting the screws back on the cover. Also be careful with the home button and the bracket on the back of it. I had enough old adhesive on left on the bracket that it stuck back to the new glass fine. So far only 12 hours in, so we will see how that holds up when the kids get at it.
Another alternative if you do not have the iopener is to use a bed time hotwater bottle. Do not over fill it though. Just put enough hot water in to support the phone while you work around the adhesive.
I use both the hot water bottle and iopener together on Samsung's. It makes life easier
I followed the directions and heated my iOpener for 30 seconds in a 1000 watt microwave, and it came out at 160 degrees F, as verified by a infrared thermometer. This allowed me to separate the last bit of the back of my Samsung S8, which was already coming off due to a swollen battery (hence the reason for the repair).
If you follow these instructions, you will crack your screen like I did. Heating the iOpener for 30 seconds, using it to melt glue, then waiting 10 minutes to reheat is useless. The iOpener can be used to maybe warm the glue on whatever side you aren’t working on. You need a hairdryer and/or a heat gun to melt the glue and separate the glass from the iPad.
Anyone want to buy an old iPad with broken glass and a dead battery?
Not everybody has a microwave. You should provide a target temperature for the iOpener and instructions for a conventional oven, or pot of warm water, or whatever. Although I will probably use a heat gun …
I support the comments about the iOpener. Everyone has a hair drier, FHS, so get a cheap IR thermometer (£18) and blow heat until the area is 60+ deg C. Still takes w while, and getting the screen off is v scary, but just add more heat if you feel resistance.
The rest of the kit is good, esp the magnetic screwdrivers.
No, everyone does not have a hairdryer. Some of us don’t even have hair. Thank goodness I already had an IR thermometer, though.
nin10doh -
#### WARNUNG WENN MINIMALSTER SPRUNG IM DISPLAY IST FUNKTIONERT DAS NICHT!!! ######
Hatte einen winzigen, minimalen Sprung im Display. Ich dachte es könnte gehen, weil der Sprung “abgeschlossen” war. Er hat in einer Ecke ein winzige Glasteil rausgeschnitten. NEIN! Geht nicht. Habe alles mit viel Geduld dem iOpener und einem Föhn erhitzt. Es ist trotzdem sofort über das komplette Display zersprungen…
I’ve started with iOpener but changed very quickly to a heatgun. That was more efficient.
I could not get the iOpener hot enough to melt the glue on my ipad 6. I heated for 45 seconds once and it was boiling and it still never worked. Thank goodness contributors mentioned using a hair dryer. Using an 1700w hair dryer on high did the trick to get the screen off. Still took some time and the case got pretty hot but be patient. It took twice as long and a lot more patience to get the battery out.
I have an Ipad with touch screen issue, if i replace this part it should be Ok?
WARNING - DO NOT MICROWAVE ON A METAL MICROWAVE RACK
The metal microwave rack can heat up and melt through the iOpener cover letting the contents leak out.
Not a big issue for me as I have a heat gun and used that instead.
I opened my iPad with the iOpener. Be patient! It may take quite a bit longer to it the iOpener in the microwave than it says in the guide. My microwave can only do 800W and I had to put the iOpener in several times (maybe a total of 90-120 seconds). I recommend that you have the transparent side up an watch the bag carefully. As long a the bag doesn't bloat up and the liquid doesn't start bubbling you should be fine. But I recommend to take the iO out from time to time to check it. (More comments in Step 6.)
iPad mini gen5. I used the iOpener. My microwave is 1200w with carousel. 30 sec got the iOpener to 155ºF. For the 2nd heating, after 10 minutes sitting, the temp was still around 125º so I only cooked it for 15 sec. Not enough increase so +5 sec more which me to 165-170ºF. This should be considered ballpark info because who knows the real output of the various microwaves and the quality of the IR tool used to determine temp.
To successfully open my iPad mini I applied the iOpener twice to the left edge and twice to bottom. & once to R edge. Using the suction cup was difficult for me (I'm in my 70's so my hands don't work too well anymore). I had trouble holding the guitar pick and slipping them in (at an downward angle). In the end, sliding my thumbnail along the edge opened it very slightly and allowed the pick to get into the gap. I marked the ends of all my picks with a sharpie pen for the recommended 2mm insertion to avoid going in too deep. To get the screen open it took me approx 1 hour.
A hairdryer or heat gun works, if heating is kept around 100 deg C (212 deg F - boiling point of water). But… heating this way is cumbersome. Using a hotplate, set to 100 deg C, measured carefully with a fairly inexpensive IR gun, is simpler and easier, if you can afford the hotplate (I used an old pancake griddle with a thermostat knob). It works great for phones, setting them face down for 2 minutes, then picking them up with insulated gloves - cheap, wool gloves work fine. This may require repeated reheating to continue the display removal, but its much simpler.
Because its almost impossible to repeatedly lay an iPad/tablet on the hot plate, I propose an alternative.
Initially lay the larger iPad/tablet, face down, for 2 min, to heat all of the adhesive surrounding the display. Lift and begin the picking process describe in your removal steps. Then lay an iOpener on the hotplate for 2 min (already set to the exact, desired temp) to bring it to working temp for the remaining operations.
For iPads in particular, it makes sense to construct a simple, aluminum window frame, laid on a hotplate (see my comment above) that only touches the edges of the display, heating only the adhesive underneath. This prevents general heating of the entire device. Four strips of aluminum, placed together as a frame, would be the simplest and allow variations for all devices - envision it as a pinwheel of strips, radiating outward. Use it for any size device.
-
-
-
Riscalda l'iOpener per 30 secondi.
-
Se durante la riparazione l'iOpener si raffredda, scaldalo di nuovo nel microonde per altri 30 secondi.
DO NOT USE IN NON ROTATING MICROWAVE! It will pop a hole. I had it in for 45 seconds the first time. It wasn't very hot inside and I saw it started to leak on the paper towel I put under it. Just a fair bit of advice. I think I will just stick with the heat gun. Loud but useful.
I heated mine up for 30 seconds, tested, then again for 30 seconds. It felt adequately hot. Leaving it on the left side, per the instruction, for a minute did not loosen the adhesive. I ended up pulling the suction cup hard enough to shadder the old screen. Moral of the story, I don't think it gets hot enough safely to have an affect.
There is a clear problem here with the heating part using the iopener things....no details are given. Whoever is testing them needs to make it clear - What temperature does it need to be? And for which phone models, because they differ in what's needed. It's only £10-15 for a laser guided temp sensor unit, and the designers/repairers should have one of those already for doing these kinds of repairs. Explaining half a repair, is worse than not explaining at all :-(
All phones/devices differ it’s unrealistic and unsafe to put a exact time/temperature needed to soften the adhesive. It’s really quite simple you warm the device evenly and in a controlled manner just enough to enable pry tools and picks to begin separating. Best tool in my opinion but again this is because I have experience is a hot plate and heat gun both of which are used at nearly the lowest settings and I can handle flat palming the plate for almost 10 seconds I leave the device to conduct heat until approx it’s about 110 at most 120 ish this will be plenty to soften all the adhesive if any problem areas I use heat gun while prying. Again you need go slowly and learn with a throw away phone
If I may suggest include your microwave wattage so people can get an idea on time for there own
I agree with this.
I ended up using a hair dryer. That iOpener thing took forever.
30 seconds sure isn’t cutting it… 45 didn’t get the screen of my iPad air 2 to budge either… even after resting on the ipad for 4 minutes.
60 seconds in the microwave, the iOpener burst.
I’ll get a new one and try once more with heating it 45 seconds and repeat that for 30 minutes like others have said here. If that doesn’t work it’ll have to be the heat gun.
K
I can’t recommend the microwave. If the the iOpener becomes too hot, it bursts. Better put the opener in cooking water. Dry it and use it. Instead of an iOpener you can use hot/cool packs as well.
Great idea with using the heat packs. I will try that next time. Thank you
Collins -
Trust the directions! I forgot and left it in the Microwave too long and after 1 minute I had Mt Vesuvius - the iOpener burst and spewed the goodies out. The problem is, the Digitizer can be damaged by a hot air gun, so I had to tough out and remove the glue the hard way. I made it … with lots of patience! Tough lesson.
I also used a hairdryer. I used it on the low setting and I cut a piece of carboard to protect the rest of the screen. The iFixit tool and method is vert tedious and very time consuming in comparison. With the hairdryer method you can literally have the display apart in a few minutes. Using your other hand nearby the area you are heating it should be very hot but not enough to burn your hand. You only have to heat metal part of case near glass edge. If you have a cellular model then you need to be very careful because the black antenna area is plastic. So less heat and work your way up in adding heat just enough to separate around the area but not so much you melt the plastic!
iOpener was the worst part of the kit. Followed directions for :30 in microwave and took 4 trips to the microwave to loosen adhesive on left side of home button. I thought I was figuring it out and it was working well… even set a timer to wait 10 minutes between heating it up. Was on the right side and was on my 12th heat up when it exploded in the microwave. My only tip is that if you set it clear side up, as soon as you see any bubbles or boiling in the liquid, STOP! If you put a pot holder over the iOpener and press slightly to make good surface contact, that seemed to help. I finished heating with a “Corn Sack” that held heat better than the provided iOpener.
Mon iopener n'a pas tenu une réparation. Je ne vous conseille pas ce produit
Bonjour,
Nous sommes désolés que votre réparation ne se soit pas déroulée comme prévu. Il se peut que le produit était défectueux. Veuillez contacter notre service client support@ifixit.com (boutique américaine) ou eustore@ifixit.com (boutique européenne) en décrivant ce qui s’est passé.
Readers looking for temperature advice might check the comments of the previous instruction, as there are more there. I used an immersion bath to heat this to 180F and applied it to the device until the outside temperature of the opener read 150F with an IR thermometer. Removing the screen took very little force with this method.
Thank you for posting some actual temperatures. I have a heat gun with a very fine self-temperature regulation setting capability.
I will set it for 150-180 F, and use that to soften the adhesive.
Get a heat gun.
I followed the directions and heated my iOpener for 30 seconds in a 1000 watt microwave, and it came out at 160 degrees F, as verified by a infrared thermometer. A second heating about 15 minutes later in the micro and it came out at 190 degrees F. Plenty hot enough to soften the adhesive for removing the back on my S8. Based on the comments above I think people just need to use more patience.
I used various time settings. It got very hot. It would soften the glue but not a whole lot. If my screen had been intact and I was replacing something that was not a digitizer, it may have worked. A broken screen makes the process significantly more difficult. I ended up breaking the home button cable. Good bye TouchID…
It appeared 30 seconds were not enough, so I heated it more, by 5 seconds at a time until I got the right temperature about 70 degrees Celsius (measured with infrared pistol) to get the screen heated up to 60 C, the best for softening the glue. But the heat was quickly dissipating by the big aluminum back cover, so the best I got in 2 minutes of applying iOpener was around 45 C, which made the procedure difficult and having risk of breaking the screen. So I eventually abandoned iOpener and user a hot air gun with precise temperature setup. I set it to 90 C, which allowed me to open my iPad quickly and safely.
I, too, ended up using a hot air gun. I’ve done earlier versions of iPad before but the adhesive used on this IPad 5 A1822 was particularly difficult to remove.
Also, while the suction cup worked great when the glass is in tact, any cracks in the glass make the suction cup useless.
You need to remember here are different sizes of microwaves. I had the same issue.
Heating on a smaller unit I used 45-60 seconds. That worked but was time comsuming
Yeah, the iOpener didn't work for me either.... ended up using a hair dryer and that worked. The iOpener was too warm to soften the glue in my case.
-
-
-
Rimuovi l'iOpener dal forno a microonde, afferrandolo per una delle due estremità piatte per evitare il contatto con la parte centrale calda.
I did this repair. I used a hair dryer, I think it works better: gets very hot fast.
I did too, you get far more control and no expense on fancy equipment.
Readers looking for temperature advice might check the comments of the previous instruction, as there are more there. I used an immersion bath to heat this to 180F and applied it to the device until the outside temperature of the opener read 150F with an IR thermometer. Removing the screen took very little force with this method. I don’t know how much microwaves vary in heating consistency with these pads, but knowing how inconsistent the temperature of a bowl of plain rice gets in my microwave, I wasn’t interested in even trying to use it for this.
I vote for the hair dryer. The other methods work too but if you aren’t having any luck, switch to the hair dryer. While holding the iPad in my hand, I found that I am aiming the dryer at my finger at the same time and it gauges how hot it is. I stop when my finger can’t take it - maybe five seconds up close. Repeat as needed like I did.
If the maximum temperature for this iOpener is lower than the gadget glue minimum temperature, this device does not make sense.
I think the maximum temperature for this iOpener is below 100⁰C and most gadget glue minimum temperature is higher than 100⁰C. So the iOpener is useless for many opening steps in repair guides. But who knows because temperature range is not specified for this iOpener. -
-
-
Riempi una pentola o una padella con abbastanza acqua per immergerci un iOpener.
-
Scalda l'acqua finché non bolle. Spegni il fuoco.
-
Posiziona l'iOpener nell'acqua calda per 2-3 minuti. Assicurati che l'iOpener sia completamente immerso nell'acqua.
-
Usa delle pinze per estrarre l'iOpener scaldato dall'acqua calda.
-
Asciuga accuratamente l'iOpener con un asciugamano.
-
Il tuo iOpener è pronto all'uso! Se devi scaldare di nuovo l'iOpener, scalda l'acqua fino all'ebollizione, spegni il fuoco e immergi l'iOpener in acqua per 2-3 minuti.
What do I do if I don’t have a iopener?
Use a hair dryer
2 or 3 cups Rice in a sock, heat for about 2 minutes. But, I recommend the iopener.
When boiling in water you can put the iopener in a ziplock to keep it dry.
Even if you don't put in a ziplock bag, I found that the surface is mostly hydrophobic so drying it is very easy. I also didn't have tongs, but the bag is denser than water, so it sank and I attached clothes pins to the ends and was able to remove it with those.
2-3 minutes in near boiling water, then 2-3 minutes on my s10+ and it was super easy to cut the glue off.
I have a question, if I have a pan, and I have water, and a mean to boil the water, won't it be easier and cheaper to just use that.
Have you tried it? Water limits your temperature to 100℃, whereas 'pan on the stove' can easily get up to twice that. If your pan is even slightly warped, you'll have a few hot spots of direct conduction with convection everywhere else, heating things unevenly. Assuming you get the device up to temperature, how will you get it out without scratching it or burning yourself? After you're finished, do you really want to prepare food in the pan you warmed up adhesives and trace manufacturing substances in?
.
Boiling something form fitting to heat your device with is a lot more foolproof, and not being foolish is easier and cheaper. Direct pan heating can work, but you are leaving yourself open to a lot more problems than just taking the safe route.
-
-
-
Scaldare il bordo inferiore dell'iPhone aiuterà ad ammorbidire l'adesivo che fissa il display rendendolo più facile da aprire.
How long should I use a hairdryer for?
I used it until it was hot to the touch but not too hot where you burn yourself.
gczarny -
Hey, I just took apart my first iPhone 7 plus today, and it was easier for me to use guitar picks and a magic glass tool. I did tear the home flex on the screen—now I know to be more careful of that on disassembly—-~Katrina of iPad Rehab Microsoldering
Get a T-shirt add heat to a lil corner of it, with either a hair straighter or an Iron , touch the T-shirt if it’s seems hot but doesn’t burn u hold that lil hot piece of T-shirt against the edge ur trying to pry open , if it’s still not opening add a I’ll more heat,
I took a hot water bottle and layed it on the display of the iPhone for a minute, because I did not have an iOpener. That worked for me perfect.
How can I get all this tools
-
-
-
-
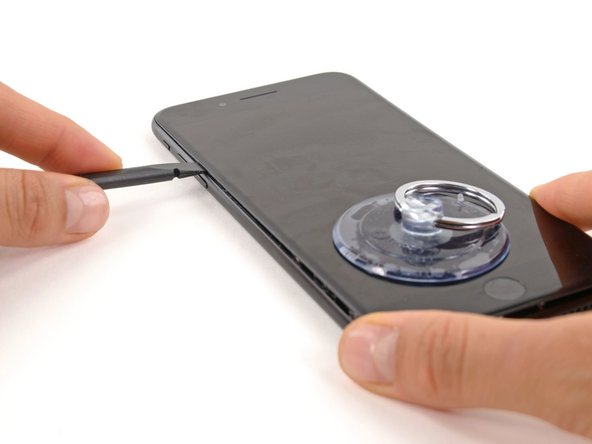
Applica una ventosa nella metà inferiore del pannello frontale, appena sopra il pulsante home.
Hi! My suction cup doesn’t work. It won’t strongly suck on my screen. Does anyone have any advice?
Heat it up just a little with a hair dryer make sure it’s flat , let it coo a bit now try it??
The suction cup you provide sucks. In that it doesn’t hold. Luckily I had a set of heavy duty suction cups from when I worked on my iMac.
-
-
-
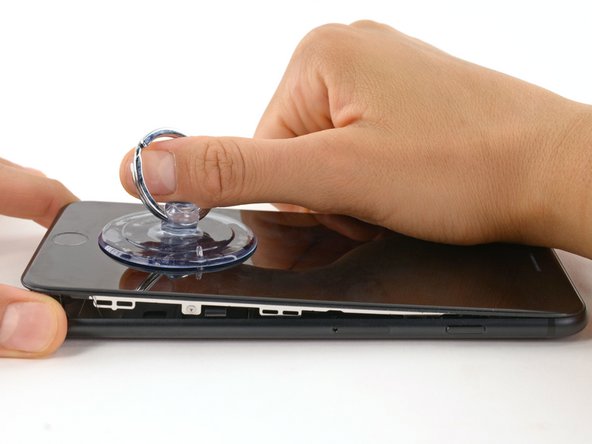
Tira la ventosa con una pressione forte e costante per creare una piccola fessura tra il pannello anteriore e il case posteriore.
-
Inserisci l'estremità piatta di uno spudger nella fessura.
-
Mentre continui a tirare la ventosa, fai ruotare lo spudger per allargare l'apertura tra lo schermo e il case posteriore.
Be very careful not to pull up with too much force. My screen just shattered while I was pulling up with my suction cup. (There were no previous cracks or chips or anything).
I’m stuck on this part. I’ve heated the bottom up and attached the suction cup right above the home button, but I can’t pull it apart. I feel like I’m going to break the glass display. Tips?
Someone mentioned above, using strong tape helps .
My first 7 Plus opening. I pulled up the screen just enough to insert a thin guitar pick at the bottom of the phone to break the adhesive. I didn’t even create a gap as such. I then ran the pick along the sides to continue to detach the adhesive, just like iFixIt show in Step 10 for the top of the phone.
My screen already had a crack at the bottom, near the home button, so I was nervous about pulling too hard on the screen. It had a screen protector fitted so maybe that helped keep it all together.
iFixIt’s use of a spudger at the bottom of the phone looked hazardous to me, especially with my damaged screen.
This must be a joke. I’ve been trying for days to pull open the iphone like this. Doesn’t work. I bent the ring on the suction cup trying to pull it off, but nothing happens, no gap, not remote possibility of a pick or spudger getting in there.
Ended up using a blowdryer and a razor blade. Bottom got scratched up, but there was no way that fat plastic spudger was going to fit. I got the razor under the corner, from there worked to middle and twisted with repeatedly adding heat. Lots of heat.
Be aware that there is a small connector, under the home button.
I found that the edge of the spudger was too thick, so I sanded it down to almost a knife edge. This made it much easier to insert into the gap.
Use the Opener and a razor blade to cut through the adhesive. It takes about 45 seconds to heat up the Opener in a 1000 watt microwave. Be careful not to damage the thin display ribbon cables on the right side iphone. After you use the razor blade to cut the adhesive on the two sides and bottom you should be able to use the spudger to remove the display screen.
-
-
-
Inserisci l'estremità piatta di uno spudger tra il pannello anteriore e il case posteriore nella parte inferiore sinistra dell'iPhone.
-
Fai scorrere lo spudger lungo il lato sinistro del telefono iniziando dal basso e muovendoti verso i pulsanti del controllo volume e dello switch suoneria/silenzioso, per rompere l'adesivo che tiene in posizione il display.
-
-
-
Fai scorrere una levetta di apertura sotto il display lungo il lato superiore del telefono per indebolire l'adesivo rimanente.
I couldn't find the pick in the tool set, so made my own. Then I found the original in the battery box. %#*@.
Same thing for me
-
-
-
Tira il gruppo display allontanandolo lievemente dal bordo superiore del telefono per sfilare le clip che lo fissano al case posteriore.
-
Apri l'iPhone inclinando il display e sollevandolo dal lato sinistro, come si farebbe con la quarta di copertina di un libro.
So if I broke the cable that connects the display to the logic board. What replacement part would I need to order now?
Probably the screen
-
-
-
Rimuovi le seguenti quattro viti tri-wing Y000 che fissano la staffa inferiore del cavo del display alla scheda logica:
-
Tre viti da 1,2 mm
-
Una vite da 2,6 mm
Is it really safe to lay the device fully open like a book? The cable leading to the LCD gets stretched across the sharp edge of the aluminum edge of the back cover.
Generally I'd say no, it's not safe. In reality I've seen a bit of variance in the cable length, and sometimes it'll be fine—but mostly I'd be prepared to prop the display up or hold it in place at a slight angle so it doesn't put too much stress on the cables. On prior iPhones it was easy to rubberband the display to a box or a can of soda, and something like that would probably work well here too. Use your own judgment.
You could stick the suction cup back on, near the right side of the phone, with the blue hook oriented in such a way that it becomes a stand for the screen. That way it won’t open much more than 90 degrees, and leaves both your hands free.
Mark -
The tri wing screws are so hard to remove. What's the trick?
I cannot remove one of the corner screws in this step and i have used the tweezers and the y000 tri tip and i am afraid that it is stripping it. is there a work around for this step?
@katmonday1 No workaround unfortunately. Make sure the driver tip is in good condition and fits the screw correctly. Seat it in the screw, hold the driver perfectly vertical, press down hard (and maintain it), and turn. It’ll come out. If it’s really stripped you’ll have to get more aggressive—try one or more of the techniques in this guide or get some help. Good luck!
A tip to remember which screw is which as the differences are pretty tiny: I used different colored sharpie fine-points and made a mark on the top of the screws before removing. I thought about having strips of tape that I stuck similar sizes to, but the coloring seemed to work more easily. I only did this for step 11 and it saved me down the road when trying to differentiate the 1.2 and the 1.3mm screws!
STOP! Before you remove Any screws, be sure to create several bins to hold the various sizes in… or mark them like Trey suggested. I failed to pay attention because I thought they were all the same… they are not. It is very hard to figure out the sizes if you remove them all and store them in a single location.
i had a piece of paper with the steps numbered that involved screws. I had double sided tape on the paper and the number of screws and thier position marked. This was so helpful in removing and then finding and installing the tiniest screws on earth. And i have TINY hands. I can’t imagine someone with large paws being able to accomplish any of this.
there is one screw thats 1.2 mm but its bigger than the others and will fit in no hole of the entire phone. i got it out bot now i have no idea where it has to go i tried every hole. can somebody help me?
what do i do if one of the screws dont want to come off
-
-
-
Rimuovi la staffa inferiore del cavo del display.
I am confused, please help. LOL the bracket, the very first one being removed. I see it has three screws the same size and one a different size? I've been trying to fix my daughter's phone and ordered a 0.6 mm Tri Wing screwdriver for iPhone 7 plus /Apple watch. It seems to fit the screws and it seems to be turning them although I can't see that well but they're not coming out. However when I used it on a smaller bracket with two screws they came right out so I'm thinking I don't have the right screwdriver I am at my Wit's End!! I have been working on this phone or attempting to for a while now. I cannot find a list anywhere of the exact size screwdrivers needed to Take apart an iPhone 7 plus. Any help would be greatly appreciated.
If your tri-wing screwdriver worked for other tri-point screws in the phone, then it should work for the screws you are struggling with! If it feels like the screws are spinning but not coming out, try to use tweezers to pull them out. I often struggle with tri-point screws, and need to apply some downward pressure to remove them. This can be risky though, as you do not want to strip the screw or damage components underneath the bracket. If you continue to struggle, you can give this driver and this bit a try.
Also be aware that the battery connector might stick to the bottom of the steel bracket. This part had me a bit puzzled at first. lol
Just gently pry the connector off the steel bracket to release it and be sure the connector isn’t allowed to accidentally reconnect to the board.
-
-
-
Usa l'estremità a punta di uno spudger per sollevare il connettore della batteria dal suo zoccolino sulla scheda logica.
on reassembly, make sure that the connector cable is back in place, along side the battery, and not up, or on top in any way.
I slipped a small piece of paper under the flap.
After this step it is worth jumping to step 36 and disconnecting the lighting connector assembly (indicated with the orange rectangle) and connecting the new cable to test it out. After attaching the new lightning connector assembly, reattach the battery, and try plugging it in to see if the new assembly works correctly. If it does, then power down the phone, disconnect the battery, and disconnect the new lightning connector assembly. Then continue. If it doesn’t work, this check will save you a couple of hours of work.
-


Per rimontare il tuo dispositivo, segui queste istruzioni in ordine inverso.
Per rimontare il tuo dispositivo, segui queste istruzioni in ordine inverso.
Un ringraziamento speciale a questi traduttori:
100%

albertob ci sta aiutando ad aggiustare il mondo! Vuoi partecipare?
Inizia a tradurre ›

Un commento
after I replaced my battery and tried to turn on my phone it would just stay on the apple logo and nothing would happen. I know I did everything right but… help
The recommendation of discharging the battery is completely unnecessary. Even a 25% charged battery can explode. Completely ridiculous suggestion.
pargoff - Replica
The risk of thermal runaway on these batteries decreases with the battery's SOC (state of charge). Below 50% charge the risk is fairly low, and at 25% charge the risk of a thermal event is near zero. If I recall correctly, the same suggestion appears in Apple's official (non-public) service manuals for the iPhone.
Jeff Suovanen -
@jeffsu Yes, that is correct. Apple does require all certified staff to discharge the battery below 25%. This is an industry standard for all LiION batteries. If you don’t want to do this, just make sure to not puncture the battery and disconnect it first thing.
iHelpU.Tech - Replica
Hang on a second here, doesn’t the Ifixit part I ordered come with the seals? The display assembly? It doesn’t. Now I have to wait another week?!
Vanessa Pinter - Replica
How do you turn off if the screen isn’t responding to touch?
adam - Replica
The replacement battery came with the seal—but how do you put it on???
lkollar - Replica
Instructions for replacing the seal are here: Sostituzione guarnizione adesiva display iPhone
bester - Replica
I just found the instructions on how to install the seals AFTER I was completed and had to figure it out. Maybe, just maybe you should link this somewhere on the guild instead of buried in a comment. Just a thought.
Charles Meitin - Replica
Step 1 is: Read through all the steps and comments or the method prior to starting on this Step 1. There's a lot of much needed information and experience that you can learn from which will reduce the chance of struggling, wasting time or even breaking your device.
My favourites are:
Use a hot water bottle.
Label all screws you remove with their size and location on a piece of paper with double sided sticky tape.
Test the lightning assembly at step 13
There is a Standoff driver bit in the box, don't use a screwdriver.
etc...
Neil Eriksen - Replica
A tip for looking out for all those little screws. I used an ice block tray, for all the little screws etc. I numbered each with the step number, as in the instructions, but not all steps have bits to look out for. Where two different size screws are used I had a tray for each size and marked step a and step b. For this I coloured each tray sticker with the colour of the screw as shown in the instructions. All this worked a treat with no confusion or using the wrong part.
Herb
Herb Adler - Replica
The screw size for those with a screw set is P2.
Gareth Flandro - Replica