Salta al contenuto principale

Disassembling

Solo Prerequisita
Questa guida è destinata a essere usata solo come prerequisito per altre guide. Da sola è incompleta.

Cosa ti serve

  1. Disassembling, Disassembling: passo 1, immagine 1 di 1
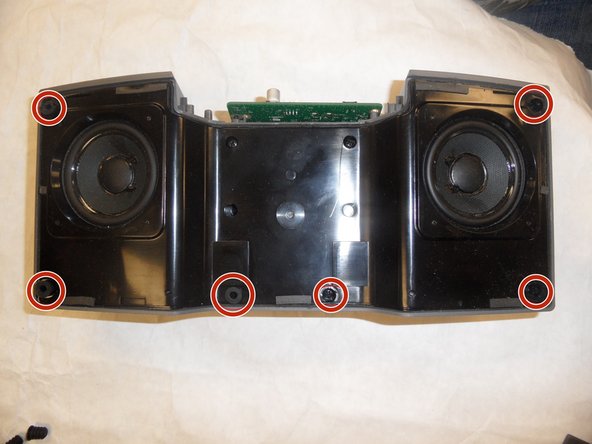
    • Remove six 10 mm length screws from the bottom panel of the SoundDock.XT using a #1 Phillips screwdriver.

  2. Disassembling: passo 2, immagine 1 di 1
    • Remove the Front Panel, use a #2 Phillips screwdriver to remove the two 6.5 mm length front panel screws located under the bottom cover (highlighted in red circles in the photo).

  3. Disassembling: passo 3, immagine 1 di 1
    • Next, use a plastic opening tool to slide under the edge of the front cover. Start edge located at the top of the left or right speaker and work your way around the speaker. Remove the front cover.

  4. Disassembling: passo 4, immagine 1 di 2 Disassembling: passo 4, immagine 2 di 2
    • Use a wide nose tweezer to remove six rubber grommets from the front of the SoundDock XT.

    • Using pointed tweezers may damage the rubber grommet.

  5. Disassembling: passo 5, immagine 1 di 1
    • Use a #2 screwdriver to remove the six 8.5 mm length screws from the speaker cover.

  6. Disassembling: passo 6, immagine 1 di 1
    • Using a metal spudger, slide between the outer case and the front speaker cover. Work your way around the cover and remove the speaker cover. You now have access to the speakers.

    • Using the metal spudger may damage the plastic speaker cover.

Conclusione

To reassemble your device, follow these instructions in reverse order.

Altre 2 persone hanno completato questa guida.

Team

IUPUI, Team 1-4, Hagerty Fall 2015 Membro di IUPUI, Team 1-4, Hagerty Fall 2015

IUPUI-HAGERTY-F15S1G4

5 Membri

3 Guide realizzate

0 Commenti

Aggiungi Commento

Visualizza Statistiche:

Ultime 24 Ore: 0

Ultimi 7 Giorni: 0

Ultimi 30 Giorni: 0

Tutti i Tempi: 95