Salta al contenuto principale

Questa guida ha delle modifiche più recenti. Passa all'ultima versione non verificata.

Disassembling the Samsung Laptop Ultrabook NP530U3B

Cosa ti serve

  1. Disassembling the Samsung Laptop Ultrabook NP530U3B, Disassembling the Samsung Laptop Ultrabook NP530U3B: passo 1, immagine 1 di 1
    • Remove the 8 small screws.

  2. Disassembling the Samsung Laptop Ultrabook NP530U3B: passo 2, immagine 1 di 2 Disassembling the Samsung Laptop Ultrabook NP530U3B: passo 2, immagine 2 di 2
    • Remove the other 6 screws.

    • Remove the hard disk and the RAM slots.

  3. Disassembling the Samsung Laptop Ultrabook NP530U3B: passo 3, immagine 1 di 1
    • This is the hard disk - Hitachi 500 GB

  4. Disassembling the Samsung Laptop Ultrabook NP530U3B: passo 4, immagine 1 di 1
    • Ensure that the hard disk has been removed. Carefully detach the bottom cover.

  5. Disassembling the Samsung Laptop Ultrabook NP530U3B: passo 5, immagine 1 di 1
    • Once the bottom cover is removed, your device should look like this.

  6. Disassembling the Samsung Laptop Ultrabook NP530U3B: passo 6, immagine 1 di 1
    • Remove the 4 screws to detach the battery.

    • Remove all of the sticky tape.

    • Carefully disconnect the small power connector by using a tool to push the connector out through the small gap in the middle of the connector.

    • The connector won't come out all the way, because the battery pack is in its way.

  7. Disassembling the Samsung Laptop Ultrabook NP530U3B: passo 7, immagine 1 di 2 Disassembling the Samsung Laptop Ultrabook NP530U3B: passo 7, immagine 2 di 2
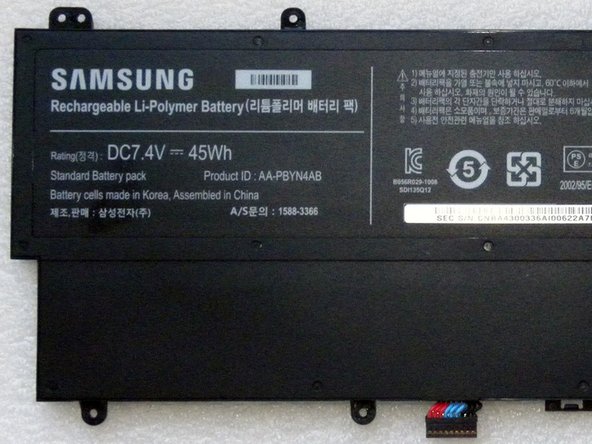
    • This is the Samsung 7.4V 45Wh battery.

    • Ensure that the battery is removed before continuing.

  8. Disassembling the Samsung Laptop Ultrabook NP530U3B: passo 8, immagine 1 di 1
    • When the battery is removed, this is how it will look.

  9. Disassembling the Samsung Laptop Ultrabook NP530U3B: passo 9, immagine 1 di 1
    • Remove the processor fan.

    • There are 2 screws holding it in place. Loosen and remove them.

  10. Disassembling the Samsung Laptop Ultrabook NP530U3B: passo 10, immagine 1 di 1
    • This is the processor fan.

  11. Disassembling the Samsung Laptop Ultrabook NP530U3B: passo 11, immagine 1 di 1
    • Remove the processor heat sink.

    • 3 screws hold this part in place. Loosen and remove them.

  12. Disassembling the Samsung Laptop Ultrabook NP530U3B: passo 12, immagine 1 di 1
    • Disconnect the antenna cables from the WiFi card.

    • Remove the screw.

    • Be sure to match the colors when reattaching the cables.

  13. Disassembling the Samsung Laptop Ultrabook NP530U3B: passo 13, immagine 1 di 1
    • Remove the screw.

    • Lift the latch upwards to loosen the cable.

  14. Disassembling the Samsung Laptop Ultrabook NP530U3B: passo 14, immagine 1 di 1
    • Remove the screw.

  15. Disassembling the Samsung Laptop Ultrabook NP530U3B: passo 15, immagine 1 di 1
    • Remove the screw.

  16. Disassembling the Samsung Laptop Ultrabook NP530U3B: passo 16, immagine 1 di 1
    • To remove the Motherboard, carefully disconnect the cables.

  17. Disassembling the Samsung Laptop Ultrabook NP530U3B: passo 17, immagine 1 di 2 Disassembling the Samsung Laptop Ultrabook NP530U3B: passo 17, immagine 2 di 2
    • This is the Motherboard - there is a front and rear view.

Conclusione

To reassemble your device, follow these instructions in reverse order.

Altre 34 persone hanno completato questa guida.

30 Commenti

Hello,

Do you know where can i reset the Bios CMOS in that motherboard?

I think there are people who wants to know becose system upgrade is leading to bios ACPI Error.

Thanks for your help

Luis Orland - Replica

No, I do not know where is a reset pin of BIOS.

Try to disconnect NVRAM battery.

Wait 15 minutes and reconnect again.

Jose Gustavo Abreu Murta - Replica

To reset BIOS this NP530U3, only disconnect all power supply (MAIN battery, CMOS battery and power source). And hold press POWER button for 1 min.

warmdk - Replica

I try it but don't work, do you know another way to do this

manhique -

Hello,

I have seen many screens with model number LTN140AT21-XXX for this laptop. My laptop NP530u4b has a screen LTN140AT21-802. I would like to know if I can use a LTN140AT21-002 screen, or if only is good a screen with number LTN140AT21-8.

thanks for your help.

alex - Replica

Aggiungi Commento

Visualizza Statistiche:

Ultime 24 Ore: 4

Ultimi 7 Giorni: 18

Ultimi 30 Giorni: 69

Tutti i Tempi: 52,894