Salta al contenuto principale

Disassembling Yamaha YPG-225 Faceplate

Cosa ti serve

  1. Disassembling Yamaha YPG-225 Faceplate, Batteries: passo 1, immagine 1 di 1
    • Turn the keyboard over so that the keys are facing the ground.

  2. Disassembling Yamaha YPG-225 Faceplate: passo 2, immagine 1 di 1
    • Pop the tabs on the battery casing and remove it from the back plate.

  3. Disassembling Yamaha YPG-225 Faceplate: passo 3, immagine 1 di 1
    • Locate the six batteries and remove them from the battery cavity.

  4. Disassembling Yamaha YPG-225 Faceplate, Faceplate: passo 4, immagine 1 di 1
    • Remove the six 10mm screws at the top of the backplate.

  5. Disassembling Yamaha YPG-225 Faceplate: passo 5, immagine 1 di 1
    • Remove the seven 12mm screws in the middle of the back plate.

  6. Disassembling Yamaha YPG-225 Faceplate: passo 6, immagine 1 di 1
    • Remove the eight 10mm screws from the side and the bottom of the back plate.

  7. Disassembling Yamaha YPG-225 Faceplate: passo 7, immagine 1 di 1
    • As the face plate is no longer connected to the body of the keyboard, be careful to not drop the body when performing this step.

    • Flip over the keyboard.

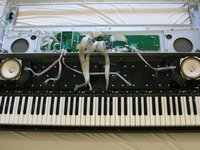
  8. Disassembling Yamaha YPG-225 Faceplate: passo 8, immagine 1 di 2 Disassembling Yamaha YPG-225 Faceplate: passo 8, immagine 2 di 2
    • Lifting from the front and the back of the face plate equally, pull the face plate up and then back, away from the keyboard.

    • Be careful when removing the face plate. There are wires attached.

Conclusione

To reassemble your device, follow these instructions in reverse order.

Team

Cal Poly, Team 2-62, Propen Fall 2012 Membro di Cal Poly, Team 2-62, Propen Fall 2012

CPSU-PROPEN-F12S2G62

2 Membri

6 Guide realizzate

0 Commenti

Aggiungi Commento

Visualizza Statistiche:

Ultime 24 Ore: 0

Ultimi 7 Giorni: 0

Ultimi 30 Giorni: 4

Tutti i Tempi: 1,651