Salta al contenuto principale
Disassembling VTech MobiGo Touch Learning System Screen Enclosure

Disassembling VTech MobiGo Touch Learning System Screen Enclosure

Daniel Kresge

Daniel Kresge e 4 altri collaboratori

Ultimo aggiornamento il May 10, 2020

10 minuti
Moderato

Introduzione

Vai al passo 1

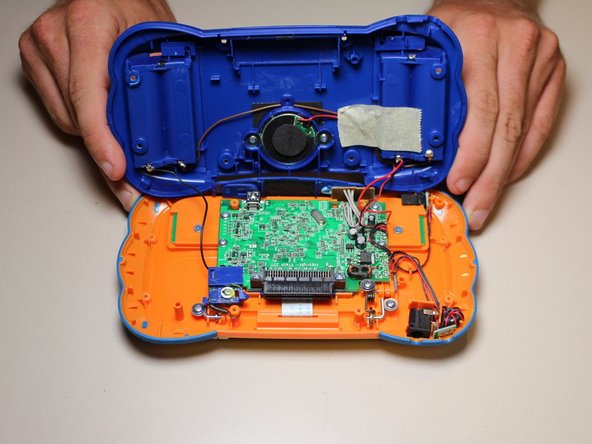
The VTech has two cases. The main case housing the main circuit board and other components and a smaller enclosure that houses the screen and two buttons. This guide is how to disassemble the Vtech to gain access to the screen and button components.

Cosa ti serve

Strumenti

Mostra di più…

  1. Disassembling VTech MobiGo Touch Learning System Screen Enclosure, Case: passo 1, immagine 1 di 1
    • Remove the battery covers and the four batteries.

  2. Disassembling VTech MobiGo Touch Learning System Screen Enclosure: passo 2, immagine 1 di 2 Disassembling VTech MobiGo Touch Learning System Screen Enclosure: passo 2, immagine 2 di 2
    • Remove the four plastic caps with a metal spudger to expose the 6.0 mm Philips JIS #0 case screws.

    • Remove the eight 6.0 mm JIS #0 case screws.

  3. Disassembling VTech MobiGo Touch Learning System Screen Enclosure: passo 3, immagine 1 di 2 Disassembling VTech MobiGo Touch Learning System Screen Enclosure: passo 3, immagine 2 di 2
    • Using a plastic opening tool, separate the two pieces of the case carefully.

  4. Disassembling VTech MobiGo Touch Learning System Screen Enclosure, Disassembling VTech MobiGo Touch Learning System Screen Enclosure: passo 4, immagine 1 di 1
    • Remove the three 4.0 mm Philips J0 screws holding the "L" shaped brackets in place.

  5. Disassembling VTech MobiGo Touch Learning System Screen Enclosure: passo 5, immagine 1 di 1
    • Remove the three "L" shaped brackets and the spring.

  6. Disassembling VTech MobiGo Touch Learning System Screen Enclosure: passo 6, immagine 1 di 1
    • Flip the device over and remove the three 4.0 mm Philips J0 case screws.

  7. Disassembling VTech MobiGo Touch Learning System Screen Enclosure: passo 7, immagine 1 di 1
    • Separate the front and back of the case.

    • Use a plastic opening tool if necessary.

Conclusione

To reassemble your device, follow these instructions in reverse order.

Altre 2 persone hanno completato questa guida.

Team

USF Tampa, Team 8-3, Eyestone Fall 2015 Membro di USF Tampa, Team 8-3, Eyestone Fall 2015

USFT-EYESTONE-F15S8G3

3 Membri

17 Guide realizzate

1Commento della guida

Does anyone know what company in china sells the touch screen replacement?

Anthony Shaw - Replica

Aggiungi Commento

Visualizza Statistiche:

Ultime 24 Ore: 0

Ultimi 7 Giorni: 3

Ultimi 30 Giorni: 14

Tutti i Tempi: 2,191