Introduzione
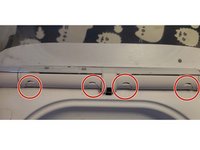
This guide is for the Surepet microchip pet feeders with serial number below E020 -0400001. These contain a modular motor cartridge that Surepet used to replace - these modules are not made anymore.
In this disassembly I show how to remove and replace the arms, and resolve the issue of the lid disengaging from the motor. The lid may not open when the motor turns, resulting in the motor spinning nonstop. You might be able to manually open and close the lid, and other symptoms may include a ticking sound where the motor tries to turn when it shouldn't.
I also found two great videos showing disassembly and reassembly for cleaning (not my videos!), but they're in German. Feel free to follow along - steps 5 and 6 in this guide, repair-specific steps relating to the motor, would be the only new information not given in the videos.
I also mention that the arms can be replaced with 3d printed parts - I don't have any print files because I haven't needed them yet, but I could make them if enough people want them (at least for the arms, they seem simple enough).
Cosa ti serve
-
-
Surepet has this unlisted video showing you how to remove the broken motor cartridge. Very useful even if you just need to clean inside the device.
-
Follow along until 1:41. Try to start with the lid open before removing batteries (if the lid moves freely this doesn't matter).
-
-
Attrezzo utilizzato in questo passaggio:Tweezers$4.99
-
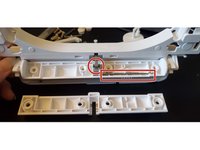
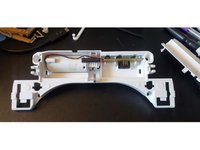
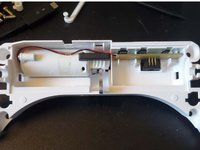
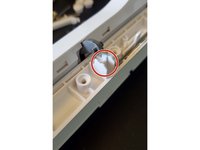
Remove the two pins on either side of the motor cartridge that hold the arms in place. They should come out with a shake, but you can also use tweezers to grab them if they're not coming out. Keep the pins safe.
-
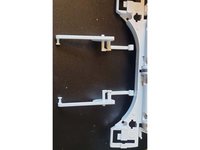
Swing the arms out, and remove them by lining up the notch shown in the third image. These arms are two pieces clipped together - they can also be pulled apart.
-
The arms can easily be replaced with 3d printed parts.
-
-
-
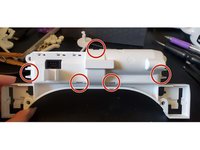
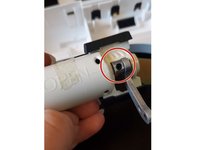
Pry off the 4 screw covers and unscrew the cover of the cylindrical rotating piece. (Please excuse the photo I took after putting everything back together)
-
Remove the short pin in the center, the long thin pin holding down the lid release slider, and the lid release slider. Keep these small pieces safe.
-
Pull off the rotating cylindrical piece by releasing it from the clips on either side. Watch out for the grease in the areas that get clipped in, as they attract dust and hair. If needed, you can clean the old grease and put on new grease when reassembling.
-
-
-
-
This is the tricky part: the rest of the motor cartridge is two pieces held together by 5 snap tabs. Use your pry tools to push these tabs in, and stick a pry tool between the two halves to work your way around the clips. I started with the top clip (as seen in the first photo), then the left and right, then the bottom ones.
-
Use the second image as a reference to see where the seam is between the two halves.
-
-
-
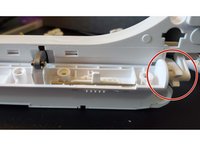
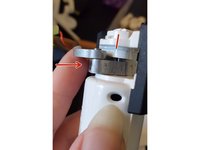
The motor and daughter circuit board should pull right out. Find the set screw holding the lid mechanism linkage to the motor (second photo). If your motor wasn't opening the lid or making a clicking sound, this has probably come loose.
-
The shaft of the motor is a D shape, and the set screw needs to be tightened on the flat side - the line in the third photo. is parallel to the desired flat side, and the arrow shows the direction the set screw should be.
-
At this point, you may need to power the motor and allow the motor to rotate so the flat side can be lined up with the set screw. On the main unit, screw the battery housing back on (undo the step at 1:11 on Surepet's video), insert batteries, and connect the ribbon cable, paying attention to the direction of the connector clip.
-
Press the open/close button on the daughter circuit board so the motor attempts to move the lid. Then pull one of the batteries out when the shaft is aligned as seen in the third image.
-
Be very careful not to touch any circuit boards with metal tools or dirty hands, or to cross any wires when you do this (it's ok to interact with the smaller circuit board to press the open/close button). Once you've gotten the shaft aligned, the set screw tightened, and tested that the motor works as intended, take the batteries out.
-
-
-
An interesting point here: there is no limit switch telling the motor when to stop. When these metal pieces come into contact with its housing, the motor can't spin anymore and will draw more current to attempt to keep going. Only then does the circuit stop powering the motor.
-
If the lid does work correctly on your unit but makes a ticking sound, this may be because the set screw is just a little loose, so the motor isn't able to find a definitive stopping point. It then doesn't draw enough current for the circuit to stop powering it fully. The motor's attempt to keep going can also further loosen the set screw.
-
This is not the most robust design, as this is what causes the set screw to loosen. You'll have to keep re-tightening it over time, and in extreme cases, this may lead to the motor housing cracking, or gears inside the motor breaking.
-
-
-
Follow the guide in reverse to re-assemble. Please note the special instructions for undoing steps 3 and 2.
-
Step 3: The short, thick pin that goes through the linkage from the motor needs to sit inside notches on both halves of the cylindrical rotating piece. After clipping the cylinder onto the cartridge make sure the pin sits in the notch shown in the first photo. (Also make sure you put the lid release latch and pin back in)
-
Hold the cylinder as seen in the second photo, and drop the cylinder lid so that the lid's notch is also aligned with the pin. Screw it in place.
-
Step 2: these arms have a left side and a right side. Line them up as shown in the third photo so you don't get them on backwards.
-
-
-
Follow surepet's video from 1:44 on to re-insert the motor cartridge and close the case.
-


It's come to my attention that newer motor cartridges have plastic linkage pieces instead of metal like shown here. Let me know if you have issues with these design changes and I may take apart one of the plastic ones!
It's come to my attention that newer motor cartridges have plastic linkage pieces instead of metal like shown here. Let me know if you have issues with these design changes and I may take apart one of the plastic ones!
Annulla: non ho completato questa guida.
Un'altra persona ha completato questa guida.

Un commento
Thank you so much, it has been several time I tried to fix this damned motor and I never thought the problem was due to this screw.
All is tight now and working fine finally !
Have a good day !