Salta al contenuto principale

Disassembling Nokia 3560 Logic Board

Cosa ti serve

  1. Disassembling Nokia 3560 Logic Board, Back Cover: passo 1, immagine 1 di 2 Disassembling Nokia 3560 Logic Board, Back Cover: passo 1, immagine 2 di 2
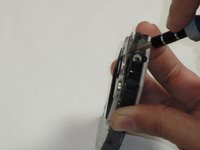
    • Press down on the release latch on the bottom of the cover.

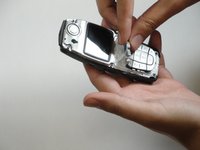
    • Once the latch is released, lift the cover from the phone.

  2. Disassembling Nokia 3560 Logic Board, Disassembling Nokia 3560 Keypad: passo 2, immagine 1 di 1
    • Lift the front case off of the phone body.

  3. Disassembling Nokia 3560 Logic Board: passo 3, immagine 1 di 2 Disassembling Nokia 3560 Logic Board: passo 3, immagine 2 di 2
    • Lift the keypad off of the phone.

  4. Disassembling Nokia 3560 Logic Board, Disassembling Nokia 3560 LCD Display: passo 4, immagine 1 di 1
    • The screen is held to the body by six screws.

  5. Disassembling Nokia 3560 Logic Board: passo 5, immagine 1 di 1
    • Unscrew the six screws with a Torx screwdriver (six-pointed star shaped bit).

  6. Disassembling Nokia 3560 Logic Board: passo 6, immagine 1 di 2 Disassembling Nokia 3560 Logic Board: passo 6, immagine 2 di 2
    • Insert a flat screwdriver between the black body and plastic layer.

  7. Disassembling Nokia 3560 Logic Board: passo 7, immagine 1 di 1
    • Pry the layers apart. The LCD and plastic layer will lift out as one piece.

  8. Disassembling Nokia 3560 Logic Board, Disassembling Nokia 3560 Logic Board: passo 8, immagine 1 di 1
    • With the screws removed, the logic board can then be lifted out of the body by hand.

Conclusione

To reassemble your device, follow these instructions in reverse order.

Sam Ryan

Membro da: 04/18/10

1 Reputazione

8 Guide realizzate

Team

Cal Poly, Team 30-39, Garner Spring 2010 Membro di Cal Poly, Team 30-39, Garner Spring 2010

CPSU-GARNER-S10S30G39

5 Membri

16 Guide realizzate

0 Commenti

Aggiungi Commento

Visualizza Statistiche:

Ultime 24 Ore: 0

Ultimi 7 Giorni: 0

Ultimi 30 Giorni: 1

Tutti i Tempi: 1,845