Salta al contenuto principale

Questa guida ha delle modifiche più recenti. Passa all'ultima versione non verificata.

Disassembling Dell Vostro V13

Cosa ti serve

  1. Disassembling Dell Vostro V13, Disassembling any part from hard drive to motherboard: passo 1, immagine 1 di 3 Disassembling Dell Vostro V13, Disassembling any part from hard drive to motherboard: passo 1, immagine 2 di 3 Disassembling Dell Vostro V13, Disassembling any part from hard drive to motherboard: passo 1, immagine 3 di 3
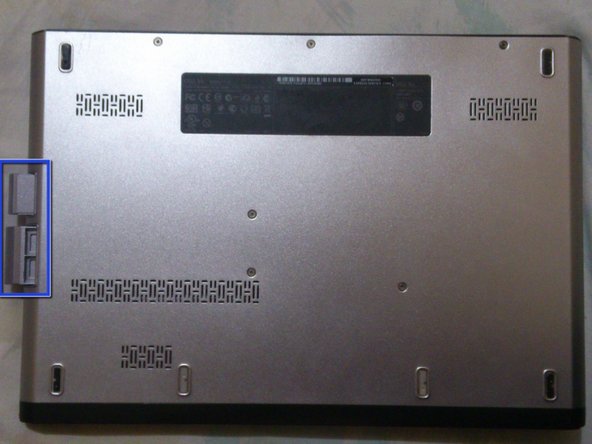
    • Remove the two (2) dummy cards from the laptop.

    • Using a Phillips head screwdriver, unscrew the six (6) screws from the bottom of the laptop.

    • Unscrew the two (2) screws from the back of the laptop, located at the extreme left and right of the back panel.

    • Slide bottom cover forward and lift upwards to remove. You may need to use a strong spudger to force a gap along the base edge from the ethernet port on the right, to the kensington port on the left.

  2. Disassembling Dell Vostro V13: passo 2, immagine 1 di 1
    • Unscrew the four (4) screws from the battery.

    • Carefully remove the battery connector. It is a ribbon cable that is clamped down. Flick the black clamp up using the edge nearest the battery. The ribbon cable is now free to move for the next step.

    • Lift the battery upwards, to remove.

  3. Disassembling Dell Vostro V13: passo 3, immagine 1 di 2 Disassembling Dell Vostro V13: passo 3, immagine 2 di 2
    • Unscrew the four (4) screws from the hard drive enclosure.

    • Gently lift the hard drive at a small angle upwards and slide backwards to remove.

    • To avoid damaging the port, GENTLY lift the hard drive at a SMALL angle upward, when removing it!

  4. Disassembling Dell Vostro V13: passo 4, immagine 1 di 2 Disassembling Dell Vostro V13: passo 4, immagine 2 di 2
    • Using a plastic opening tool, pry open the top panel, with the power switch, starting with the right bottom edge closer to the keyboard.

    • Unclip and remove the ribbon from the panel.

    • Always be careful when removing ribbons! Try not to unnecessarily bend them and pull them with excess force!

  5. Disassembling Dell Vostro V13: passo 5, immagine 1 di 2 Disassembling Dell Vostro V13: passo 5, immagine 2 di 2
    • Unscrew the two (2) screws from the keyboard.

    • Gently lift the keyboard upwards and push towards the screen to remove.

    • Remove the ribbon from the board.

  6. Disassembling Dell Vostro V13: passo 6, immagine 1 di 2 Disassembling Dell Vostro V13: passo 6, immagine 2 di 2
    • Remove all the ribbons from the board.

    • Always be careful when removing ribbons! Try not to unnecessarily bend them and pull them with excess force!

    • Unscrew the one (1) screw from the audio card and lift upward to remove.

  7. Disassembling Dell Vostro V13: passo 7, immagine 1 di 2 Disassembling Dell Vostro V13: passo 7, immagine 2 di 2
    • Unscrew the six (6) screws from the memory card reader.

    • Make sure that a hand is placed underneath to hold the memory hand reader while unscrewing, so it would not fall.

    • Remove the cable from the CMOS battery.

  8. Disassembling Dell Vostro V13: passo 8, immagine 1 di 1
    • Using a small plastic opening tool, gently lift and remove the two (2) antenna cables from the wireless card.

    • Unscrew the one (1) screw.

    • The wireless card should pop up.

    • Gently slide the card forward to remove.

  9. Disassembling Dell Vostro V13: passo 9, immagine 1 di 2 Disassembling Dell Vostro V13: passo 9, immagine 2 di 2
    • Unscrew the six (6) screws from the motherboard.

    • Unscrew the two (2) screws from the fan.

    • Gently lift the motherboard upward and then slide forward to remove.

    • Be extremely careful with the motherboard! Damage to any of the components on it would cause the laptop to malfunction!

  10. Disassembling Dell Vostro V13: passo 10, immagine 1 di 1
    • Press the two (2) metal clips on the side.

    • The RAM will pop up.

    • Pull forward to remove.

  11. Disassembling Dell Vostro V13: passo 11, immagine 1 di 1
    • Unscrew the four (4) screws from the heat sink.

    • Unscrew the one (1) screw from the fan.

    • Pull the heat sink with the fan upward to remove.

Conclusione

To reassemble your device, follow these instructions in reverse order.

Altre 11 persone hanno completato questa guida.

2 Commenti

is the CPU removable?

Trevor Vuong - Replica

No, it's not. All laptops have soldered ballpoint CPUs and GPUs.

Chris Yang - Replica

Aggiungi Commento

Visualizza Statistiche:

Ultime 24 Ore: 5

Ultimi 7 Giorni: 15

Ultimi 30 Giorni: 56

Tutti i Tempi: 37,874