Salta al contenuto principale

DigiLand DL1010Q Motherboard Replacement

Cosa ti serve

  1. DigiLand DL1010Q Motherboard Replacement, Rear Case: passo 1, immagine 1 di 1
    • With a J00 Philips head screwdriver, unscrew the two 4mm black screws located at the bottom of the device.

    • Before disassembling your device, be sure it is powered off.

  2. DigiLand DL1010Q Motherboard Replacement: passo 2, immagine 1 di 2 DigiLand DL1010Q Motherboard Replacement: passo 2, immagine 2 di 2
    • Using a plastic opening tool, begin softly prying open device by first inserting it in between the front and back panels.

    • Continue prying the edges while moving around the device's perimeter until the back can be easily removed.

  3. DigiLand DL1010Q Motherboard Replacement: passo 3, immagine 1 di 1
    • Carefully lift back panel away from the body of the device.

    • Speaker wires are connected to both the front and back panel.

  4. DigiLand DL1010Q Motherboard Replacement, Motherboard: passo 4, immagine 1 di 1
    • Using a plastic opening tool, gently pry up the three Zero Insertion Force Connectors (ZIF)

  5. DigiLand DL1010Q Motherboard Replacement: passo 5, immagine 1 di 2 DigiLand DL1010Q Motherboard Replacement: passo 5, immagine 2 di 2
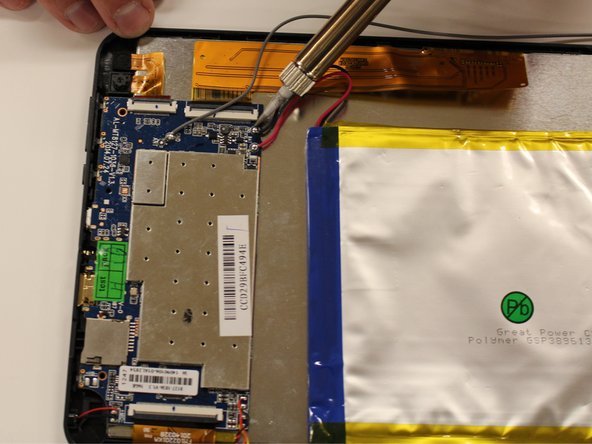
    • Using a Soldering station, desolder all 9 wires connected to the motherboard.

    • Start with the red and black positive and negative wires connected to the battery (2 wires).

    • Then move to the yellow and red twisted wires and black and red twisted wires connected to the speakers (4 wires).

    • Now desolder the single grey wire connected to the antenna (1 wire).

    • Lastly remove the black and red wires connected to the microphone (2 wires).

  6. DigiLand DL1010Q Motherboard Replacement: passo 6, immagine 1 di 1
    • Using a J00 Philips screwdriver, unscrew the three black 4mm screws from the motherboard.

  7. DigiLand DL1010Q Motherboard Replacement: passo 7, immagine 1 di 2 DigiLand DL1010Q Motherboard Replacement: passo 7, immagine 2 di 2
    • Carefully lift motherboard in a upward motion.

Conclusione

To reassemble your device, follow these instructions in reverse order.

Altre 2 persone hanno completato questa guida.

2 Commenti

How can I remove the CMOS battery?

solomon A.O - Replica

I NEED dl1010q MOTHER BOARD

myukimages - Replica

Aggiungi Commento

Visualizza Statistiche:

Ultime 24 Ore: 0

Ultimi 7 Giorni: 3

Ultimi 30 Giorni: 5

Tutti i Tempi: 1,073