Salta al contenuto principale

Dexcom G6 Receiver Motherboard Replacement

Cosa ti serve

  1. Dexcom G6 Receiver Motherboard Replacement, Display and Front Bezel: passo 1, immagine 1 di 1
    • Unscrew the 6 Torx T5 screws from the back of the device

  2. Dexcom G6 Receiver Motherboard Replacement: passo 2, immagine 1 di 2 Dexcom G6 Receiver Motherboard Replacement: passo 2, immagine 2 di 2
    • Use a spudger to lift up the screen assembly ribbon cable flap, then remove the ribbon cable.

    • Screen Information: Model AM0310R-04 Lot # NHT18080052

  3. Dexcom G6 Receiver Motherboard Replacement, Charging Port: passo 3, immagine 1 di 1
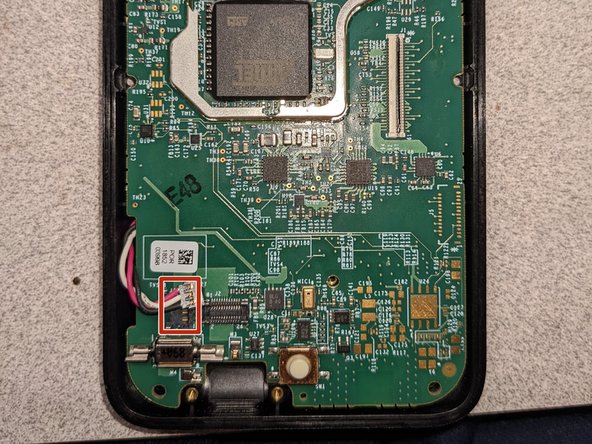
    • Using a spudger, unplug the Charging Port connector from the motherboard.

  4. Dexcom G6 Receiver Motherboard Replacement: passo 4, immagine 1 di 1
    • Remove the 2 silver Torx T5 screws holding the charging port down.

  5. Dexcom G6 Receiver Motherboard Replacement: passo 5, immagine 1 di 1
    • Remove the Charging Port Assembly from the motherboard.

  6. Dexcom G6 Receiver Motherboard Replacement, Motherboard: passo 6, immagine 1 di 1
    • Remove the silver Torx T5 screw holding the motherboard down.

  7. Dexcom G6 Receiver Motherboard Replacement: passo 7, immagine 1 di 2 Dexcom G6 Receiver Motherboard Replacement: passo 7, immagine 2 di 2
    • Using a spudger, carefully remove the battery connector on the left side of the motherboard.

  8. Dexcom G6 Receiver Motherboard Replacement: passo 8, immagine 1 di 1
    • Using a spudger, carefully pry up the motherboard to remove it.

Conclusione

To reassemble your device, follow these instructions in reverse order.

Andrew S

Membro da: 07/30/21

14.993 Reputazione

8 Guide realizzate

2 Commenti

do you know of anyone that can fix these items

Rick MacDonald - Replica

anyone out there fix these items

Rick MacDonald - Replica

Aggiungi Commento

Visualizza Statistiche:

Ultime 24 Ore: 0

Ultimi 7 Giorni: 4

Ultimi 30 Giorni: 15

Tutti i Tempi: 707