Salta al contenuto principale

Dell XPS M1330 Keyboard Replacement

Cosa ti serve

  1. Dell XPS M1330 Keyboard Replacement, Battery: passo 1, immagine 1 di 1
    • Flip the laptop on its back, so that the underside is facing up.

  2. Dell XPS M1330 Keyboard Replacement: passo 2, immagine 1 di 1
    • Push and hold the slide button to the left and unlock the mechanism.

  3. Dell XPS M1330 Keyboard Replacement: passo 3, immagine 1 di 2 Dell XPS M1330 Keyboard Replacement: passo 3, immagine 2 di 2
    • Lift the computer up and slowly pull the battery straight out from the device.

  4. Dell XPS M1330 Keyboard Replacement, Hard Drive: passo 4, immagine 1 di 1
    • Flip the laptop on its back, so that the underside is facing up

  5. Dell XPS M1330 Keyboard Replacement: passo 5, immagine 1 di 1
    • Remove the four 3.0mm Phillips #1 screws securing the hard drive casing.

  6. Dell XPS M1330 Keyboard Replacement: passo 6, immagine 1 di 3 Dell XPS M1330 Keyboard Replacement: passo 6, immagine 2 di 3 Dell XPS M1330 Keyboard Replacement: passo 6, immagine 3 di 3
    • Slide the hard drive away from the computer, slowly and carefully.

  7. Dell XPS M1330 Keyboard Replacement, Fan: passo 7, immagine 1 di 2 Dell XPS M1330 Keyboard Replacement, Fan: passo 7, immagine 2 di 2
    • Remove the four 5.0mm screws with a Phillips #1 screwdriver.

    • Remove the one external 5.0mm screw with a Phillips #1 screwdriver.

    • Remove the fan cover.

  8. Dell XPS M1330 Keyboard Replacement: passo 8, immagine 1 di 1
    • Remove the four 0.1mm screws using the Phillips #1 screwdriver.

    • Remove the one thicker 0.1 mm screw using the Phillips #1 screwdriver.

  9. Dell XPS M1330 Keyboard Replacement: passo 9, immagine 1 di 1
    • Be sure to carefully remove the wires as they are fragile and can rip easily.

    • Remove the wire bay near the fan.

    • Use the long nosed tweezers to carefully handle the white plastic piece that holds the wires together.

    • Gently pull upward while moving your hand side to side so the plastic holder will detach.

  10. Dell XPS M1330 Keyboard Replacement: passo 10, immagine 1 di 1
    • Gently remove the fan and its attachments from the bay.

  11. Dell XPS M1330 Keyboard Replacement, CPU: passo 11, immagine 1 di 1
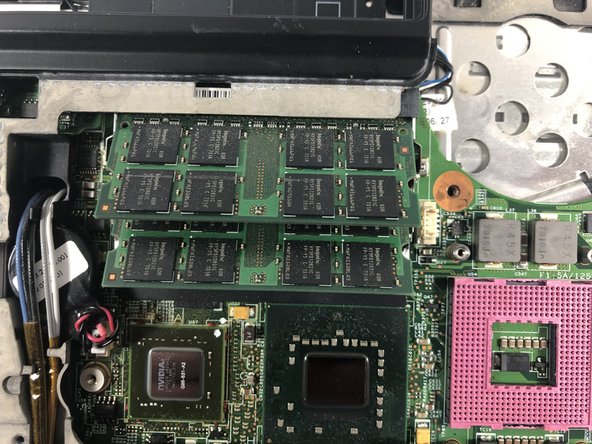
    • Using the flathead screwdriver, turn the one screw counterclockwise to loosen the CPU, but do not remove the screw.

  12. Dell XPS M1330 Keyboard Replacement: passo 12, immagine 1 di 1
    • Using the iFixit opening tool, prop up the CPU.

  13. Dell XPS M1330 Keyboard Replacement: passo 13, immagine 1 di 1
    • Carefully lift the CPU away from its housing.

  14. Dell XPS M1330 Keyboard Replacement, Keyboard: passo 14, immagine 1 di 1
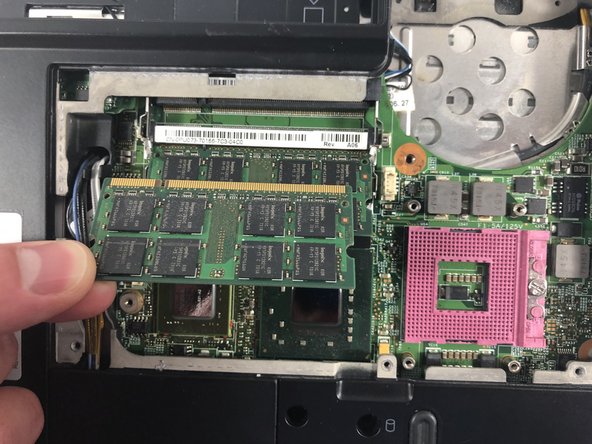
    • Unscrew the 5.0mm Phillips #1 screw from the wireless door cover.

    • Pull straight up on the wireless door.

  15. Dell XPS M1330 Keyboard Replacement: passo 15, immagine 1 di 2 Dell XPS M1330 Keyboard Replacement: passo 15, immagine 2 di 2
    • Unscrew the 3.0mm Phillips #1 screw from the wireless card.

  16. Dell XPS M1330 Keyboard Replacement: passo 16, immagine 1 di 3 Dell XPS M1330 Keyboard Replacement: passo 16, immagine 2 di 3 Dell XPS M1330 Keyboard Replacement: passo 16, immagine 3 di 3
    • Slide the card to the left and up to remove it.

  17. Dell XPS M1330 Keyboard Replacement: passo 17, immagine 1 di 3 Dell XPS M1330 Keyboard Replacement: passo 17, immagine 2 di 3 Dell XPS M1330 Keyboard Replacement: passo 17, immagine 3 di 3
    • Separate the two clips on both sides of the memory sticks.

    • The memory stick will lift up.

    • Gently pull the memory stick up and out of its holder.

    • Repeat these same steps for the second memory stick below.

  18. Dell XPS M1330 Keyboard Replacement: passo 18, immagine 1 di 1
    • Remove the two 2.5mm Phillips #1 screws in the battery housing port.

  19. Dell XPS M1330 Keyboard Replacement: passo 19, immagine 1 di 1
    • Flip the laptop back over so the cover is on top.

  20. Dell XPS M1330 Keyboard Replacement: passo 20, immagine 1 di 2 Dell XPS M1330 Keyboard Replacement: passo 20, immagine 2 di 2
    • Carefully open the screen, so it is facing toward yourself.

    • Flatten out the screen as much as possible.

  21. Dell XPS M1330 Keyboard Replacement: passo 21, immagine 1 di 2 Dell XPS M1330 Keyboard Replacement: passo 21, immagine 2 di 2
    • Carefully lift the computer, so you can get a good grip by the hinges.

    • Carefully lift and remove the central control media button cover from the base.

    • This piece snaps out of its constraints. Be slow and controlled, so you don't break a snap. There is also a cable attached underneath.

  22. Dell XPS M1330 Keyboard Replacement: passo 22, immagine 1 di 1
    • Use the Phillips #1 screwdriver to remove the two 3.0mm screws at the top of the keyboard.

  23. Dell XPS M1330 Keyboard Replacement: passo 23, immagine 1 di 2 Dell XPS M1330 Keyboard Replacement: passo 23, immagine 2 di 2
    • When removing this piece lift slowly as there is a cord underneath that connects to the keyboard.

    • Carefully lift the keyboard up and toward the front screen.

  24. Dell XPS M1330 Keyboard Replacement: passo 24, immagine 1 di 2 Dell XPS M1330 Keyboard Replacement: passo 24, immagine 2 di 2
    • Lift the keyboard latch toward yourself.

  25. Dell XPS M1330 Keyboard Replacement: passo 25, immagine 1 di 2 Dell XPS M1330 Keyboard Replacement: passo 25, immagine 2 di 2
    • Gently pull the keyboard cable away from your body.

    • Detach the keyboard cable.

Conclusione

To reassemble your device, follow these instructions in reverse order.

Kai Kapossy

Membro da: 03/24/19

676 Reputazione

5 Guide realizzate

Team

0 Commenti

Aggiungi Commento

Visualizza Statistiche:

Ultime 24 Ore: 0

Ultimi 7 Giorni: 0

Ultimi 30 Giorni: 15

Tutti i Tempi: 561