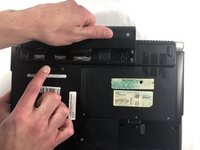
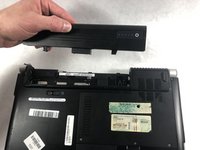
Salta al contenuto principale

Dell XPS M1330 Fan Replacement

Cosa ti serve

  1. Dell XPS M1330 Fan Replacement, Battery: passo 1, immagine 1 di 1
    • Flip the laptop on its back, so that the underside is facing up.

  2. Dell XPS M1330 Fan Replacement: passo 2, immagine 1 di 1
    • Push and hold the slide button to the left and unlock the mechanism.

  3. Dell XPS M1330 Fan Replacement: passo 3, immagine 1 di 2 Dell XPS M1330 Fan Replacement: passo 3, immagine 2 di 2
    • Lift the computer up and slowly pull the battery straight out from the device.

  4. Dell XPS M1330 Fan Replacement, Fan: passo 4, immagine 1 di 2 Dell XPS M1330 Fan Replacement, Fan: passo 4, immagine 2 di 2
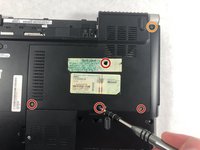
    • Remove the four 5.0mm screws with a Phillips #1 screwdriver.

    • Remove the one external 5.0mm screw with a Phillips #1 screwdriver.

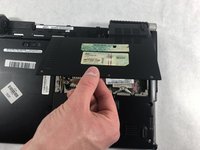
    • Remove the fan cover.

  5. Dell XPS M1330 Fan Replacement: passo 5, immagine 1 di 1
    • Remove the four 0.1mm screws using the Phillips #1 screwdriver.

    • Remove the one thicker 0.1 mm screw using the Phillips #1 screwdriver.

  6. Dell XPS M1330 Fan Replacement: passo 6, immagine 1 di 1
    • Be sure to carefully remove the wires as they are fragile and can rip easily.

    • Remove the wire bay near the fan.

    • Use the long nosed tweezers to carefully handle the white plastic piece that holds the wires together.

    • Gently pull upward while moving your hand side to side so the plastic holder will detach.

  7. Dell XPS M1330 Fan Replacement: passo 7, immagine 1 di 1
    • Gently remove the fan and its attachments from the bay.

Conclusione

To reassemble your device, follow these instructions in reverse order.

Un'altra persona ha completato questa guida.

Kai Kapossy

Membro da: 03/24/19

676 Reputazione

5 Guide realizzate

Team

0 Commenti

Aggiungi Commento

Visualizza Statistiche:

Ultime 24 Ore: 0

Ultimi 7 Giorni: 0

Ultimi 30 Giorni: 3

Tutti i Tempi: 337