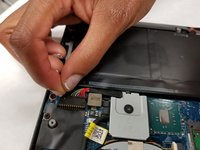
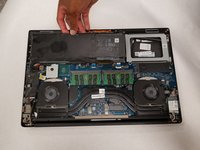
Salta al contenuto principale

Dell Precision 5510 Hard Drive Replacement

Cosa ti serve

  1. Dell Precision 5510 Hard Drive Replacement, Base Cover: passo 1, immagine 1 di 1
    • Open the system badge flap over to reveal the screws underneath (marked 1 on the image).

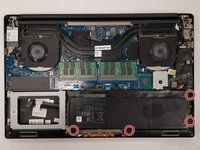
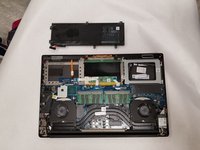
    • Remove the 12 screws that secure the base cover to the computer.

  2. Dell Precision 5510 Hard Drive Replacement: passo 2, immagine 1 di 1
    • Pry the edges base cover and lift it to remove it from computer.

  3. Dell Precision 5510 Hard Drive Replacement, Battery: passo 3, immagine 1 di 2 Dell Precision 5510 Hard Drive Replacement, Battery: passo 3, immagine 2 di 2
    • Unplug the connection that links the battery to the computer.

  4. Dell Precision 5510 Hard Drive Replacement: passo 4, immagine 1 di 2 Dell Precision 5510 Hard Drive Replacement: passo 4, immagine 2 di 2
    • Remove the four 4.0 mm JIS #0 screws surrounding the battery.

  5. Dell Precision 5510 Hard Drive Replacement: passo 5, immagine 1 di 2 Dell Precision 5510 Hard Drive Replacement: passo 5, immagine 2 di 2
    • Carefully remove the battery from the computer.

  6. Dell Precision 5510 Hard Drive Replacement, Hard Drive: passo 6, immagine 1 di 2 Dell Precision 5510 Hard Drive Replacement, Hard Drive: passo 6, immagine 2 di 2
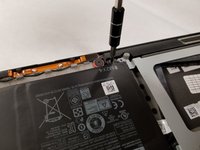
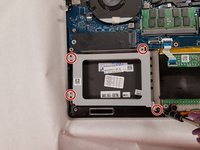
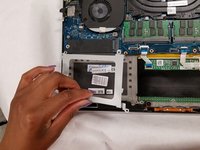
    • Remove the four 4.0 mm screws with a Phillips 1 screwdriver, and remove the hard drive bracket.

  7. Dell Precision 5510 Hard Drive Replacement: passo 7, immagine 1 di 1
    • Unplug the hard drive, and remove it. (We do not have a hard drive to be shown, but see image for where the hard drive would be unplugged from.)

Conclusione

To reassemble your device, follow these instructions in reverse order.

Team

IUPUI, Team S1-G5, Arle Fall 2018 Membro di IUPUI, Team S1-G5, Arle Fall 2018

IUPUI-ARLE-F18S1G5

3 Membri

6 Guide realizzate

0 Commenti

Aggiungi Commento

Visualizza Statistiche:

Ultime 24 Ore: 2

Ultimi 7 Giorni: 13

Ultimi 30 Giorni: 44

Tutti i Tempi: 3,759