Salta al contenuto principale

Questa guida ha delle modifiche più recenti. Passa all'ultima versione non verificata.

Dell Latitude E5470 Screen Assembly Replacement

Cosa ti serve

  1. Dell Latitude E5470 Screen Assembly  Replacement, Remove Bottom Cover: passo 1, immagine 1 di 2 Dell Latitude E5470 Screen Assembly  Replacement, Remove Bottom Cover: passo 1, immagine 2 di 2
    • Loosen the 8 Philips screws on the bottom of the laptop. They will not come all the way out but loosen till they spin freely.

    • Use a splurger to slowly pry the bottom cover off the laptop. Pull the bottom off in the direction of the arrow.

    • Important Be carefull to not break the snaps as they are delicate.

  2. Dell Latitude E5470 Screen Assembly  Replacement, Disconnect Battery: passo 2, immagine 1 di 1
    • Important Disconnect the battery before any work is done. Failure to do so could result in electric shock and cause harm to you and the laptop.

    • Carefully use the plastic tab to remove the battery cable from the motherboard.

  3. Dell Latitude E5470 Screen Assembly  Replacement, Disconnect Wireless Card: passo 3, immagine 1 di 2 Dell Latitude E5470 Screen Assembly  Replacement, Disconnect Wireless Card: passo 3, immagine 2 di 2
    • Unscrew the screw holding the card in place.

    • Remove the metal guard holding the connections in place.

    • Use the splurger to gently lift the wires from the card.

  4. Dell Latitude E5470 Screen Assembly  Replacement, Disconnect Display: passo 4, immagine 1 di 2 Dell Latitude E5470 Screen Assembly  Replacement, Disconnect Display: passo 4, immagine 2 di 2
    • Remove screw holding the metal plate in place.

    • Remove metal plate

    • Carefully pull on the tab to disconnect the display cable from the motherboard.

  5. Dell Latitude E5470 Screen Assembly  Replacement, Free display cables: passo 5, immagine 1 di 2 Dell Latitude E5470 Screen Assembly  Replacement, Free display cables: passo 5, immagine 2 di 2
    • Remove both screws holding the plate in place.

    • Remove plate

    • Remove tape holding the display cable to the laptop.

    • Pull the cable free

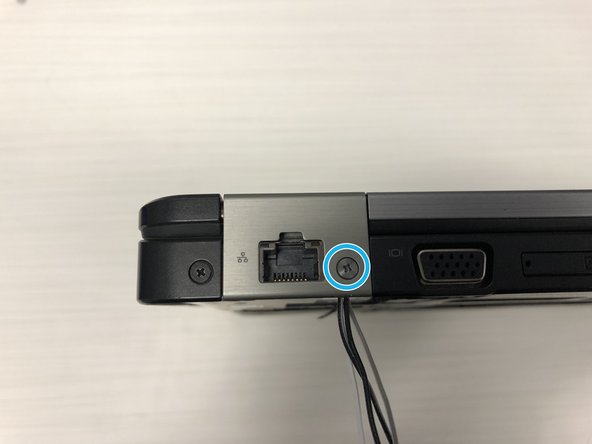
  6. Dell Latitude E5470 Screen Assembly  Replacement, Remove hinge covers: passo 6, immagine 1 di 2 Dell Latitude E5470 Screen Assembly  Replacement, Remove hinge covers: passo 6, immagine 2 di 2
    • Remove both the screws and hing covers on the back of the device.

  7. Dell Latitude E5470 Screen Assembly  Replacement, Remove display screws - Part 1: passo 7, immagine 1 di 2 Dell Latitude E5470 Screen Assembly  Replacement, Remove display screws - Part 1: passo 7, immagine 2 di 2
    • Remove two screws from the bottom of the device

  8. Dell Latitude E5470 Screen Assembly  Replacement, Remove display screws - Part 2: passo 8, immagine 1 di 2 Dell Latitude E5470 Screen Assembly  Replacement, Remove display screws - Part 2: passo 8, immagine 2 di 2
    • Remove screws underneath the hinge covers on the back of the device

  9. Dell Latitude E5470 Screen Assembly  Replacement, Remove display: passo 9, immagine 1 di 1
    • Carefully remove the display from its slots.

    • Be mindful to feed the WiFi and Display cables through the holes.

  10. Dell Latitude E5470 Screen Assembly  Replacement, You are done!: passo 10, immagine 1 di 1
    • The display is now disconnected from the laptop.

Conclusione

To reassemble your device, follow these instructions in reverse order.

Altre 5 persone hanno completato questa guida.

Ethan Jones

Membro da: 07/16/18

542 Reputazione

2 Guide realizzate

0 Commenti

Aggiungi Commento

Visualizza Statistiche:

Ultime 24 Ore: 1

Ultimi 7 Giorni: 12

Ultimi 30 Giorni: 38

Tutti i Tempi: 2,449