Questa versione può contenere modifiche errate. Passa all'ultima istantanea verificata.
Cosa ti serve
-
Questo passaggio è privo di traduzione. Aiuta a tradurlo
-
Locate the notch under the cover at the top of the keyboard
-
Using the spudger as a lever, lift the plastic covering
-
Carefully remove the rest of the covering from right to left
-
-
Questo passaggio è privo di traduzione. Aiuta a tradurlo
-
Unscrew the top portion of the keyboard using a #00 screwdriver
-
-
Questo passaggio è privo di traduzione. Aiuta a tradurlo
-
Hold keyboard from the top and gently pull towards the LCD screen to remove the keyboard from the case
-
-
-
Questo passaggio è privo di traduzione. Aiuta a tradurlo
-
Once keyboard is out of the case, lay it face-down on the track pad
-
-
Questo passaggio è privo di traduzione. Aiuta a tradurlo
-
Using a small spudger, pull back on the black bar to release the blue lever
-
-
Questo passaggio è privo di traduzione. Aiuta a tradurlo
-
Pull up on the metal bar connected to the socket to detach the ribbon cable
-
-
Questo passaggio è privo di traduzione. Aiuta a tradurlo
-
With the keyboard removed, you should be able to see ram slot A.
-
Place new ram into the slot making sure it is aligned
-
-
Questo passaggio è privo di traduzione. Aiuta a tradurlo
-
Replace the keyboard by following the previous steps in reverse
-
Close the laptop, and flip it over onto its backside
-
-
Questo passaggio è privo di traduzione. Aiuta a tradurlo
-
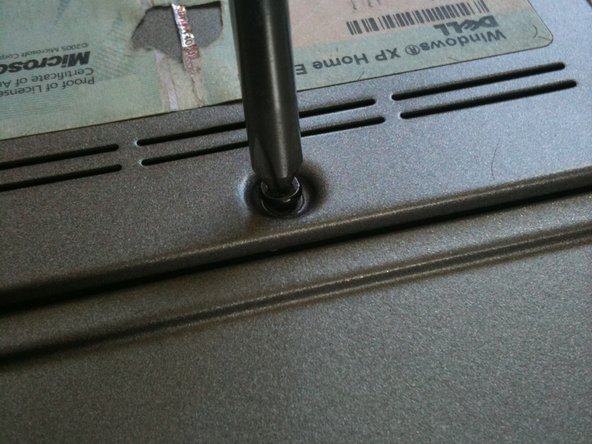
Loosen the screw that holds the RAM cover in place.
-


Annulla: non ho completato questa guida.
Altre 25 persone hanno completato questa guida.
Team

Cal Poly, Team 24-35, Regan Spring 2010 Membro di Cal Poly, Team 24-35, Regan Spring 2010
CPSU-REGAN-S10S24G35
4 Membri
4 Guide realizzate
2 Commenti
If you are increasing the amount of RAM installed -> On first power on after installing the RAM, system on boot up will complain about memory size changed, and to reseat the memory. Wait for about 60 - 90 seconds, and you will receive a few additional messages about F1 to continue or F2 for Setup. Go into Setup and verify that the system sees all memory installed. If installing 2 x 2GB DDR2, max possible, 4GB. BIOS setup should report 4GB installed, of which 3.37GB usable.
J’étais inquiet, mais en lisant votre commentaire, me voilà rassuré et j’ai donc suivi vos instructions. Ca fonctionne 2X2 GO …Merci