Questa versione può contenere modifiche errate. Passa all'ultima istantanea verificata.
Cosa ti serve
-
Questo passaggio è privo di traduzione. Aiuta a tradurlo
-
Unlock the battery by sliding the right-hand switch to the right.
-
-
Questo passaggio è privo di traduzione. Aiuta a tradurlo
-
While holding the left-hand switch to the left position, pull the battery away from the laptop.
-
-
Questo passaggio è privo di traduzione. Aiuta a tradurlo
-
The battery is now fully removed and the laptop will not power on without it.
-
-
Questo passaggio è privo di traduzione. Aiuta a tradurlo
-
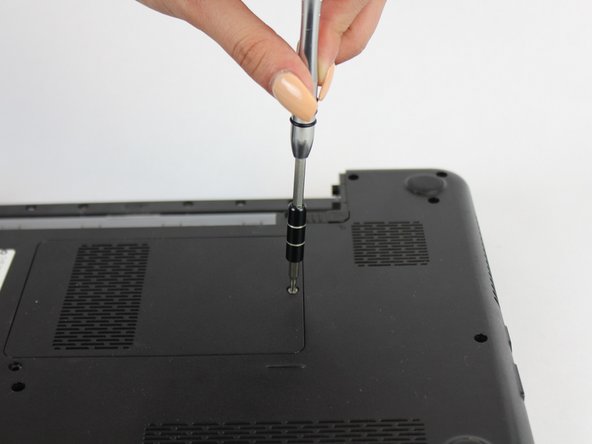
Using the #0 Philips head, unscrew the indicated screw.
-
Carefully pull the RAM cover up and away.
-
-
Questo passaggio è privo di traduzione. Aiuta a tradurlo
-
Unscrew the indicated 5.7mm screw beneath the RAM Cover.
-
-
Questo passaggio è privo di traduzione. Aiuta a tradurlo
-
Remove another screw above the battery release tab
-
-
Questo passaggio è privo di traduzione. Aiuta a tradurlo
-
Using a thin plastic tool (such as a guitar pick or spudger) at the top of the keyboard just above the F7 key, gently pry the keyboard away.
-
Move the spudger to either end at the top of the keyboard to fully undo all plastic clips.
-
-
Questo passaggio è privo di traduzione. Aiuta a tradurlo
-
Carefully tip the keyboard upwards and pull it slightly away from the body of the laptop.
-
-
-
Questo passaggio è privo di traduzione. Aiuta a tradurlo
-
Carefully unclip the ribbon cable by tipping the keyboard towards the screen.
-
-
Questo passaggio è privo di traduzione. Aiuta a tradurlo
-
Remove the indicated 5.7mm screws.
-
Remove the smaller 3mm screws from underneath the battery compartment.
-
-
Questo passaggio è privo di traduzione. Aiuta a tradurlo
-
With a plastic spudger, pry away the silver top cover from the black casing.
-
Move the tool to the right and left along the seams to fully disconnect the cover.
-
-
Questo passaggio è privo di traduzione. Aiuta a tradurlo
-
Disconnect the indicated ribbon cables underneath where the keyboard sits.
-
-
Questo passaggio è privo di traduzione. Aiuta a tradurlo
-
Lift the cover upwards and away from the body of the laptop, after removing the optical drive and unscrewing the three screws on the right
-
-
Questo passaggio è privo di traduzione. Aiuta a tradurlo
-
Peel back the yellow tape to expose the ribbon connector.
-
Unplug the ribbon cable from the motherboard.
-
-
Questo passaggio è privo di traduzione. Aiuta a tradurlo
-
Unplug the 3-wire connector from the motherboard.
-
-
Questo passaggio è privo di traduzione. Aiuta a tradurlo
-
Unscrew the indicated 5.6mm screws with the #0 Phillips Head Screwdriver.
-
-
Questo passaggio è privo di traduzione. Aiuta a tradurlo
-
Unscrew the two screws on the right hand speaker with the #0 Phillips Head.
-
Unplug the speaker connector from the motherboard.
-
-
Questo passaggio è privo di traduzione. Aiuta a tradurlo
-
Reaching under the daughter board, disconnect the connector.
-
-
Questo passaggio è privo di traduzione. Aiuta a tradurlo
-
Unscrew the indicated 5.6mm screws with a Phillips #0 screwdriver.
-
-
Questo passaggio è privo di traduzione. Aiuta a tradurlo
-
The motherboard can now be removed by pulling upwards, tilting it to the left of the laptop until the connectors clear the body of the laptop.
-
-
Questo passaggio è privo di traduzione. Aiuta a tradurlo
-
Unscrew the (2) two 3.6mm Phillips head screws with the #0 Phillips head.
-


Team

USF Tampa, Team S13-G5, Boczar Fall 2017 Membro di USF Tampa, Team S13-G5, Boczar Fall 2017
USFT-BOCZAR-F17S13G5
5 Membri
9 Guide realizzate