Salta al contenuto principale

Dell Inspiron 6000 Screen Replacement

Cosa ti serve

  1. Dell Inspiron 6000 Screen Replacement, Battery: passo 1, immagine 1 di 1
    • To prevent injury, make sure the laptop is unplugged before removing the battery.

    • Flip the laptop over, bottom-side up.

  2. Dell Inspiron 6000 Screen Replacement: passo 2, immagine 1 di 1
    • Push the switch next to the battery.

    • At the same time, lift the battery away from the laptop.

  3. Dell Inspiron 6000 Screen Replacement, Keyboard: passo 3, immagine 1 di 3 Dell Inspiron 6000 Screen Replacement, Keyboard: passo 3, immagine 2 di 3 Dell Inspiron 6000 Screen Replacement, Keyboard: passo 3, immagine 3 di 3
    • Place the laptop on flat surface.

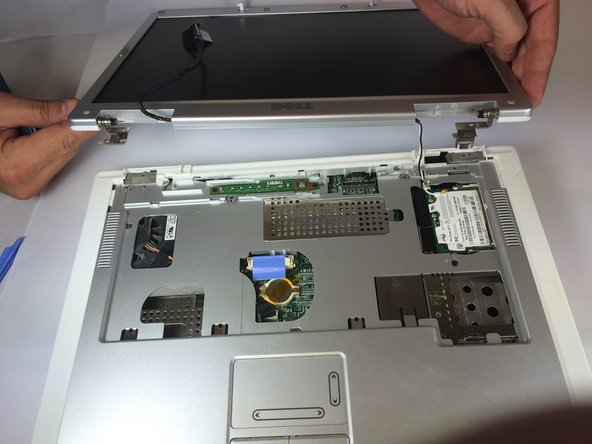
    • Carefully open the laptop at far as it will go so that the back of screen is touching the flat surface.

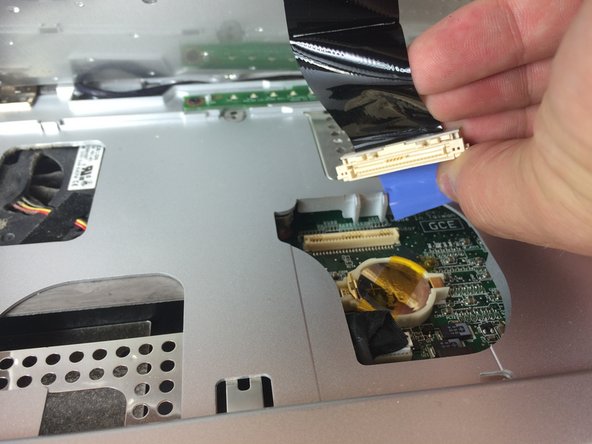
    • Carefully take a spudger and separate part of the cover at the red circle.

  4. Dell Inspiron 6000 Screen Replacement: passo 4, immagine 1 di 2 Dell Inspiron 6000 Screen Replacement: passo 4, immagine 2 di 2
    • Remove two 4 mm Philips #00 screws.

  5. Dell Inspiron 6000 Screen Replacement: passo 5, immagine 1 di 1
    • Gently lift the keyboard away from the laptop without harming the cord that is located at the bottom of the keyboard.

  6. Dell Inspiron 6000 Screen Replacement: passo 6, immagine 1 di 3 Dell Inspiron 6000 Screen Replacement: passo 6, immagine 2 di 3 Dell Inspiron 6000 Screen Replacement: passo 6, immagine 3 di 3
    • Gently pull the blue tab up until it comes away from computer.

  7. Dell Inspiron 6000 Screen Replacement, Screen: passo 7, immagine 1 di 1
    • Remove one 4mm Philips #00 screw to completely disengage blue tab.

  8. Dell Inspiron 6000 Screen Replacement: passo 8, immagine 1 di 1
    • Pull and disconnect the blue tab.

  9. Dell Inspiron 6000 Screen Replacement: passo 9, immagine 1 di 1
    • Disconnect the black and white wires.

  10. Dell Inspiron 6000 Screen Replacement: passo 10, immagine 1 di 1
    • Remove four 4mm Philips #00 screws at the hinges for the screen.

  11. Dell Inspiron 6000 Screen Replacement: passo 11, immagine 1 di 1
    • Separate the top panel of the laptop from the bottom panel.

  12. Dell Inspiron 6000 Screen Replacement: passo 12, immagine 1 di 2 Dell Inspiron 6000 Screen Replacement: passo 12, immagine 2 di 2
    • Use the plastic opening tools to remove the six rubber screw covers in the corners.

    • Remove six 4 mm #00 Philips screws located in the corners.

  13. Dell Inspiron 6000 Screen Replacement: passo 13, immagine 1 di 2 Dell Inspiron 6000 Screen Replacement: passo 13, immagine 2 di 2
    • Insert the plastic opening tools between the screen holders.

    • Go completely around the screen, separating the screen holders with the plastic opening tools.

  14. Dell Inspiron 6000 Screen Replacement: passo 14, immagine 1 di 2 Dell Inspiron 6000 Screen Replacement: passo 14, immagine 2 di 2
    • Remove 12 4mm #00 Philips screws at the perimeter of the screen.

  15. Dell Inspiron 6000 Screen Replacement: passo 15, immagine 1 di 2 Dell Inspiron 6000 Screen Replacement: passo 15, immagine 2 di 2
    • Gently lift the screen from the holder.

    • Do not touch the copper part of the bottom side of the screen.

Conclusione

To reassemble your device, follow these instructions in reverse order.

Altre 3 persone hanno completato questa guida.

Jacob DeWar

Membro da: 09/23/14

533 Reputazione

3 Guide realizzate

Team

USF Tampa, Team 11-1, Blackwell Fall 2014 Membro di USF Tampa, Team 11-1, Blackwell Fall 2014

USFT-BLACKWELL-F14S11G1

5 Membri

7 Guide realizzate

0 Commenti

Aggiungi Commento

Visualizza Statistiche:

Ultime 24 Ore: 0

Ultimi 7 Giorni: 2

Ultimi 30 Giorni: 12

Tutti i Tempi: 2,550