Salta al contenuto principale

Dell Inspiron 3520 RAM Replacement

Cosa ti serve

  1. Dell Inspiron 3520 RAM Replacement, Battery: passo 1, immagine 1 di 2 Dell Inspiron 3520 RAM Replacement, Battery: passo 1, immagine 2 di 2
    • Turn off notebook

    • Set the notebook upside down with the battery facing away from you.

    • Locate the unlock and release sliding tabs on the bottom right and left hand corners of the battery respectively.

  2. Dell Inspiron 3520 RAM Replacement: passo 2, immagine 1 di 3 Dell Inspiron 3520 RAM Replacement: passo 2, immagine 2 di 3 Dell Inspiron 3520 RAM Replacement: passo 2, immagine 3 di 3
    • Slide the right tab to the right to unlock the battery.

    • Slide and hold the the left tab to the left to release the battery from the unit.

    • Finally, remove the battery by sliding it away from the unit and yourself.

  3. Dell Inspiron 3520 RAM Replacement, Keyboard: passo 3, immagine 1 di 2 Dell Inspiron 3520 RAM Replacement, Keyboard: passo 3, immagine 2 di 2
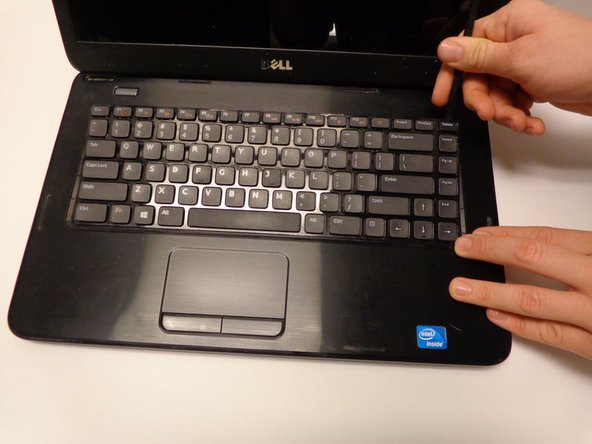
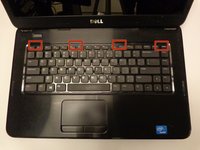
    • Locate the four tabs along the top edge of the keyboard.

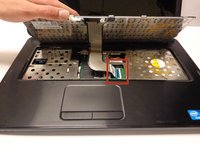
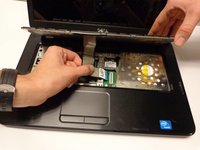
    • Using the spudger, push the tabs away from the keyboard and pull the keyboard up away from the laptop.

  4. Dell Inspiron 3520 RAM Replacement: passo 4, immagine 1 di 1
    • Slide the keyboard forward towards the screen to release the bottom tabs.

  5. Dell Inspiron 3520 RAM Replacement: passo 5, immagine 1 di 2 Dell Inspiron 3520 RAM Replacement: passo 5, immagine 2 di 2
    • Carefully lift the board up and locate the connecting cable.

    • Gently pull the end of the cable free from the port on the laptop.

  6. Dell Inspiron 3520 RAM Replacement, RAM: passo 6, immagine 1 di 1
    • Locate the RAM chip(s)

    • There are no RAM chips present in this photo.

  7. Dell Inspiron 3520 RAM Replacement: passo 7, immagine 1 di 2 Dell Inspiron 3520 RAM Replacement: passo 7, immagine 2 di 2
    • There are two connecting pins for the lower chip.

    • There are two connecting pins for the upper chip.

    • Pull the pins away from the sides of the chip(s) to release it.

    • The chip(s) should slide away from the dock easily.

Conclusione

To reassemble your device, follow these instructions in reverse order.

Altre 17 persone hanno completato questa guida.

Ian

Membro da: 01/30/15

1.557 Reputazione

5 Guide realizzate

Team

USF Tampa, Team 16-2, Watkins Winter 2015 Membro di USF Tampa, Team 16-2, Watkins Winter 2015

USFT-WATKINS-W15S16G2

3 Membri

5 Guide realizzate

0 Commenti

Aggiungi Commento

Visualizza Statistiche:

Ultime 24 Ore: 8

Ultimi 7 Giorni: 19

Ultimi 30 Giorni: 61

Tutti i Tempi: 31,971