Salta al contenuto principale

Questa guida ha delle modifiche più recenti. Passa all'ultima versione non verificata.

Dell Inspiron 15R SE 7520 Hard Drive Replacement

Cosa ti serve

  1. Dell Inspiron 15R SE 7520 Hard Drive Replacement, Remove the Screws: passo 1, immagine 1 di 1
    • WARNING: Before working inside your computer, read the safety information that shipped with your computer and follow the steps in "Before You Begin".

    • Remove the screws that secure the hard-drive assembly to the computer base.

  2. Dell Inspiron 15R SE 7520 Hard Drive Replacement, Sliding the Hard Drive: passo 2, immagine 1 di 1
    • Using the pull-tab, slide the hard-drive assembly toward the back of the computer to disconnect the hard-drive assembly from the connector on the system board.

  3. Dell Inspiron 15R SE 7520 Hard Drive Replacement, Lifting the Hard-Drive Assembly: passo 3, immagine 1 di 1
    • Lift the hard-drive assembly out of the computer base.

  4. Dell Inspiron 15R SE 7520 Hard Drive Replacement, Remove the Screws: passo 4, immagine 1 di 1
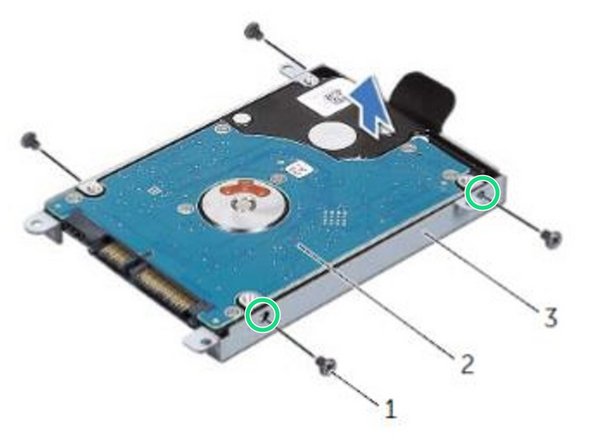
    • Remove the screws that secure the hard-drive bracket to the hard drive.

  5. Dell Inspiron 15R SE 7520 Hard Drive Replacement, Lifting the Hard Drive: passo 5, immagine 1 di 2 Dell Inspiron 15R SE 7520 Hard Drive Replacement, Lifting the Hard Drive: passo 5, immagine 2 di 2
    • Lift the hard drive off the hard-drive bracket.

  6. Dell Inspiron 15R SE 7520 Hard Drive Replacement, Align the Screw Holes: passo 6, immagine 1 di 1
    • Align the screw holes on the hard drive-bracket with the screw holes on the NEW hard drive.

  7. Dell Inspiron 15R SE 7520 Hard Drive Replacement, Replace the Screws: passo 7, immagine 1 di 1
    • Replace the screws that secure the hard-drive bracket to the hard drive.

  8. Dell Inspiron 15R SE 7520 Hard Drive Replacement, Place the Hard-Drive Assembly: passo 8, immagine 1 di 1
    • Place the hard-drive assembly on the computer base.

  9. Dell Inspiron 15R SE 7520 Hard Drive Replacement, Sliding the Hard Drive Assembly: passo 9, immagine 1 di 1
    • Using the pull-tab, slide the hard-drive assembly toward the front of the computer, to connect the hard-drive assembly to the connector on the system board.

  10. Dell Inspiron 15R SE 7520 Hard Drive Replacement, Replace the Screws: passo 10, immagine 1 di 1
    • Replace the screws that secure the hard-drive assembly to the computer base.

Linea Traguardo

Un'altra persona ha completato questa guida.

Terrence15

Membro da: 12/18/17

79.091 Reputazione

441 Guide realizzate

Team

RampUP America, Inc. Membro di RampUP America, Inc.

Community

42 Membri

1.985 Guide realizzate

0 Commenti

Aggiungi Commento

Visualizza Statistiche:

Ultime 24 Ore: 0

Ultimi 7 Giorni: 0

Ultimi 30 Giorni: 2

Tutti i Tempi: 1,003