Salta al contenuto principale

Questa guida ha delle modifiche più recenti. Passa all'ultima versione non verificata.

Dell Inspiron 1545 Power Button Board Replacement

Cosa ti serve

  1. Dell Inspiron 1545 Power Button Board Replacement, Power Button Board: passo 1, immagine 1 di 1
    • Turn the laptop off and disconnect it from all power sources.

    • Turn the laptop over so that the bottom is facing upwards.

  2. Dell Inspiron 1545 Power Button Board Replacement: passo 2, immagine 1 di 1
    • Slide the release latch while simultaneously pulling the battery outwards.

  3. Dell Inspiron 1545 Power Button Board Replacement: passo 3, immagine 1 di 1
    • Slide the battery completely out of the bay.

  4. Dell Inspiron 1545 Power Button Board Replacement: passo 4, immagine 1 di 1
    • Once the battery has been removed, take out the two screws (3mm Phillips #1) beneath it. These screws hold the center control cover in place.

  5. Dell Inspiron 1545 Power Button Board Replacement: passo 5, immagine 1 di 1
    • Flip the laptop back over to the front and push the screen open as far as possible.

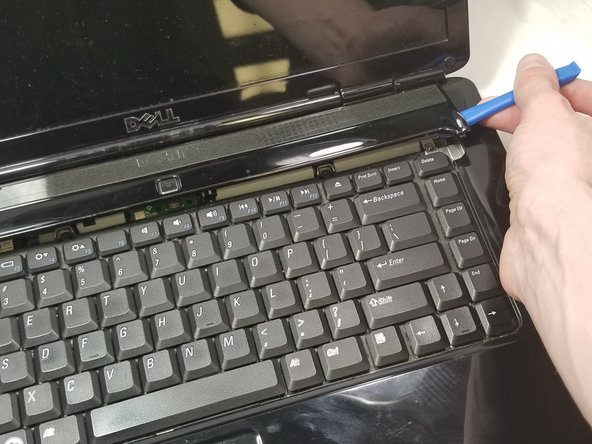
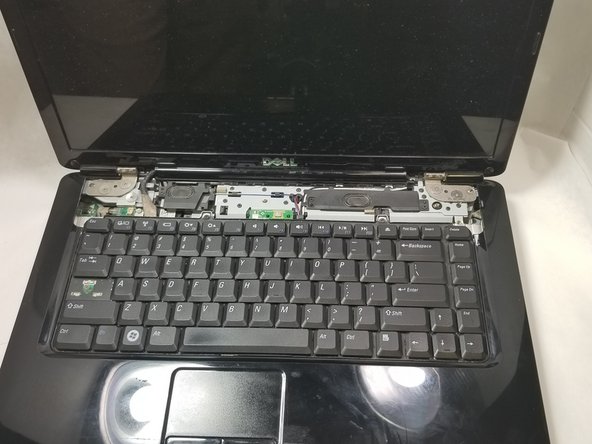
  6. Dell Inspiron 1545 Power Button Board Replacement: passo 6, immagine 1 di 3 Dell Inspiron 1545 Power Button Board Replacement: passo 6, immagine 2 di 3 Dell Inspiron 1545 Power Button Board Replacement: passo 6, immagine 3 di 3
    • The center control cover is very fragile; be careful when prying it off.

    • Pry the center control cover off of the laptop using a plastic opening tool. On the right side of the cover, there is a small divot to help you start removing the cover.

    • Carefully lift the central control cover away from the laptop.

  7. Dell Inspiron 1545 Power Button Board Replacement: passo 7, immagine 1 di 1
    • Remove the two screws (5mm Phillips #1) at the top of the keyboard.

  8. Dell Inspiron 1545 Power Button Board Replacement: passo 8, immagine 1 di 1
    • Be careful when pulling the keyboard away from the laptop, you may damage the connector holding it to the motherboard.

    • Using your hands, push the keyboard out and away from the laptop.

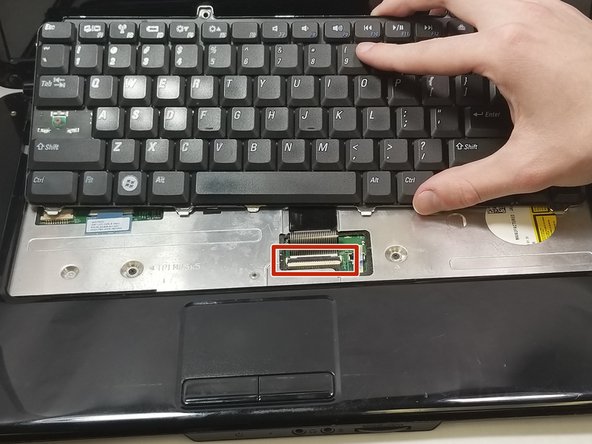
  9. Dell Inspiron 1545 Power Button Board Replacement: passo 9, immagine 1 di 2 Dell Inspiron 1545 Power Button Board Replacement: passo 9, immagine 2 di 2
    • Lift the connector latch to remove the keyboard cable from the motherboard.

    • Lift the keyboard away from the laptop.

  10. Dell Inspiron 1545 Power Button Board Replacement: passo 10, immagine 1 di 1
    • Lift the connector latch to remove the power button board from the motherboard.

    • Pull on the blue plastic tab to help prevent causing any damage to the connector.

  11. Dell Inspiron 1545 Power Button Board Replacement: passo 11, immagine 1 di 1
    • Pry the power button board out with your finger.

    • Pull the power button board away from the laptop.

Conclusione

To reassemble your device, follow these instructions in reverse order.

Michael Hill

Membro da: 02/28/18

193 Reputazione

1 Guida realizzata

0 Commenti

Aggiungi Commento

Visualizza Statistiche:

Ultime 24 Ore: 2

Ultimi 7 Giorni: 5

Ultimi 30 Giorni: 14

Tutti i Tempi: 2,166