Salta al contenuto principale

Dell G3 15 3579 RAM Replacement

Cosa ti serve

  1. Dell G3 15 3579  RAM Replacement, RAM: passo 1, immagine 1 di 1
    • Make sure the laptop is off.

    • Lay the laptop on its front so the bottom is facing up.

  2. Dell G3 15 3579  RAM Replacement: passo 2, immagine 1 di 1
    • Use the Phillips #0 to remove the eight screws (M2.5x6) on the bottom of the laptop.

    • Use the Phillips #0 to loosen the two captive screws (M2.5).

  3. Dell G3 15 3579  RAM Replacement: passo 3, immagine 1 di 3 Dell G3 15 3579  RAM Replacement: passo 3, immagine 2 di 3 Dell G3 15 3579  RAM Replacement: passo 3, immagine 3 di 3
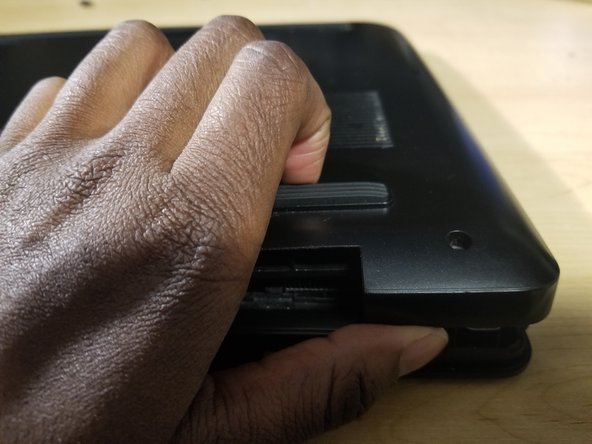
    • Use your hands or an opening tool to gently pry the bottom panel off, starting from the left hinge.

    • Continue prying from the bottom to the right side of the back panel and lift it off.

  4. Dell G3 15 3579  RAM Replacement: passo 4, immagine 1 di 2 Dell G3 15 3579  RAM Replacement: passo 4, immagine 2 di 2
    • Gently unplug the battery connecter from the motherboard.

  5. Dell G3 15 3579  RAM Replacement: passo 5, immagine 1 di 3 Dell G3 15 3579  RAM Replacement: passo 5, immagine 2 di 3 Dell G3 15 3579  RAM Replacement: passo 5, immagine 3 di 3
    • Release the tabs on each side of the chip by simultaneously pushing each tab away from the RAM.

    • These tabs lock the chip in place and releasing them will cause the chip to "pop" up.

    • After the RAM chip has popped up, pull it straight out of its socket.

  6. Dell G3 15 3579  RAM Replacement: passo 6, immagine 1 di 2 Dell G3 15 3579  RAM Replacement: passo 6, immagine 2 di 2
    • Gently align the new RAM with the tab on the slot.

    • Then slide it firmly into the slot at an angle and press the RAM down until it clicks into place.

    • If you do not hear the click, remove the RAM and reinstall it.

  7. Dell G3 15 3579  RAM Replacement: passo 7, immagine 1 di 1
    • Align the bottom cover with the slots of the laptop and snap it into place.

    • Tighten the two captive screws (M2.5) to secure the bottom cover.

    • Replace the eight screws (M2.5x6) to secure the bottom cover.

Conclusione

To reassemble your device, follow these instructions in reverse order.

0 Commenti

Aggiungi Commento

Visualizza Statistiche:

Ultime 24 Ore: 6

Ultimi 7 Giorni: 21

Ultimi 30 Giorni: 77

Tutti i Tempi: 4,142