Salta al contenuto principale

Dell Chromebook 3100 2-in-1 Motherboard Replacement

Cosa ti serve

  1. Dell Chromebook 3100 2-in-1 Motherboard Replacement, Back Cover: passo 1, immagine 1 di 2 Dell Chromebook 3100 2-in-1 Motherboard Replacement, Back Cover: passo 1, immagine 2 di 2
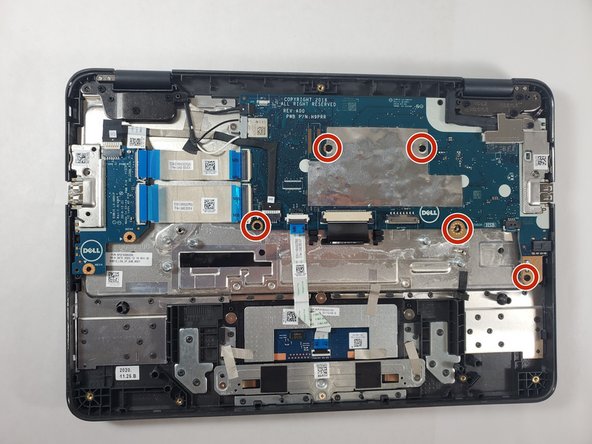
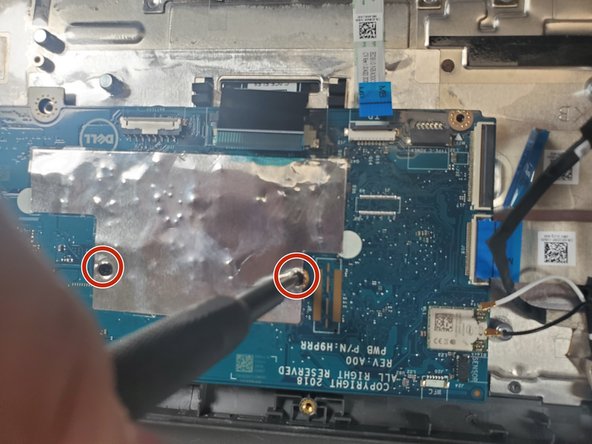
    • Using a Phillips #1 screwdriver, remove all nine of the 5 mm screws from the back cover.

  2. Dell Chromebook 3100 2-in-1 Motherboard Replacement: passo 2, immagine 1 di 2 Dell Chromebook 3100 2-in-1 Motherboard Replacement: passo 2, immagine 2 di 2
    • Use the opening tool to pry the back cover off of the device.

  3. Dell Chromebook 3100 2-in-1 Motherboard Replacement, Battery: passo 3, immagine 1 di 2 Dell Chromebook 3100 2-in-1 Motherboard Replacement, Battery: passo 3, immagine 2 di 2
    • Disconnect the battery cable from the connector on the system board.

  4. Dell Chromebook 3100 2-in-1 Motherboard Replacement: passo 4, immagine 1 di 3 Dell Chromebook 3100 2-in-1 Motherboard Replacement: passo 4, immagine 2 di 3 Dell Chromebook 3100 2-in-1 Motherboard Replacement: passo 4, immagine 3 di 3
    • Using a Phillips #1 screwdriver, remove the three 4 mm screws that secure the battery.

    • Remove the adhesive tape that secures the battery in place.

  5. Dell Chromebook 3100 2-in-1 Motherboard Replacement: passo 5, immagine 1 di 2 Dell Chromebook 3100 2-in-1 Motherboard Replacement: passo 5, immagine 2 di 2
    • Carefully remove the battery from the device.

  6. Dell Chromebook 3100 2-in-1 Motherboard Replacement, Speaker: passo 6, immagine 1 di 2 Dell Chromebook 3100 2-in-1 Motherboard Replacement, Speaker: passo 6, immagine 2 di 2
    • Remove adhesive tape that secures the speaker cable.

    • Disconnect the speaker cable from the connector on the system board.

  7. Dell Chromebook 3100 2-in-1 Motherboard Replacement: passo 7, immagine 1 di 2 Dell Chromebook 3100 2-in-1 Motherboard Replacement: passo 7, immagine 2 di 2
    • Remove the speaker cable from the retention clips.

  8. Dell Chromebook 3100 2-in-1 Motherboard Replacement: passo 8, immagine 1 di 2 Dell Chromebook 3100 2-in-1 Motherboard Replacement: passo 8, immagine 2 di 2
    • Lift and remove the speakers from the device.

  9. Dell Chromebook 3100 2-in-1 Motherboard Replacement, Motherboard: passo 9, immagine 1 di 3 Dell Chromebook 3100 2-in-1 Motherboard Replacement, Motherboard: passo 9, immagine 2 di 3 Dell Chromebook 3100 2-in-1 Motherboard Replacement, Motherboard: passo 9, immagine 3 di 3
    • Disconnect the keyboard cable.

  10. Dell Chromebook 3100 2-in-1 Motherboard Replacement: passo 10, immagine 1 di 1
    • Disconnect the two input-output board cables from the motherboard.

  11. Dell Chromebook 3100 2-in-1 Motherboard Replacement: passo 11, immagine 1 di 2 Dell Chromebook 3100 2-in-1 Motherboard Replacement: passo 11, immagine 2 di 2
    • Disconnect the touchpad cable.

    • Disconnect the USB Type-C power cable.

  12. Dell Chromebook 3100 2-in-1 Motherboard Replacement: passo 12, immagine 1 di 3 Dell Chromebook 3100 2-in-1 Motherboard Replacement: passo 12, immagine 2 di 3 Dell Chromebook 3100 2-in-1 Motherboard Replacement: passo 12, immagine 3 di 3
    • Remove the single 3 mm screw that secures the WLAN bracket to the system board using a Phillips #1 screwdriver.

    • Lift the WLAN bracket from the system board.

    • After lifting the bracket, carefully unplug the two coaxial cables.

  13. Dell Chromebook 3100 2-in-1 Motherboard Replacement: passo 13, immagine 1 di 1
    • Remove the single 4 mm screw that secures the eDP bracket to the motherboard using a Phillips #1 screwdriver.

    • Remove the eDP bracket.

  14. Dell Chromebook 3100 2-in-1 Motherboard Replacement: passo 14, immagine 1 di 2 Dell Chromebook 3100 2-in-1 Motherboard Replacement: passo 14, immagine 2 di 2
    • Disconnect the display cable from the motherboard by using a plastic opening pick.

  15. Dell Chromebook 3100 2-in-1 Motherboard Replacement: passo 15, immagine 1 di 3 Dell Chromebook 3100 2-in-1 Motherboard Replacement: passo 15, immagine 2 di 3 Dell Chromebook 3100 2-in-1 Motherboard Replacement: passo 15, immagine 3 di 3
    • Remove the five 4 mm screws that secure the motherboard using a Phillips #1 screwdriver.

  16. Dell Chromebook 3100 2-in-1 Motherboard Replacement: passo 16, immagine 1 di 2 Dell Chromebook 3100 2-in-1 Motherboard Replacement: passo 16, immagine 2 di 2
    • Lift and remove the motherboard from the computer.

Conclusione

To reassemble your device, follow these instructions in reverse order.

Altre 4 persone hanno completato questa guida.

Muhammad Ali

Membro da: 09/02/21

316 Reputazione

2 Guide realizzate

Team

Gateway, Team 1-1, Pee Fall 2021 Membro di Gateway, Team 1-1, Pee Fall 2021

GCC-PEE-F21S1G1

5 Membri

5 Guide realizzate

Un commento

Any idea how to use the USB repair shim? Dell's guide didn't help

Josie - Replica

Aggiungi Commento

Visualizza Statistiche:

Ultime 24 Ore: 1

Ultimi 7 Giorni: 11

Ultimi 30 Giorni: 72

Tutti i Tempi: 1,751