Questa versione può contenere modifiche errate. Passa all'ultima istantanea verificata.
Cosa ti serve
-
Questo passaggio è privo di traduzione. Aiuta a tradurlo
-
Close the display, and turn the computer over.
-
-
Questo passaggio è privo di traduzione. Aiuta a tradurlo
-
Remove the screws that secure the base cover to the computer base.
-
-
Questo passaggio è privo di traduzione. Aiuta a tradurlo
-
Slide and lift the base cover off the computer base.
-
-
Questo passaggio è privo di traduzione. Aiuta a tradurlo
-
Align the tabs on the NEW base cover with the slots on the computer base and slide the base cover into place.
-
-
Questo passaggio è privo di traduzione. Aiuta a tradurlo
-
Replace the screws that secure the base cover to the computer base.
-
-
Questo passaggio è privo di traduzione. Aiuta a tradurlo
-
Turn the computer over and open the display.
-
-
Questo passaggio è privo di traduzione. Aiuta a tradurlo
-
Disconnect the battery cable from the system-board connector.
-
-
Questo passaggio è privo di traduzione. Aiuta a tradurlo
-
Remove the screws that secure the battery to the computer base.
-
-
-
Questo passaggio è privo di traduzione. Aiuta a tradurlo
-
Using the battery cable, lift the battery and release it from the tabs on the computer base.
-
-
Questo passaggio è privo di traduzione. Aiuta a tradurlo
-
Turn the computer over and open the display as far as possible.
-
-
Questo passaggio è privo di traduzione. Aiuta a tradurlo
-
Press and hold the power button for five seconds to ground the system board.
-
-
Questo passaggio è privo di traduzione. Aiuta a tradurlo
-
Close the display and turn the computer over.
-
-
Questo passaggio è privo di traduzione. Aiuta a tradurlo
-
Align the tabs on the NEW battery with the slots on the computer base.
-
-
Questo passaggio è privo di traduzione. Aiuta a tradurlo
-
Align the screw holes on the battery with the screw holes on the computer base.
-
-
Questo passaggio è privo di traduzione. Aiuta a tradurlo
-
Replace the screws that secure the battery to the computer base.
-
-
Questo passaggio è privo di traduzione. Aiuta a tradurlo
-
Connect the battery cable to the system-board connector.
-
-
Questo passaggio è privo di traduzione. Aiuta a tradurlo
-
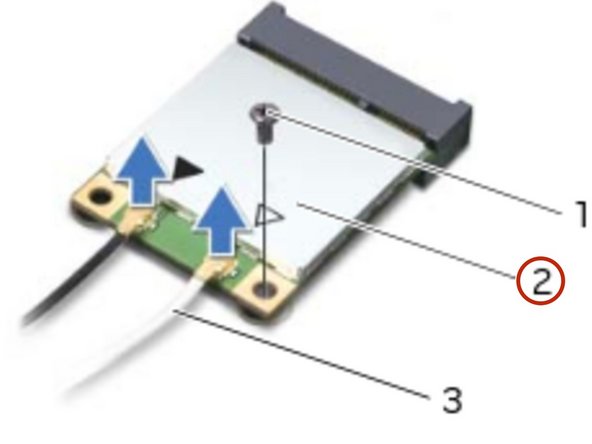
Disconnect the antenna cables from the wireless mini-card.
-
-
Questo passaggio è privo di traduzione. Aiuta a tradurlo
-
Remove the screw that secures the wireless mini-card to the system board.
-
-
Questo passaggio è privo di traduzione. Aiuta a tradurlo
-
Slide and remove the wireless-mini card from the system-board connector.
-
-
Questo passaggio è privo di traduzione. Aiuta a tradurlo
-
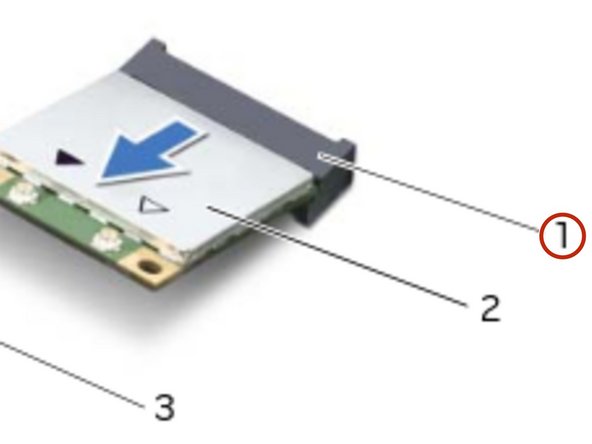
Align the notch on the NEW wireless mini-card with the tab on the system-board connector.
-
-
Questo passaggio è privo di traduzione. Aiuta a tradurlo
-
Insert the wireless mini-card at a 45-degree angle into the system-board connector.
-
-
Questo passaggio è privo di traduzione. Aiuta a tradurlo
-
Press the other end of the wireless mini-card down into the slot on the system board and replace the screw that secures the wireless mini-card to the system board.
-
-
Questo passaggio è privo di traduzione. Aiuta a tradurlo
-
Connect the antenna cables to the connectors on the wireless mini-card.
-


Team
