Salta al contenuto principale

DeLonghi ESAM xxxx Solenoid Replacement

Cosa ti serve

  1. DeLonghi ESAM  xxxx Solenoid Replacement, Solenoid: passo 1, immagine 1 di 1
    • Before you begin: UNPLUG! Remember not to touch current leading parts, if plugged in.

  2. DeLonghi ESAM  xxxx Solenoid Replacement, Open the machine: passo 2, immagine 1 di 3 DeLonghi ESAM  xxxx Solenoid Replacement, Open the machine: passo 2, immagine 2 di 3 DeLonghi ESAM  xxxx Solenoid Replacement, Open the machine: passo 2, immagine 3 di 3
    • Rearside: unscrew two screws, push upside.

    • Side covers: unscrew two screws, push backwards.

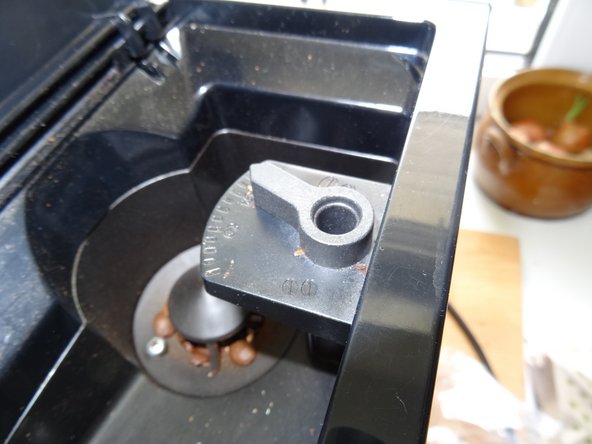
    • Top: unscrew four screws, disassemble the adjuster of the grinder as shown in step 3

  3. DeLonghi ESAM  xxxx Solenoid Replacement, Adjuster: passo 3, immagine 1 di 3 DeLonghi ESAM  xxxx Solenoid Replacement, Adjuster: passo 3, immagine 2 di 3 DeLonghi ESAM  xxxx Solenoid Replacement, Adjuster: passo 3, immagine 3 di 3
    • Remove the cap, then unscrew the exposed screw. Take away the adjuster.

    • Now you can remove the top of the machine.

  4. DeLonghi ESAM  xxxx Solenoid Replacement, The Solenoid Valve: passo 4, immagine 1 di 2 DeLonghi ESAM  xxxx Solenoid Replacement, The Solenoid Valve: passo 4, immagine 2 di 2
    • Now plug in and try to get a cup of coffee but CAUTION, don´t touch anything, high voltage.

    • On top of the boiler you can see the valve. Can you see if the water really drips out of the valve? Pull the plug!

  5. DeLonghi ESAM  xxxx Solenoid Replacement, Old and new: passo 5, immagine 1 di 2 DeLonghi ESAM  xxxx Solenoid Replacement, Old and new: passo 5, immagine 2 di 2
    • Of course buy a new one at a DeLonghi supplier. The old one normally has a metal body, the new one plastic. That provokes some problems. You also need raccords for directions in- and out. The outgoing one is double, but there may be differences. In the photo they are already assembled.

    • Attention! The valve has a direction. The sense of the flew is towards the black point. The double raccord must be there!

  6. DeLonghi ESAM  xxxx Solenoid Replacement, Changing 1: passo 6, immagine 1 di 3 DeLonghi ESAM  xxxx Solenoid Replacement, Changing 1: passo 6, immagine 2 di 3 DeLonghi ESAM  xxxx Solenoid Replacement, Changing 1: passo 6, immagine 3 di 3
    • The boiler and valve are fixed with three screws. Also loosen some cables and hoses until the boiler can be removed.

  7. DeLonghi ESAM  xxxx Solenoid Replacement, Changing 2: passo 7, immagine 1 di 3 DeLonghi ESAM  xxxx Solenoid Replacement, Changing 2: passo 7, immagine 2 di 3 DeLonghi ESAM  xxxx Solenoid Replacement, Changing 2: passo 7, immagine 3 di 3
    • Two screws hold the valve looking upwards.

    • As the old one uses M4 screws you have to cut the thread into the plastic body. Use a threader.

    • and make a circle cut into the plastic of the holder of the boiler in order to let the incoming hose pass by.

  8. DeLonghi ESAM  xxxx Solenoid Replacement, Finito!: passo 8, immagine 1 di 1
    • Hopefully you can get a cup of coffee! Then reassemble all parts.

Conclusione

Have a cup of coffee!

Altre 4 persone hanno completato questa guida.

VauWeh

Membro da: 10/19/15

198.114 Reputazione

246 Guide realizzate

Team

Repair is War on Entropy Membro di Repair is War on Entropy

Community

24 Membri

1.080 Guide realizzate

3 Commenti

Superb,thank you very much !!!

Vedrasco Victor Vasili - Replica

This guide helped me tremendously with the repair of my Delonghi Magnifica which is very similar. In particular, the explanation of the difference between the old and new solenoids, and the need for new raccords (a new word to me!) was helpful, although I’ve yet to figure out where to get the raccords from.

I fitted a new pump, flow meter, and will be fitting a new solenoid when I get the relevant parts.

Alan Shilling - Replica

Glad to help you. Maybe the above mentioned German dealer is shipping?

VauWeh -

Aggiungi Commento

Visualizza Statistiche:

Ultime 24 Ore: 6

Ultimi 7 Giorni: 44

Ultimi 30 Giorni: 232

Tutti i Tempi: 16,565