Salta al contenuto principale
Unisciti alla Community delle riparazioni - Crea un account
DMC-GF3 LCD Display Replacement

DMC-GF3 LCD Display Replacement

Sales Cameraparts4you

Sales Cameraparts4you e 3 altri collaboratori

Ultimo aggiornamento il 31 lug 2024

Nessuna stima
Moderato
Guida fornita dalla comunità

Introduzione

Vai al passo 1

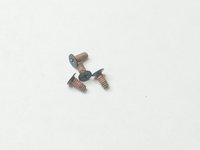
This guide will help you safely disassemble your unit and replace your existing damaged LCD. You will need a Phillips #000 screwdriver.

Cosa ti serve

Strumenti

  • Phillips #000 Screwdriver
    Phillips #000 Screwdriver
  • Spudger
    Spudger

Mostra di più…

  1. DMC-GF3 LCD Display Replacement, LCD Display: passo 1, immagine 1 di 1
    • Remove the battery and memory card from the device.

  2. DMC-GF3 LCD Display Replacement: passo 2, immagine 1 di 2 DMC-GF3 LCD Display Replacement: passo 2, immagine 2 di 2
    • Remove 4 (2mm) screws from the bottom of the unit.

  3. DMC-GF3 LCD Display Replacement: passo 3, immagine 1 di 3 DMC-GF3 LCD Display Replacement: passo 3, immagine 2 di 3 DMC-GF3 LCD Display Replacement: passo 3, immagine 3 di 3
    • Remove 4 (4mm) screws from the sides of the unit. You are removing screws from both the right and left sides of the unit (4 screws total)

  4. DMC-GF3 LCD Display Replacement: passo 4, immagine 1 di 2 DMC-GF3 LCD Display Replacement: passo 4, immagine 2 di 2
    • Slightly lift up the left side of unit to remove the side panel. Do not remove the rear chassis. Just lift up enough to remove side panel.

    • Caution. The rear Chassis is attached to two ribbon panels so please do not remove the chassis in this step.

  5. DMC-GF3 LCD Display Replacement: passo 5, immagine 1 di 1
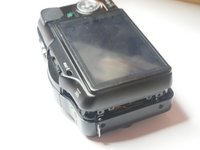
    • When opening the rear casing be careful not to pull on the flex cables. There are 2 flex cables on each side of the rear casing.

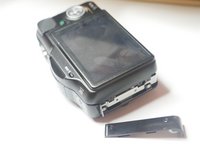
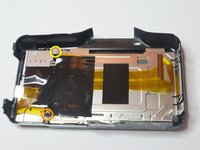
    • Slightly lift the rear casing. Do not completely remove it. Just lift just enough so the right flex clamp is visible. Keep in mind the left side of the rear casing is also attached to a flex clamp. Use a spudger or other method to release the cable. Do not remove the rear casing yet.

  6. DMC-GF3 LCD Display Replacement: passo 6, immagine 1 di 1
    • Remove flex cable using a spudger or other method. Remove rear casing.

    • These plastic clamps are fragile and break easily. Use caution when releasing the cable. Use equal pressure throughout entire clamp or risk breaking the clamp.

  7. DMC-GF3 LCD Display Replacement: passo 7, immagine 1 di 2 DMC-GF3 LCD Display Replacement: passo 7, immagine 2 di 2
    • Insert wisdom here.

Conclusione

To reassemble your device, follow these instructions in reverse order.

Altre 2 persone hanno completato questa guida.

0Commenti sulla guida

Aggiungi Commento

Visualizza Statistiche:

Ultime 24 Ore: 0

Ultimi 7 Giorni: 7

Ultimi 30 Giorni: 24

Tutti i Tempi: 921