Questa versione può contenere modifiche errate. Passa all'ultima istantanea verificata.
Cosa ti serve
-
Questo passaggio è privo di traduzione. Aiuta a tradurlo
-
Use your finger tips to pinch the damaged propeller.
-
Twist the propeller counterclockwise and pull up to remove.
-
-
Questo passaggio è privo di traduzione. Aiuta a tradurlo
-
Remove the eight 7 mm hex screws by turning counterclockwise with a 2 mm hex bit.
-
-
Questo passaggio è privo di traduzione. Aiuta a tradurlo
-
Pry the LED motor covers off with a metal spudger.
-
-
Questo passaggio è privo di traduzione. Aiuta a tradurlo
-
Pry the paper covering off the four corners with a metal spudger.
-
-
Questo passaggio è privo di traduzione. Aiuta a tradurlo
-
Remove the twelve 8.7 mm hex screws with a 2 mm hex bit from the motor bases.
-
-
-
Questo passaggio è privo di traduzione. Aiuta a tradurlo
-
Flip the drone on its back
-
Remove the eight 4.5 mm hex screws by turning them counterclockwise with a 1.5 mm hex bit.
-
Separate the mesh from the drone by pulling up gently and rocking left to right.
-
-
Questo passaggio è privo di traduzione. Aiuta a tradurlo
-
Remove two 1.2mm screws using the JIS #000 bit from the camera cable retaining bracket.
-
-
Questo passaggio è privo di traduzione. Aiuta a tradurlo
-
Lift the camera connector at one end with your hand and remove the mesh.
-
-
Questo passaggio è privo di traduzione. Aiuta a tradurlo
-
Remove the two 1.2 mm screws using a JIS #000 bit from the antenna retaining bracket.
-
Pull the four U.FL antennae up.
-
Remove the two 4 mm screws using a JIS #000 bit.
-
-
Questo passaggio è privo di traduzione. Aiuta a tradurlo
-
Pry apart the clamshell at the motor end.
-
Separate the clamshell.
-
-
Questo passaggio è privo di traduzione. Aiuta a tradurlo
-
Press the connector tabs with a spudger and pull on the wire simultaneously.
-
Remove the shell from the rest of the drone.
-
-
Questo passaggio è privo di traduzione. Aiuta a tradurlo
-
Peel the electrical tape off.
-
Unlock the connector by prying up on the black latch.
-
Pull the ribbon cable out with tweezers.
-
-
Questo passaggio è privo di traduzione. Aiuta a tradurlo
-
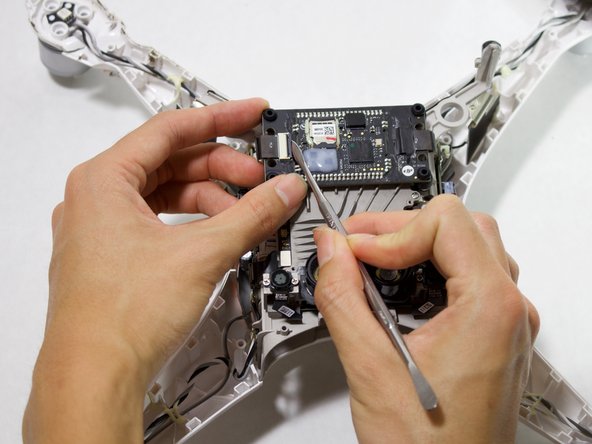
Remove the flight controller vibration dampers by pushing the dampers into the mounts with the spudger.
-


Annulla: non ho completato questa guida.
Altre 6 persone hanno completato questa guida.
Team

Cal Poly, Team S15-G6, White Fall 2018 Membro di Cal Poly, Team S15-G6, White Fall 2018
CPSU-WHITE-F18S15G6
4 Membri
6 Guide realizzate
4 Commenti
Great guide but there should have been step 14 to show how to put the control board back on top of the isolators.
Also I found it was not necessary to remove the bottom shell to remove and replace the control board. There is enough room to remove and replace with the shell in place and this will greatly decrease the time required to do the repair. I used the rounded edge of a small flat screw driver.
The replacement of the board is a challenge and that is where I got stuck. I used monofilament fishing line. Make a loop in the line and insert the loop through the mounting hole in the board. Pass the loop over the isolator ball and into the groove around it. Bring the mounting board into contact with the isolator ball and gently pull the fishing line loop and pull the isolator ball up into the mounting hole. If you are lucky, the ball will come through and flatten itself out as is is supposed to. If not, use tweezers to grab the ball and gently pull it up through the hole.
Excellent guide. This helped so much for me to replace my failed flight control board. I dropped one of the small screws and could not find it! I bought a DJI Phantom 4 fastener pack that has alot of these specialty screws. I only needed one screw, but now have lots of backups for future. An improvement to the instructions would be reassembly steps. It could help with some of the wire routing that I figured out the routing, but callouts would help. As a contribution to a possible update, I figured out a simple, reliable technique to push the dampener boots through the flight control board corners. Essentially use needle-nose pliers to squeeze the wide part of the dampener and push one end of the squished profile through the board hole. Use your other hand to pinch or roll the rest of the dampener through the hole. If allowed here is a link to a video showing how I did this: https://youtu.be/QHvy0n_iorE
Thanks for this. The visuals helped out a ton in knowing what to do. Like comments above mentioned, there is just enough room to do this without removing the entire shell. The dampeners were the hardest part to reinstall. I tried the fishing line trick commented above with no success so I brute forced it. I lined up the board with the dampeners, pushed down on the board to compress them and then took my tweezers and really forcefully grabbed them. Once one side was up, I dug my tweezers down into it to grab the opposite side through the hole. I got the rest of them done within 5 min doing it this way.