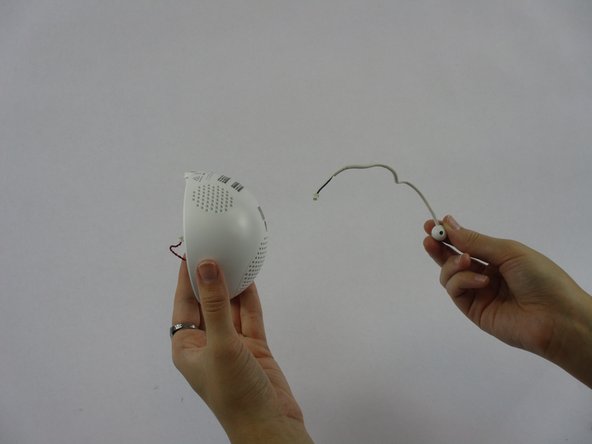
Salta al contenuto principale

D-Link DCS-825L Antenna Replacement

Cosa ti serve

  1. D-Link DCS-825L Antenna Replacement, Accent Ring: passo 1, immagine 1 di 1
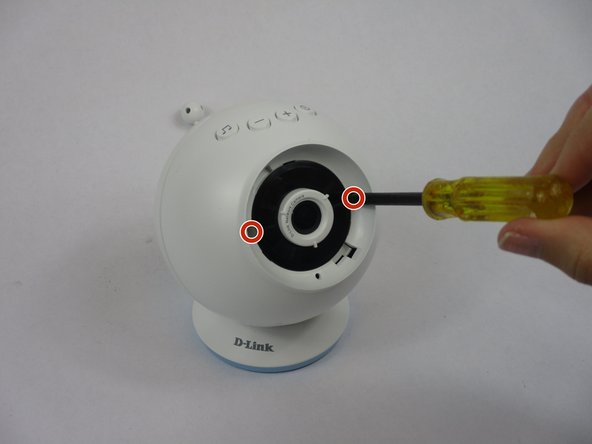
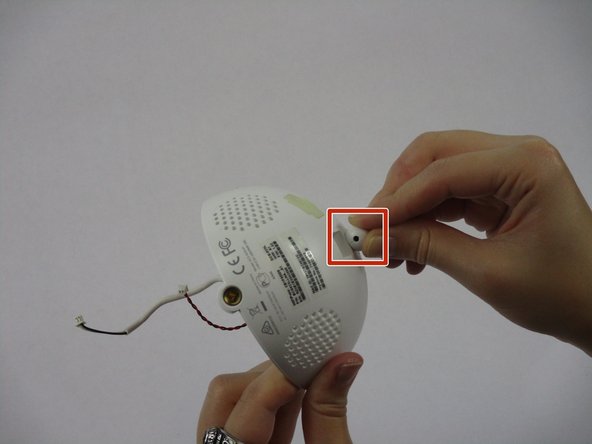
    • Grasp the side of the accent ring. There is a notch that your thumb will be able to grab ahold of.

  2. D-Link DCS-825L Antenna Replacement: passo 2, immagine 1 di 1
    • Twist the accent ring until it pops off. You may need to use both hands if the accent ring is stuck.

  3. D-Link DCS-825L Antenna Replacement: passo 3, immagine 1 di 1
    • Replace your accent ring with whichever color you choose.

  4. D-Link DCS-825L Antenna Replacement, Back Casing: passo 4, immagine 1 di 2 D-Link DCS-825L Antenna Replacement, Back Casing: passo 4, immagine 2 di 2
    • Remove one Phillips #2 screw from each side of the camera lens.

  5. D-Link DCS-825L Antenna Replacement: passo 5, immagine 1 di 3 D-Link DCS-825L Antenna Replacement: passo 5, immagine 2 di 3 D-Link DCS-825L Antenna Replacement: passo 5, immagine 3 di 3
    • Pull the Wi-Fi Baby Camera open.

    • It should be easily done after the screws are removed.

  6. D-Link DCS-825L Antenna Replacement: passo 6, immagine 1 di 2 D-Link DCS-825L Antenna Replacement: passo 6, immagine 2 di 2
    • Take your tweezers and gently pull the white tip out from its plug that is connected to a red and black twisted wire.

  7. D-Link DCS-825L Antenna Replacement: passo 7, immagine 1 di 3 D-Link DCS-825L Antenna Replacement: passo 7, immagine 2 di 3 D-Link DCS-825L Antenna Replacement: passo 7, immagine 3 di 3
    • Take your tweezers and gently pull the white tip that is on the end of the white wire (the antenna) out from its plug in.

  8. D-Link DCS-825L Antenna Replacement, Antenna: passo 8, immagine 1 di 1
    • Once you have the back casing removed from the other half of the device, it should look like this with the antenna poking out.

  9. D-Link DCS-825L Antenna Replacement: passo 9, immagine 1 di 3 D-Link DCS-825L Antenna Replacement: passo 9, immagine 2 di 3 D-Link DCS-825L Antenna Replacement: passo 9, immagine 3 di 3
    • There will be a light yellow rubber stopper that is holding the antenna in place.

    • With your tweezers, gently tug on the stopper to make it come out, or at least come loose.

    • If the stopper does not completely come out, use the round top of the antenna to push down on it.

    • You can do this simply by pulling the antenna as close to the back casing as possible, and then pushing down on it until the rubber stopper comes out completely.

    • After it has come out, it can either be taken off from the antenna and set aside, or it can be kept on.

  10. D-Link DCS-825L Antenna Replacement: passo 10, immagine 1 di 2 D-Link DCS-825L Antenna Replacement: passo 10, immagine 2 di 2
    • Once the rubber stopper has been pushed out, you will now be able to easily pull the antenna out from the back casing.

    • After it has been removed, you are now able to replace the antenna of your Wi-Fi Baby Camera.

Conclusione

To reassemble your device, follow these instructions in reverse order.

Alexis Clopton

Membro da: 10/09/18

97 Reputazione

1 Guida realizzata

Team

USF Tampa, Team S1-G5, Leahy Fall 2018 Membro di USF Tampa, Team S1-G5, Leahy Fall 2018

USFT-LEAHY-F18S1G5

4 Membri

4 Guide realizzate

0 Commenti

Aggiungi Commento

Visualizza Statistiche:

Ultime 24 Ore: 1

Ultimi 7 Giorni: 3

Ultimi 30 Giorni: 8

Tutti i Tempi: 456