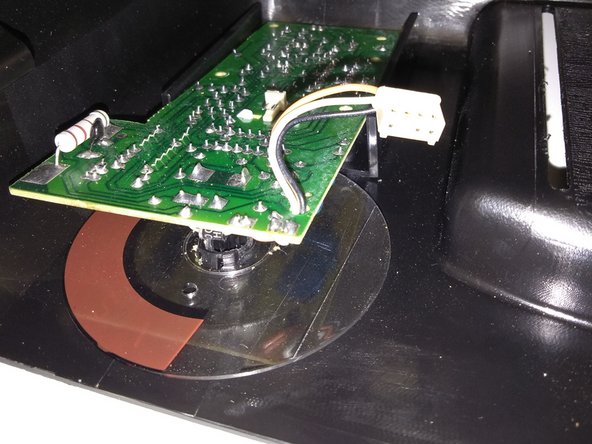
Salta al contenuto principale

Cuisinart CPT-140BK Circuit Board Replacement

Cosa ti serve

  1. Cuisinart CPT-140BK  Circuit Board Replacement, Circuit Board: passo 1, immagine 1 di 1
    • Unplug the toaster before disassembly.

  2. Cuisinart CPT-140BK  Circuit Board Replacement: passo 2, immagine 1 di 2 Cuisinart CPT-140BK  Circuit Board Replacement: passo 2, immagine 2 di 2
    • Turn the toaster upside down.

    • Unscrew all 4mm screws using Phillips #2 screwdriver.

  3. Cuisinart CPT-140BK  Circuit Board Replacement: passo 3, immagine 1 di 1
    • Turn the toaster right side up.

    • Lift up the front cover carefully because the cables can be damaged.

    • Pull out the toaster lever knobs by pulling it away from the toaster before removing the top cover.

  4. Cuisinart CPT-140BK  Circuit Board Replacement: passo 4, immagine 1 di 3 Cuisinart CPT-140BK  Circuit Board Replacement: passo 4, immagine 2 di 3 Cuisinart CPT-140BK  Circuit Board Replacement: passo 4, immagine 3 di 3
    • Detach the cable that connects the toaster to the circuit board, in both control panels.

  5. Cuisinart CPT-140BK  Circuit Board Replacement: passo 5, immagine 1 di 1
    • Carefully lift up the top cover.

  6. Cuisinart CPT-140BK  Circuit Board Replacement: passo 6, immagine 1 di 3 Cuisinart CPT-140BK  Circuit Board Replacement: passo 6, immagine 2 di 3 Cuisinart CPT-140BK  Circuit Board Replacement: passo 6, immagine 3 di 3
    • The circuit board is located inside the front cover.

    • Unscrew total of six 4mm screws that attach each circuit board to the top cover, using Phillips #2 screwdriver.

    • Remove and replace the circuit board.

Conclusione

To reassemble your device, follow these instructions in reverse order.

0 Commenti

Aggiungi Commento

Visualizza Statistiche:

Ultime 24 Ore: 0

Ultimi 7 Giorni: 1

Ultimi 30 Giorni: 4

Tutti i Tempi: 500