Questa versione può contenere modifiche errate. Passa all'ultima istantanea verificata.
Cosa ti serve
-
Questo passaggio è privo di traduzione. Aiuta a tradurlo
-
Unscrew the two 18 mm long Phillips #2 screws on the side of the hair dryer.
-
-
Questo passaggio è privo di traduzione. Aiuta a tradurlo
-
Once you have taken the screws out, take the top half of the handle off by lifting it off of the dryer.
-
-
Questo passaggio è privo di traduzione. Aiuta a tradurlo
-
Remove the inner white disk piece by gently pulling it out with your finger nail.
-
-
Questo passaggio è privo di traduzione. Aiuta a tradurlo
-
Gently remove the tan boxes (power supply) by wiggling them out of place and set them aside so you can take the back part of the handle off.
-
-
-
Questo passaggio è privo di traduzione. Aiuta a tradurlo
-
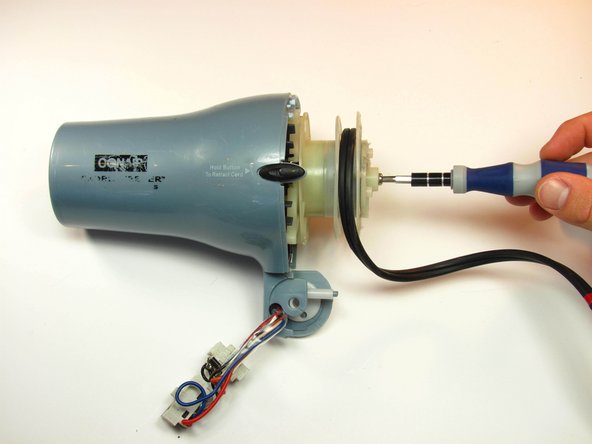
Remove the inner white disk piece from the base of the dryer head by gently pulling it out with your finger nail.
-
-
Questo passaggio è privo di traduzione. Aiuta a tradurlo
-
Unscrew the three 12 mm long Phillips #2 screws to remove the back of the hairdryer.
-
-
Questo passaggio è privo di traduzione. Aiuta a tradurlo
-
Once the three screws are removed, pop the back of the dryer off by wiggling it until it comes loose. This shouldn't take too much effort.
-
-
Questo passaggio è privo di traduzione. Aiuta a tradurlo
-
Unwind the cord and lay it to the side so you can get to the screw in the middle easier.
-
Remove the single 12 mm long Phillips #2 screw in the middle of the cord track.
-
-
Questo passaggio è privo di traduzione. Aiuta a tradurlo
-
Take off the white cap that covers the heating coil. You will see a wound up piece of metal (cord retracting coil) underneath once the cap is removed.
-
-
Questo passaggio è privo di traduzione. Aiuta a tradurlo
-
To remove the coil, use your screw driver to pop the coil out of the slot.
-
-
Questo passaggio è privo di traduzione. Aiuta a tradurlo
-
Once the coil is removed, unscrew the three 11 mm long Phillips #2 screws underneath to remove the retracting wheel.
-


Annulla: non ho completato questa guida.
Un'altra persona ha completato questa guida.
Team

Cal Poly, Team 10-33, Maness Winter 2014 Membro di Cal Poly, Team 10-33, Maness Winter 2014
CPSU-MANESS-W14S10G33
3 Membri
7 Guide realizzate