Salta al contenuto principale

Questa guida ha delle modifiche più recenti. Passa all'ultima versione non verificata.

Conair Cord-Keeper 169XR Cool Down Button Replacement

Cosa ti serve

  1. Conair Cord-Keeper 169XR Cool Down Button Replacement, Handle Cover: passo 1, immagine 1 di 2 Conair Cord-Keeper 169XR Cool Down Button Replacement, Handle Cover: passo 1, immagine 2 di 2
    • Unscrew the two 18 mm long Phillips #2 screws on the side of the hair dryer.

  2. Conair Cord-Keeper 169XR Cool Down Button Replacement: passo 2, immagine 1 di 1
    • Be cautious of pieces that can possibly fall out when removing the face of the handle.

    • Once you have taken the screws out, take the top half of the handle off by lifting it off of the dryer.

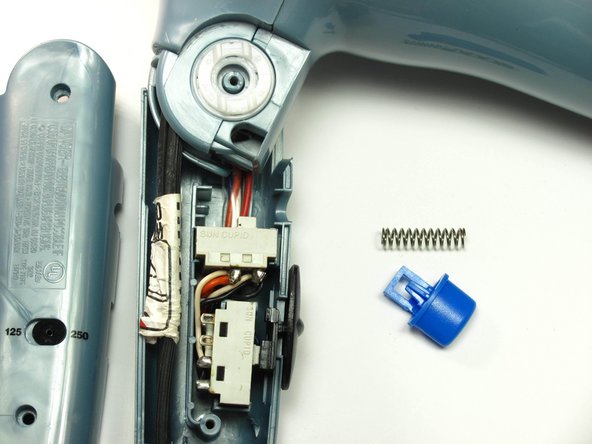
  3. Conair Cord-Keeper 169XR Cool Down Button Replacement, Cool Down Button: passo 3, immagine 1 di 2 Conair Cord-Keeper 169XR Cool Down Button Replacement, Cool Down Button: passo 3, immagine 2 di 2
    • Take out the cool down button and the spring behind it by gently lifting the button up toward you and pushing it to the right out of its groove.

    • You may need to replace the button and spring depending on which one is broken.

Conclusione

To reassemble your device, follow these instructions in reverse order.

Un'altra persona ha completato questa guida.

Candace

Membro da: 01/23/14

992 Reputazione

7 Guide realizzate

Team

Cal Poly, Team 10-33, Maness Winter 2014 Membro di Cal Poly, Team 10-33, Maness Winter 2014

CPSU-MANESS-W14S10G33

3 Membri

7 Guide realizzate

0 Commenti

Aggiungi Commento

Visualizza Statistiche:

Ultime 24 Ore: 0

Ultimi 7 Giorni: 0

Ultimi 30 Giorni: 3

Tutti i Tempi: 1,246