Introduzione
Questa guida illustra la procedura di clonazione di software, sistema operativo e dati esistenti mettendo il tutto su un nuovo hard drive.
(SuperDuper è ora competibile con Big Sur e Monterey.)
NOTA: Con l'introduzione di macOS Catalina, alcuni passaggi di questa quida sono diventati obsoleti.
IMPORTANTE: Clonare il disco rigido non è una procedura raccomandata se il tuo Mac usa una partizione di ripristino (MacOS 10.7 - attuale) o ripristino attraverso internet (2011 - attuale). Per spostare i tuoi dati sul nuovo disco, invece, prima crea un backup del tuo disco esistente. In seguito puoi usare ripristino attraverso internet oppure creare un disco esterno avviabile in modo tale tu sia pronto a installare macOS sul tuo nuovo disco e migrare così tutti i tuoi dati.
Se sei soddisfatto dell'installazione del sistema operativo esistente e desideri semplicemente aggiornare la capacità dell'hard drive, puoi clonare l'hard drive esistente su una nuova unità.
Per clonare un disco rigido, devi poter collegare il secondo disco rigido al tuo Mac. Il nostro Box Esterno da 2.5" o uno dei nostri Kit di upgrade Hard Drive funzionano alla grande per clonare il disco.
Per clonare il tuo hard drive ti consigliamo di usare un programma chiamato SuperDuper!, della Shirt Pocket Software.
Le seguenti istruzioni presuppongono che userai SuperDuper! e la custodia da 2,5" per clonare su una nuova unità da 2,5". Se userai altri strumenti, la procedura di installazione potrebbe essere leggermente diversa.
Cosa ti serve
-
-
Porta dati (stretta)
-
Porta di alimentazione (larga)
-
-
-
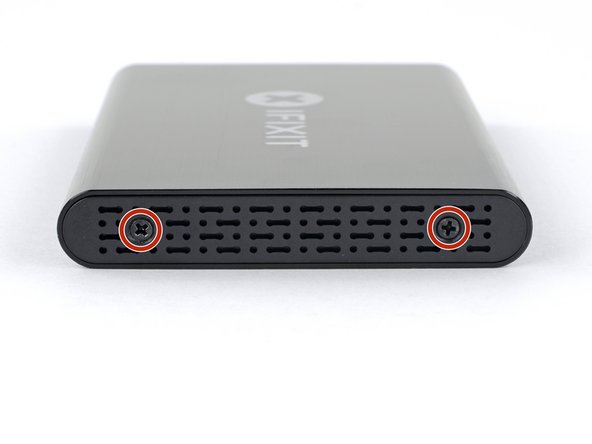
Usa il cacciavite in dotazione per rimuovere le due viti a croce Phillips.
-
-
-
Posiziona l'unità nel vassoio di plastica e allinea le porte dell'unità con la presa del vassoio.
-
Spingi con cautela l'unità nella presa del vassoio per collegare le porte.
-
Premi nel vassoio di plastica il bordo rialzato dell'unità.
It is helpful to use something thin like a credit card as a shoe horn here - while the back edge is still raised, insert a thin card between the edge of the drive and the foam block, then push the drive edge down and slip the card out. This will allow the end of the drive to sit flush against the block without any overlap or mashing of the block. It also eliminates the need to keep pressing or forcing the edge of the drive to fit.
-
-
-
-
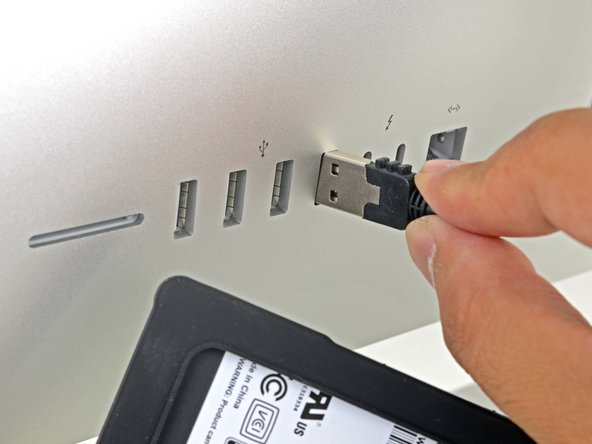
Accendi il tuo Mac e attendi che si avvii completamente.
-
Collega il box esterno alla porta USB del tuo Mac.
-
-
-
Seleziona il tuo nuovo hard drive dalla colonna di sinistra in Utility Disco.
-
Seleziona l'opzione Inizializza sulla barra superiore dei pulsanti.
-
Scegli un nome per la tua nuova unità e seleziona "APFS" per il formato.
-
Premi il pulsante Inizializza.
-
Esci da Utility Disco una volta completata la cancellazione.
When I try to partition, I message comes up saying "file system formatter failed". What do I do?
On latest MacOS (from High Sierra on) you should use APFS. This is mandatory on Catalina, but in this case the system update itself converted the existing drive from MacOS Journaled to APFS.
-
-
-
Scarica e installa SuperDuper!
-
Sotto il menu a discesa Vai, seleziona Applicazioni.
-
Apri SuperDuper!
With the newer OS-X & MacOS releases its wise not to use 3rd party cloning software.
A better approach is to use Apple supplied Migration Assistant during the OS install on a fresh drive, or you can do it later its located in the Utility folder.
Sadly, cloning apps don't create the hidden partition the OS installer does and if you are not careful you can wipe it out with the cloning app.
An alternative is using Disk Utilities Imaging tool which allows you to create an image file that you can then reuse over and over again if you have to manage multiple systems this offers a very quite way of cloning a standard set of config & apps.
-
-
-
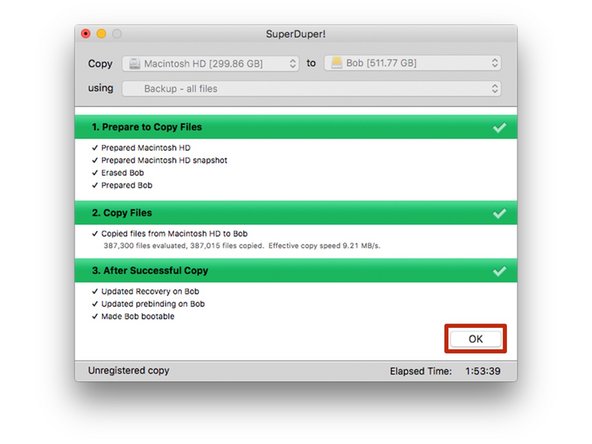
Attendi che l'unità venga copiata (potrebbe richiedere diverse ore se hai molte cose sul tuo hard drive).
-
Quando ti viene richiesta la registrazione a SuperDuper!, scegli "Registra" per acquistare il software o "Più tardi" per registrarti in seguito.
-
Dopo aver completato la copia, fai clic su "Ok" e chiudi SuperDuper!
-
-
-
A questo punto, il nuovo disco rigido dovrebbe essere un clone dell'unità esistente e pronto per l'installazione.
-
Lascia il box esterno collegato al computer e riavvia il computer. Tieni premuto il tasto "option" mentre si riavvia finché non viene visualizzato un menu di opzioni di avvio.
Everything worked up until I was trying to boot from my SSD. I figured it out though if anyone else is having the same problem in 2023. Right after quiting SuperDuper! Click apple > system preferences > start up disk > click lock to make changes > select new SSD > restart.
-
-
-
Seleziona il tuo nuovo hard drive dal menu delle opzioni di avvio.
-
Attendi il riavvio del computer e verifica che funzioni correttamente.
-
Il tuo nuovo hard drive è ora pronto per essere installato sul tuo computer.
Can an Apple Time Machine be used to facilitate the cloning of a new hard drive, in LIEU of the $28.00 SUPER DUPER! applications program? My aged MacBook Pro 1297 17” is running OS10.11.6 and I am clueless as to whether or not the original hard drive is even partitioned: After 11 years, it may be time for a new SSD…
-


Rimuovi il nuovo hard drive dal box esterno e installalo nel computer. Le istruzioni di installazione sono disponibili per diversi tipi di Mac.
Rimuovi il nuovo hard drive dal box esterno e installalo nel computer. Le istruzioni di installazione sono disponibili per diversi tipi di Mac.
Annulla: non ho completato questa guida.
Altre 110 persone hanno completato questa guida.
Un ringraziamento speciale a questi traduttori:
100%


Questi traduttori ci stanno aiutando ad aggiustare il mondo! Vuoi partecipare?
Inizia a tradurre ›

Team

Mike's Super Duper Computer Repairs Membro di Mike's Super Duper Computer Repairs
Business
1 Membro
8 Guide realizzate
24 Commenti
This guide was straightforward and helpful along the way when I replaced my hard drive! My only comment is that this should be a link in the "MacBook Pro 13" Unibody Early 2011 Hard Drive Replacement" article, since the Youtube videos link to each other, but the articles do not. Thanks for all your help with these fantastic guides!
Wow! Thank you Mike.
Everything went very well with a big bonus. My older version of Photoshop does not work with the newer Mac operating systems. Now that I installed a new 1TB hard drive, I can upgrade OS if I want. Then I can use the old drive in an internal enclosure replacing the DVD running the old OS X keeping all of my older Adobe apps!
Ifixit rocks!
Hi BuckNYC,
As far as I know, SuperDuper will not clone the BootCamp partition. You will have to use something like Winclone to do that.
Worked fine. Only issue is that before installing the new drive, you need to set it as the boot disk (System Preferences, Startup Disk) Do this when you’ve got it connected to USB (after Step 12) - when you tested that it’s bootable. (I missed this and had a fraught few hours until Dan helped me out.)
Great tutorial Mike! Made it a lot easier to swap my old HD for an SSD. Many Thanks!
Glad to hear it! :)
Mike -
Does this tutorial also work, if I want to switch from FusionDrive to SSD?
Yes - Make a clone on the new SSD first using an external housing, start up from that disk, then split the internal Fusion Drive in the Mini in its HDD and SSD components using Terminal. Reformat the internal SSD and HDD. Shut down, and replace HDD with the new “external” SSD. The SSD-part of the Fusion drive becomes an extra internal SSD. For fastest performance, put OSX on the faster ex-Fusion SSD and datafiles on the newly installed SSD.
Wannes -
IMPORTANT: Cloning the hard drive is not recommended if you have a Mac that uses a recovery partition (MacOS 10.7 - present)
Why?
Dunno - Bombich.com Carbon Copy Cloner (my go-to clone app for years) clones them perfectly and has done so for years.
Wannes -
I am looking to upgrade my 2012 hard drive to an ssd. I would prefer the easiest fastest way of migrating or copying my entire installation to the new drive. Is super duper cloning suggested or is there a better way?
So is Super Duper not recommended even though they’ve updated to include Catalina support? If they aren’t, what’s another method as I’ve read that Time Machine backups may not work as well for complete replacement of the drive? I was about to purchase it, but if anyone has bad experiences with it, please let me know before I do?
Info from Super Duper:
v3.3.1 now available!
The latest version of SuperDuper! is faster, better, fully compatible with macOS Catalina (10.15) - in fact, it's compatible with macOS 10.10 and later, has Smart Wake, Smart Delete, Notification Center support, additional control capabilities, and improves many aspects of the user experience. Of course, it still includes great features like snapshot support, APFS recovery volume support, Backup on Connect, Eject after Copy, Sparse Bundle support, lets you store a bootable backup alongside Time Machine backups, copy Time Machine backups to other drives, and run scheduled copies on demand. As with every update, we've polished and improved many other aspects as well. (A full list can be found by selecting Help > Revision History.)
Easy …. Informative and much appreciated…!
Anyone else having problem with SuperDuper! on BigSur 11.1 ? Tried twice to run it and after 19 hours nothing.
Also tried to boot in recovery mode and clone from there but got broken seal error which seems to be a BigSur issue.
My understanding is that SuperDuper does not work currently with Big Sur (I experiences similar results as Constantine). I used Carbon Copy Clone successfully (they also have a free trial version) that is able to do the file conversion required for Big Sur.
Funktioniert SuperDuper! auch um eine größere 1TB (eingebaute) Festplatte auf die neue 500GB SSD zu klonen?
Zumindest gibt es dieses Video, wo jemand erklärt, wie das geht.
Why should I use SuperDuper over dd?
dd will not "quite" work - if the two drives are different size (the second drive needs to be same or larger size of course), then it seems you have difficulty with modifying the new drive partition table with Disk Utility (anyway that's the situation I'm currently in and trying to solve). Also it duplicates the UUID values, and these are supposed to always be unique I think. Maybe there are ways to fix both these issues, and am now trying to find out if it's possible.
-bob
Does not appear that SuperDuper will handle the case where there are multiple partitions on a drive and let you duplicate everything in one step. And not sure if APFS volumes will work or not. Any other suggestions for how to duplicate a drive with multiple partitions (some HFS, some APFS, some data only, some recovery partitions, basically any possible scenario including BOOTCAMP partitions)? Thanks ....
-bob - Nov 9, 2022